English Русский
Български
Беларускі
Український
Српски
Hrvatski
Română
Polski
Slovenský
Magyar
Articles Bookmark Contacts Sitemap   
Company Audi Company Ford Company Hyundai Company Kia Company Mazda Company Mercedes-Benz Company Nissan
MitsubishiMan.ru


Home Colt Lancer Galant L200 Outlander Pajero Others
Outlander 1 (2003-2008)

Removal and installation the side rear view mirror (Mitsubishi Outlander 1)

  • Home
  • Outlander
  • 1 (2003-2008)
  • Body and interior
  • Exterior (external elements)
  • Removal and installation the side rear view mirror
0
Contents: Removal ⤓ Installing the interior decorative…⤓ Installing the side mirror assembly ⤓ Checking the remote control of the…⤓ Checking the remote control switch…⤓ Checking the side mirror heaters ⤓
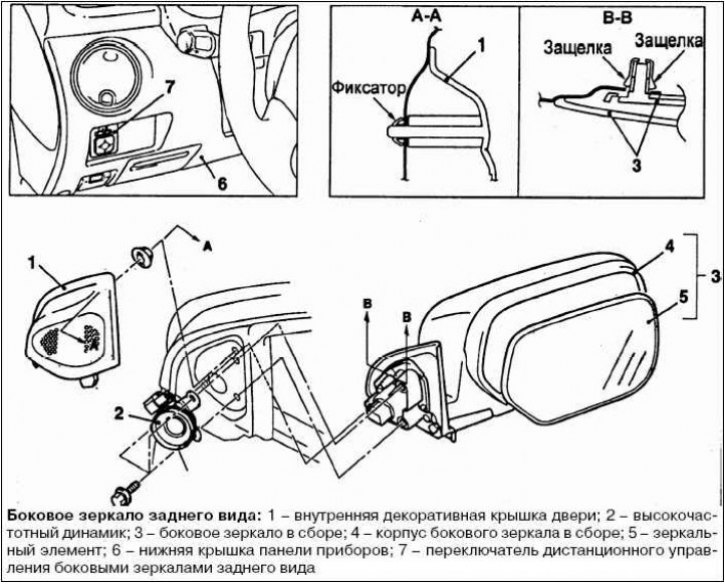

Removal


The parts are removed in the order shown in the figure.

When removing parts, pay attention to the operation of removing the mirror element.

Caution! When disassembling in cold weather, the latches may break, so warm them up to 20°C before starting work.
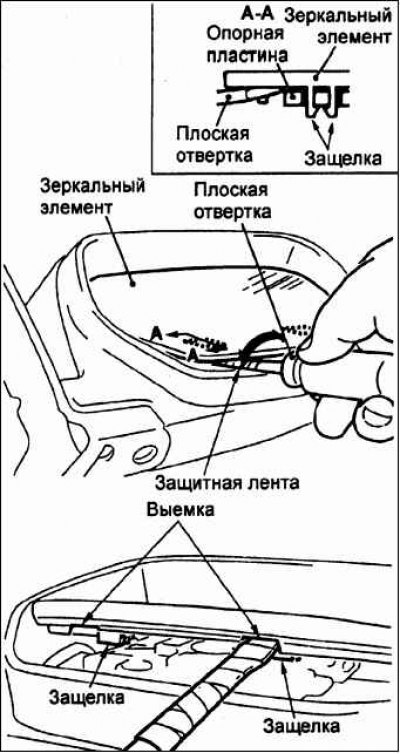


Press the top of the mirror element with your hand to make it turn. Wrap the flat-head screwdriver with protective tape. Insert the flat-head screwdriver into the opening of the mirror housing as shown in the figure, lift the mirror element and remove it from the support plate.


Installing the interior decorative door cover
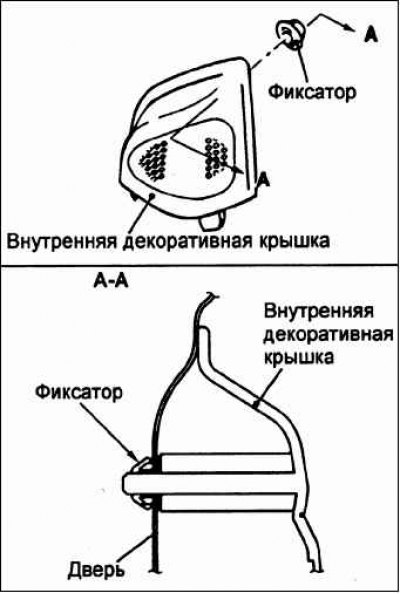


Caution! Be careful when installing the inner decorative door cover, as the clips may fall out inside the door. Install the inner decorative cover together with the clips.


Installing the side mirror assembly
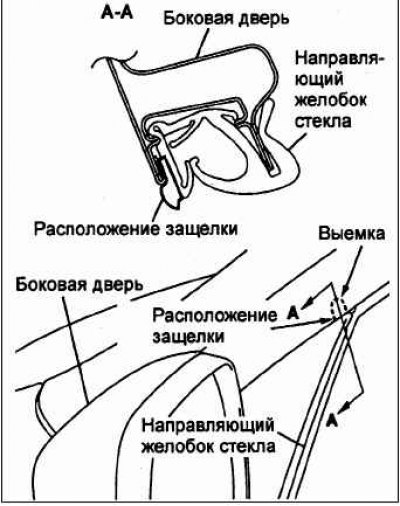


Caution: When installing the side mirror, make sure that its latches match the corresponding grooves in the door glass guide groove.


Checking the remote control of the side rear view mirrors
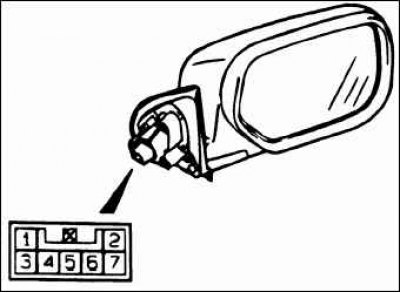


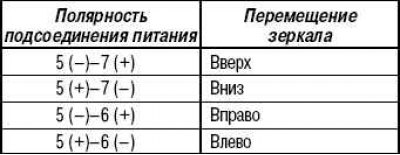
Check the direction of movement of the mirror element with different connections of the battery terminal wires to the connector terminals according to the table provided.


Table for checking the remote control of the side mirrors


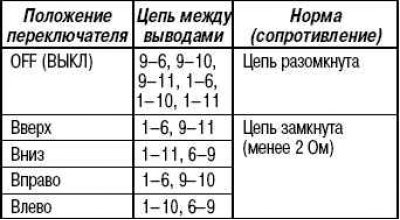
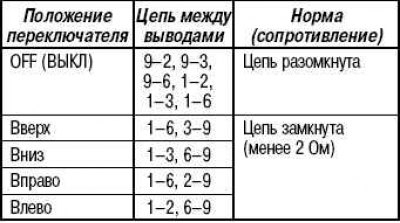
Checking the remote control switch for the side rear view mirrors
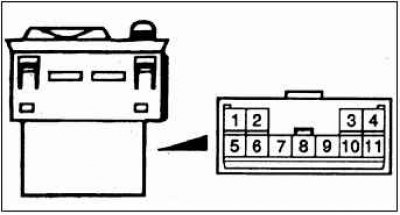


Check the condition of the circuit between the terminals at different switch positions according to the table provided.

Table for checking the switch when moving the right mirror


Checking the side mirror heaters
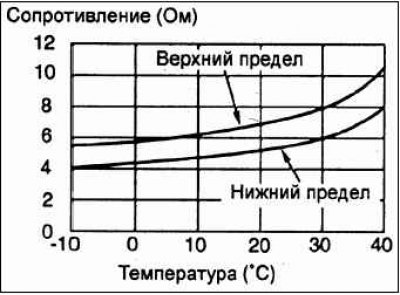


Measure the resistance between terminals "1" and "2" of the side mirror connector for two or more temperature values. The resistance value should not be outside the range indicated in the graph.

Caution: If the vehicle has been moved from one environment to another and the temperature difference between the environments is large (for example, from a warm environment to a cold one), leave it for a while before checking.
This article is available at: russian, bulgarian, belarusian, ukrainian, serbian, croatian, romanian, polish, slovak, hungarian
This article was reviewed by: Arseny Pavlov
Share with friends:
◀ Previous
Outlander 1: Exterior (external elements)
Next ▶

Removal and installation the hood
Adjusting the fuel filler flap
Adjusting the hood
Removal and installation roof rack supports
Removal and installation the rear spoiler
 
Similar materials for other Mitsubishi models

➤ Rear view mirror (side) — removal and installation Mitsubishi Colt 4 and 5 (1991-2003)
➤ Additional side rear view mirror Mitsubishi Lancer 9 (2000-2007, petrol)
➤ Rear window/external rear view mirror heating switch Mitsubishi Galant 6 and 7 (1987-1998)
➤ Rear view mirrors Mitsubishi L200 4 (2005-2014, diesel)
➤ Interior rear view mirror Mitsubishi Pajero 1 and 2 (1982-1999)
➤ Interior rear view mirror Mitsubishi Space Star (1998-2005)
Link in different formats to this article
Comments and feedback from visitors
No comments yet


Add up two numbers 34 + 38


Outlander 1 (2003-2008) 
  • General information
  • User manual
  • Governing bodies
  • Salon equipment
  • Driving and maintenance
  • Power unit
  • Engine repair
  • Cooling and lubrication system
  • Fuel injection system (MPI)
  • Transmission
  • Clutch
  • Mechanical gearbox
  • Automatic gearbox
  • Drive shafts and cardan
  • Chassis and running gear
  • Wheels and tires
  • Front suspension
  • Rear suspension
  • Steering
  • Brake system
  • Body and interior
  • Exterior (external elements)
  • Doors, locks and windows
  • Electrical equipment
  • Equipment and devices
  • Headlights and lighting
  • Power devices
  • Ignition system
  • Electrical circuits
MitsubishiMan.ru © 2018–2026 • Mobile version • Articles about Mitsubishi • Contacts • Sitemap: EN BG BY UA RS HR RO PL SK HU • Site search • Bookmark
Colt 2 and 3 (1983-1993) · Colt 4 and 5 (1991-2003) · Colt 5 (1995-2003) · Lancer 3 and 5 (1984-1992) · Lancer 9 (2000-2007) · Galant 5 (1983-1989) · Galant 6 and 7 (1987-1998) · L200 4 (2005-2014) · Outlander 1 (2003-2008) · Pajero 1 and 2 (1982-1999) · Pajero 4 (2006-2021) · Carisma (1995-2004) · Space Star (1998-2005) ·
This resource sets cookies 🍪 to avoid bothering you with repeated data entry.