



Share with friends:
Engine cooling and lubrication system Mitsubishi Outlander 1

Checking for leaks in the cooling system
Note: To avoid burns from hot coolant, release excess pressure slowly when testing the cooling system. Attention! Wipe dry all areas to be tested. Caution: When...
Note: To avoid burns from hot coolant, release excess pressure slowly when testing the cooling system. Attention! Wipe dry all areas to be tested. Caution: When...

Checking the opening pressure of the radiator cap valve
Note: Clean the radiator cap before testing. Contamination on the cap seals will cause incorrect readings. Using the adapter, connect the pneumatic tester to the plug....
Note: Clean the radiator cap before testing. Contamination on the cap seals will cause incorrect readings. Using the adapter, connect the pneumatic tester to the plug....
Replacing the coolant
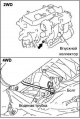
Note: When removing the radiator cap, be careful not to get burned by hot coolant or steam. Wrap a towel around the radiator cap and turn it counterclockwise slightly to...
Note: When removing the radiator cap, be careful not to get burned by hot coolant or steam. Wrap a towel around the radiator cap and turn it counterclockwise slightly to...

Checking the electronic unit of the electric fan
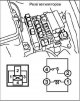
Disconnect the electric fan electronic unit connector. Turn the ignition switch to the "ON" position. Measure the voltage between terminals "1" and "3" of the...
Disconnect the electric fan electronic unit connector. Turn the ignition switch to the "ON" position. Measure the voltage between terminals "1" and "3" of the...
Checking the electric fan relay
Disconnect the electric fan connector. When connecting the battery between contacts "1" and "2" of the electric fan connector, the latter should rotate. No extraneous...
Disconnect the electric fan connector. When connecting the battery between contacts "1" and "2" of the electric fan connector, the latter should rotate. No extraneous...

Removal and installation the thermostat
Removal sequence Disconnect the coolant temperature sensor connector. Disconnect the coolant temperature sensor connector. Disconnect the lower radiator hose. Remove the...
Removal sequence Disconnect the coolant temperature sensor connector. Disconnect the coolant temperature sensor connector. Disconnect the lower radiator hose. Remove the...

Removal and installation the coolant pump
Operations to be performed before removing and after installing the pump Drain and refill the coolant. Remove (install) the timing belt and balancer mechanism. Removal...
Operations to be performed before removing and after installing the pump Drain and refill the coolant. Remove (install) the timing belt and balancer mechanism. Removal...

Removal and installation the water hose and water pipe
Operations to be performed before removing and after installing the valve Drain and refill the coolant. Remove (install) the air filter. Remove (install) the thermostat....
Operations to be performed before removing and after installing the valve Drain and refill the coolant. Remove (install) the air filter. Remove (install) the thermostat....

Removal and installation the cooling system radiator
Removal sequence Remove the drain plug. Remove the radiator cap. Remove the expansion tank hose. Remove the expansion tank. Disconnect the upper radiator hose....
Removal sequence Remove the drain plug. Remove the radiator cap. Remove the expansion tank hose. Remove the expansion tank. Disconnect the upper radiator hose....

Checking the engine oil pressure switch sensor
Check the engine oil level. Disconnect the engine oil pressure switch connector. Using a special key, remove the sensor switch. Attention! The threaded connection of the...
Check the engine oil level. Disconnect the engine oil pressure switch connector. Using a special key, remove the sensor switch. Attention! The threaded connection of the...

Removal and installation the oil cooler
Checking the oil cooler bypass valve Make sure the valve moves smoothly without sticking. Check that the distance "L" at normal temperature (20°C) and humidity...
Checking the oil cooler bypass valve Make sure the valve moves smoothly without sticking. Check that the distance "L" at normal temperature (20°C) and humidity...
This section is available on: russian, bulgarian, belarusian, ukrainian, serbian, croatian, romanian, polish, slovak, hungarian
Similar materials for other Mitsubishi models
➤ Power unit: Cooling system Mitsubishi Colt 2 and 3 (1983-1993)
➤ Power unit: Cooling system Mitsubishi Lancer 3 and 5 (1984-1992)
➤ Power unit: Cooling and heating Mitsubishi Galant 5 (1983-1989, petrol)
➤ Power unit: Cooling and lubrication system Mitsubishi Pajero 1 and 2 (1982-1999)
➤ Power unit: Cooling system Mitsubishi Carisma (1995-2004)
Link in different formats to this section
TEXTHTMLBB Code
- General information
- User manual
- Governing bodies
- Salon equipment
- Driving and maintenance
- Power unit
- Engine repair
- Cooling and lubrication system
- Fuel injection system (MPI)
- Transmission
- Clutch
- Mechanical gearbox
- Automatic gearbox
- Drive shafts and cardan
- Chassis and running gear
- Wheels and tires
- Front suspension
- Rear suspension
- Steering
- Brake system
- Body and interior
- Exterior (external elements)
- Doors, locks and windows
- Electrical equipment
- Equipment and devices
- Headlights and lighting
- Power devices
- Ignition system
- Electrical circuits