



Share with friends:
Car engine repair Mitsubishi Outlander 1

Recommendations for engine maintenance and repair
When checking any malfunction, find the cause of the problem. If the diagnostic results indicate the need to remove and disassemble the unit, perform the work according...
When checking any malfunction, find the cause of the problem. If the diagnostic results indicate the need to remove and disassemble the unit, perform the work according...

Operations in the engine compartment
Checking the engine oil level Make sure the engine oil level is between the maximum and minimum marks. If the level drops below the minimum mark, add the required amount...
Checking the engine oil level Make sure the engine oil level is between the maximum and minimum marks. If the level drops below the minimum mark, add the required amount...
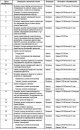
Periodic maintenance regulations
The check must be carried out at intervals measured by the vehicle's mileage or time interval (months), whichever comes first. Note. Heavy-duty maintenance intervals...
The check must be carried out at intervals measured by the vehicle's mileage or time interval (months), whichever comes first. Note. Heavy-duty maintenance intervals...

Periodic maintenance (operations in the engine compartment on a cold engine)
Checking the condition and tension of the auxiliary equipment drive belt Check the belt along its entire length for cracks, delamination and wear. Make sure that the...
Checking the condition and tension of the auxiliary equipment drive belt Check the belt along its entire length for cracks, delamination and wear. Make sure that the...

Operations on a warm engine
Engine oil change Start the engine and let it warm up to operating temperature (80–90°C). Stop the engine and remove the oil filler cap. Remove the drain plug from the...
Engine oil change Start the engine and let it warm up to operating temperature (80–90°C). Stop the engine and remove the oil filler cap. Remove the drain plug from the...

Engine Specifications and Technical Data
Note: The engine can be generally divided into two parts: the core and auxiliary systems. The core of the engine includes the elements that are directly involved in the...
Note: The engine can be generally divided into two parts: the core and auxiliary systems. The core of the engine includes the elements that are directly involved in the...

Removal and installation the engine assembly
Removal Remove the lower protective covers. Raise the power unit to release the engine mount from the power unit load and remove the engine mount. Insert the special...
Removal Remove the lower protective covers. Raise the power unit to release the engine mount from the power unit load and remove the engine mount. Insert the special...

Removal, Checking and Installing the Oil Pan (2WD Models)
Removal Remove the oil pan mounting bolts. Insert a special oil pan puller between the oil pan and the cylinder block. While moving the special puller at an angle along...
Removal Remove the oil pan mounting bolts. Insert a special oil pan puller between the oil pan and the cylinder block. While moving the special puller at an angle along...

Removal, Checking and Installing the Oil Pan (4WD Models)
Removal the lower part of the oil pan Remove the center crossmember. Remove the bolts securing the lower part of the oil pan. Place a wooden block on the side of the...
Removal the lower part of the oil pan Remove the center crossmember. Remove the bolts securing the lower part of the oil pan. Place a wooden block on the side of the...
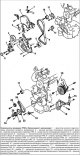
Replacing the timing belt and balancer drive belt (4G64, 4G69)
Removal Remove the lower protective covers. Raise the power unit to release the engine mount from the power unit load and remove the engine mount. Insert the special...
Removal Remove the lower protective covers. Raise the power unit to release the engine mount from the power unit load and remove the engine mount. Insert the special...

Replacing the timing belt and balancer drive belt (4G63)
Removal Remove the lower protective covers. Raise the power unit to release the engine mount from the power unit load and remove the engine mount. Rotate the crankshaft...
Removal Remove the lower protective covers. Raise the power unit to release the engine mount from the power unit load and remove the engine mount. Rotate the crankshaft...

Removal and installation camshaft seals (4G63)
Drain the coolant and engine oil. Remove the air filter assembly. Remove the ignition coils. Remove the upper timing belt cover. Remove the timing belt. Removal After...
Drain the coolant and engine oil. Remove the air filter assembly. Remove the ignition coils. Remove the upper timing belt cover. Remove the timing belt. Removal After...

Removal and installation front and rear crankshaft oil seals (4G63)
Removal the rear oil seal When removing parts, pay attention to the operation of removing the flywheel assembly. Using a special tool, secure the flywheel, then unscrew...
Removal the rear oil seal When removing parts, pay attention to the operation of removing the flywheel assembly. Using a special tool, secure the flywheel, then unscrew...

Removal and installation the cylinder head (4G64, 4G69)
Removal Relieve residual pressure from the high pressure fuel line. Drain the coolant. Drain the engine oil. Remove the air filter assembly. Disconnect the accelerator...
Removal Relieve residual pressure from the high pressure fuel line. Drain the coolant. Drain the engine oil. Remove the air filter assembly. Disconnect the accelerator...

Removal and installation the cylinder head (4G63)
Removal the cylinder head Loosen the bolts in 2 or 3 steps in the sequence shown in the figure, and then remove the cylinder head assembly. Caution: When loosening the...
Removal the cylinder head Loosen the bolts in 2 or 3 steps in the sequence shown in the figure, and then remove the cylinder head assembly. Caution: When loosening the...
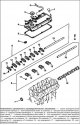
Removal, inspection and installation of the distribution mechanism
Removal the rocker arm axles as an assembly Before removing the axles together with the rocker arms, install the clamps to prevent the hydraulic compensators from...
Removal the rocker arm axles as an assembly Before removing the axles together with the rocker arms, install the clamps to prevent the hydraulic compensators from...
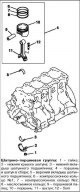
Removal and disassembly of the connecting rod and piston group
Note: Work on disassembling and assembling the connecting rod and piston group is performed using a special tool (a set for assembling and disassembling piston...
Note: Work on disassembling and assembling the connecting rod and piston group is performed using a special tool (a set for assembling and disassembling piston...

Assembly and installation of the connecting rod and piston group
Installing the oil scraper ring Install the oil ring expander into the ring groove in the piston. Note: Make sure the gaps in the scraper and spreader locks are...
Installing the oil scraper ring Install the oil ring expander into the ring groove in the piston. Note: Make sure the gaps in the scraper and spreader locks are...

Cylinder block, crankshaft and flywheel
Note: During disassembly, arrange the removed parts (thrust half rings and main bearing shells, etc.) in the order they correspond to the cylinder numbers. Checking the...
Note: During disassembly, arrange the removed parts (thrust half rings and main bearing shells, etc.) in the order they correspond to the cylinder numbers. Checking the...

Cylinder Block — Checking Condition
Assessment of the condition of the cylinder block Visually inspect the cylinder block for gasket residue or other foreign particles, damage, rust and corrosion. If...
Assessment of the condition of the cylinder block Visually inspect the cylinder block for gasket residue or other foreign particles, damage, rust and corrosion. If...

Assembly of cylinder block components
Selection of crankshaft main bearing shells Note: If the liner needs to be replaced, select and install the correct size liner. If the crankshaft is supplied as a spare...
Selection of crankshaft main bearing shells Note: If the liner needs to be replaced, select and install the correct size liner. If the crankshaft is supplied as a spare...
This section is available on: russian, bulgarian, belarusian, ukrainian, serbian, croatian, romanian, polish, slovak, hungarian
Similar materials for other Mitsubishi models
➤ Power unit: Engine in a car Mitsubishi Colt 2 and 3 (1983-1993)
➤ Power unit: Repair of MPI engines Mitsubishi Lancer 9 (2000-2007, petrol)
➤ Power unit: Dismantling the engine Mitsubishi Galant 6 and 7 (1987-1998)
➤ Power unit: Engine repair Mitsubishi Pajero 4 (2006-2021)
Link in different formats to this section
TEXTHTMLBB Code
- General information
- User manual
- Governing bodies
- Salon equipment
- Driving and maintenance
- Power unit
- Engine repair
- Cooling and lubrication system
- Fuel injection system (MPI)
- Transmission
- Clutch
- Mechanical gearbox
- Automatic gearbox
- Drive shafts and cardan
- Chassis and running gear
- Wheels and tires
- Front suspension
- Rear suspension
- Steering
- Brake system
- Body and interior
- Exterior (external elements)
- Doors, locks and windows
- Electrical equipment
- Equipment and devices
- Headlights and lighting
- Power devices
- Ignition system
- Electrical circuits