English Русский
Български
Беларускі
Український
Српски
Hrvatski
Română
Polski
Slovenský
Magyar
Articles Bookmark Contacts Sitemap   
Company Audi Company Ford Company Hyundai Company Kia Company Mazda Company Mercedes-Benz Company Nissan
MitsubishiMan.ru


Home Colt Lancer Galant L200 Outlander Pajero Others
Outlander 1 (2003-2008)

Removal, Checking and Installing the Oil Pan (4WD Models) (Mitsubishi Outlander 1)

  • Home
  • Outlander
  • 1 (2003-2008)
  • Power unit
  • Engine repair
  • Removal, Checking and Installing the Oil Pan (4WD Models)
0
Contents: Removal the lower part of the oil pan ⤓ Removal the top of the oil pan ⤓ Examination ⤓ Installing the top of the oil pan ⤓ Installing the lower part of the oil…⤓

Removal the lower part of the oil pan


Remove the center crossmember.

Remove the bolts securing the lower part of the oil pan.


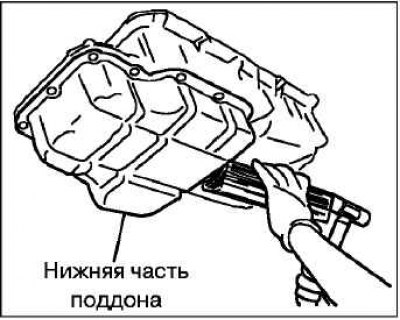
Place a wooden block on the side of the bottom of the oil pan as shown in the figure.

Using a plastic hammer, tap the block to separate the bottom of the oil pan from the top.

Caution: The top of the oil pan is made of aluminum, using an oil pan puller may deform it.


Removal the top of the oil pan


Remove the bolts securing the upper part of the oil pan.


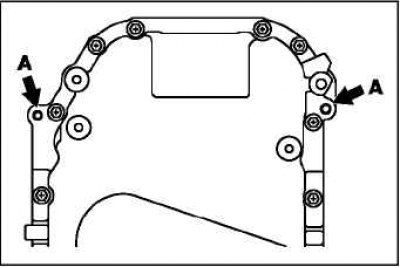
Install 2 bolts on each side of the oil pan into the threaded holes shown in the figure to separate the oil pan from the cylinder block.

Caution: The top of the oil pan is made of aluminum, using an oil pan puller may deform it.


Examination


Check the oil pan for damage.

Check the mating surface for deformations, burrs and cracks.

Check the oil intake for damage, clogging or deformation of the mesh and tube.

Installing the top of the oil pan


Clean the mating surfaces of the cylinder block and oil pan flange from any remaining old sealant.

Degrease the sealant application surface on the oil pan flange and the mating surface on the cylinder block

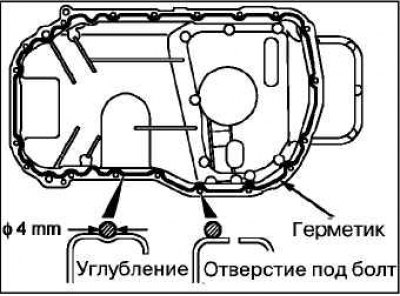
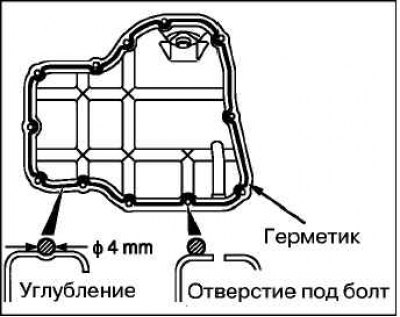
Apply a 4mm bead of sealant around the entire oil pan flange as shown.

Sealant MITSUBISHI GENUINE (Part № MD970389) or similar.

Caution: Make sure that the sealant does not protrude beyond the edge of the pan on the gearbox side.


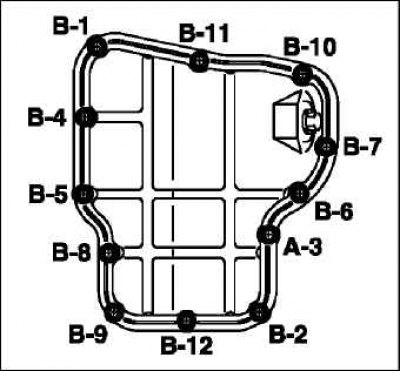
Install and secure the oil pan within 15 minutes after applying the sealant. Tighten the oil pan mounting bolts sequentially diagonally in several steps.

Tightening torque: 9.0 ±3 Nm.

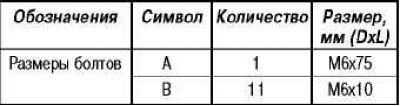
Caution! Do not insert the "B" bolts (gearbox side bolts) at an angle, as they may be damaged when tightened. Please note that the length of the bolts varies depending on where they are installed.


Caution! After installing the oil pan, do not start the engine for 1 hour.


Installing the lower part of the oil pan


Clean the mating surfaces of the cylinder block and oil pan flange from any remaining old sealant.

Degrease the sealant application surface on the oil pan flange and the mating surface on the cylinder block


Apply a 4mm bead of sealant around the entire oil pan flange as shown.

Sealant MITSUBISHI GENUINE (Part № MD970389) or similar.

Install and secure the lower part of the oil pan within 15 minutes after applying the sealant. Tighten the oil pan mounting bolts in the sequence shown in the figure.

Tightening torque: 9.0 ±3 Nm.

Caution! Do not insert the "B" bolts (gearbox side bolts) at an angle, as they may be damaged when tightened. Please note that the length of the bolts varies depending on where they are installed.


Caution! After installing the oil pan, do not start the engine for 1 hour.


D – standard diameter.
L – standard length.


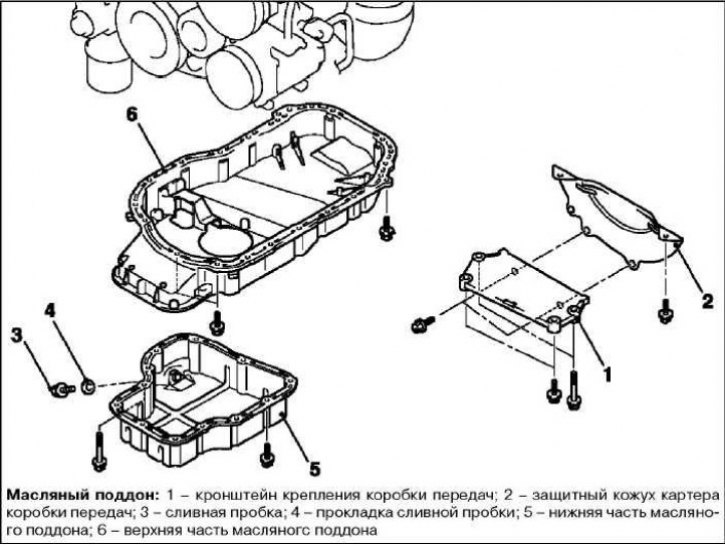
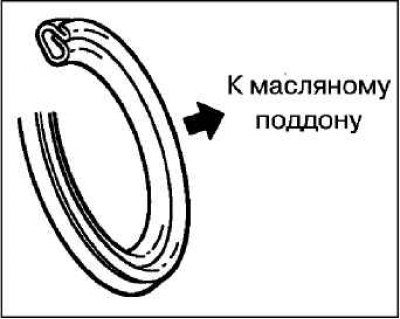
Install a new drain plug O-ring in the direction shown in the illustration.

Install the center cross beam.
This article is available at: russian, bulgarian, belarusian, ukrainian, serbian, croatian, romanian, polish, slovak, hungarian
This article was reviewed by: Arseny Pavlov
Share with friends:
◀ Previous
Outlander 1: Engine repair
Next ▶

Removal, Checking and Installing the Oil Pan (2WD Models)
Removal and installation the engine assembly
Engine Specifications and Technical Data
Operations on a warm engine
Periodic maintenance (operations in the engine compartment on a cold engine)
Replacing the timing belt and balancer drive belt (4G64, 4G69)
Replacing the timing belt and balancer drive belt (4G63)
Removal and installation camshaft seals (4G63)
Removal and installation front and rear crankshaft oil seals (4G63)
Removal and installation the cylinder head (4G64, 4G69)
Similar materials for other Mitsubishi models

➤ Camshaft — Checking and Installing Mitsubishi Colt 4 and 5 (1991-2003)
➤ Checking the Transfer Case Oil Level (4WD Models) Mitsubishi Lancer 9 (2000-2007, petrol)
➤ Checking, removing and installing the generator Mitsubishi Galant 6 and 7 (1987-1998)
➤ Checking and adjusting the tension of auxiliary drive belts Mitsubishi L200 4 (2005-2014, diesel)
➤ Drive Belts — Checking and Adjusting Tension Mitsubishi Pajero 1 and 2 (1982-1999)
➤ Checking for fluid leaks and hose tightness Mitsubishi Carisma (1995-2004)
Link in different formats to this article
Comments and feedback from visitors
No comments yet


Add up two numbers 15 + 16


Outlander 1 (2003-2008) 
  • General information
  • User manual
  • Governing bodies
  • Salon equipment
  • Driving and maintenance
  • Power unit
  • Engine repair
  • Cooling and lubrication system
  • Fuel injection system (MPI)
  • Transmission
  • Clutch
  • Mechanical gearbox
  • Automatic gearbox
  • Drive shafts and cardan
  • Chassis and running gear
  • Wheels and tires
  • Front suspension
  • Rear suspension
  • Steering
  • Brake system
  • Body and interior
  • Exterior (external elements)
  • Doors, locks and windows
  • Electrical equipment
  • Equipment and devices
  • Headlights and lighting
  • Power devices
  • Ignition system
  • Electrical circuits
MitsubishiMan.ru © 2018–2026 • Mobile version • Articles about Mitsubishi • Contacts • Sitemap: EN BG BY UA RS HR RO PL SK HU • Site search • Bookmark
Colt 2 and 3 (1983-1993) · Colt 4 and 5 (1991-2003) · Colt 5 (1995-2003) · Lancer 3 and 5 (1984-1992) · Lancer 9 (2000-2007) · Galant 5 (1983-1989) · Galant 6 and 7 (1987-1998) · L200 4 (2005-2014) · Outlander 1 (2003-2008) · Pajero 1 and 2 (1982-1999) · Pajero 4 (2006-2021) · Carisma (1995-2004) · Space Star (1998-2005) ·
This resource sets cookies 🍪 to avoid bothering you with repeated data entry.