
English Русский
Български
Беларускі
Український
Српски
Hrvatski
Română
Polski
Slovenský
Magyar
Articles Bookmark Contacts Sitemap   
Company Audi Company Ford Company Hyundai Company Kia Company Mazda Company Mercedes-Benz Company Nissan
MitsubishiMan.ru


Home Colt Lancer Galant L200 Outlander Pajero Others
Outlander 1 (2003-2008)

Removal and installation front and rear crankshaft oil seals (4G63) (Mitsubishi Outlander 1)

  • Home
  • Outlander
  • 1 (2003-2008)
  • Power unit
  • Engine repair
  • Removal and installation front and rear crankshaft oil seals (4G63)
0
Contents: Removal the rear oil seal ⤓ Installing a new seal ⤓ Removal the front oil seal ⤓ Installing the front oil seal ⤓ Installing the crankshaft sprocket ⤓
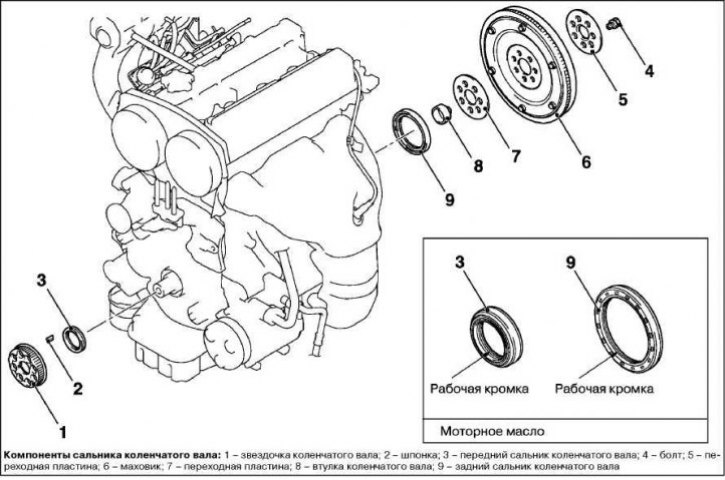

Removal the rear oil seal
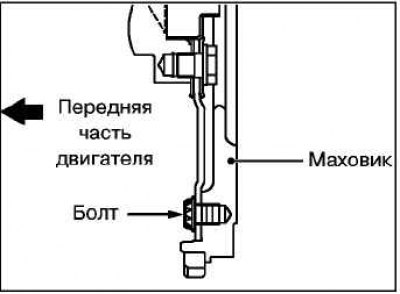


When removing parts, pay attention to the operation of removing the flywheel assembly.

Using a special tool, secure the flywheel, then unscrew the mounting bolts.

Caution: If the crankshaft is secured at the pulley end, use only the recommended special tools, otherwise the likelihood of damage to the crankshaft pulley damper increases significantly.
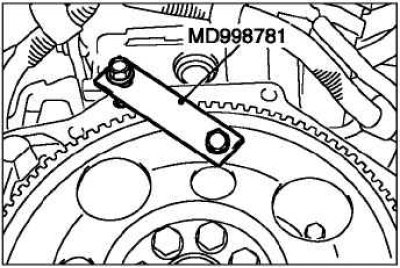


Using a special device, secure the flywheel, then unscrew the mounting bolts.


Installing a new seal
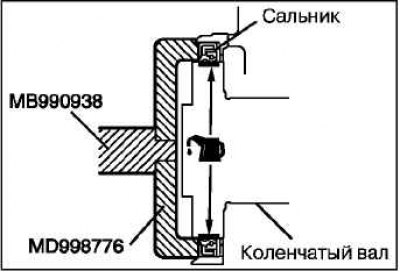


Apply a small amount of engine oil to the seal lip around its entire circumference.

By tapping on the mandrel, install the seal so that its end surface is located at the level of the chamfer of the seal housing, as shown in the figure.

Installing the flywheel

Before installation, clean the mounting bolts, threaded holes in the crankshaft and flywheel from oil, old sealant and other contaminants.

Lubricate the bearing surfaces of the flywheel mounting bolt washers with engine oil.

Note: It is permissible to apply sealant to the threaded part of the flywheel mounting bolts (manual transmission), however, this operation may lead to difficulties when subsequently unscrewing the bolts.
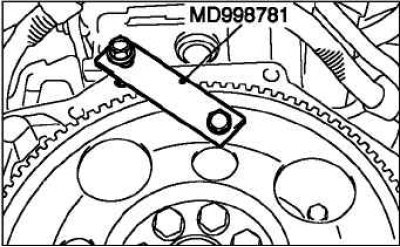


Using a special tool, secure the flywheel, then tighten the mounting bolts to the specified tightening torque.


Tightening torque: 132±5 Nm.

Install the clutch housing and driven disc.

Install the gearbox.

Removal the front oil seal


Before starting the operation, remove the timing belt and the balance mechanism drive belt.

Cut off part of the working edge of the crankshaft oil seal.

Wrap the tip of a screwdriver in a cloth, insert it into the slot in the seal and remove the seal.

Caution! Do not damage the crankshaft and oil pump housing.


Installing the front oil seal
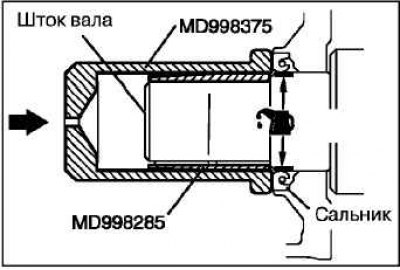


Apply a small amount of engine oil to the seal lip around its entire circumference.

[The original article was published on: mitsubishiman.ru]

Tap the mandrel to install the seal so that it is flush with the seal housing.

Installing the crankshaft sprocket
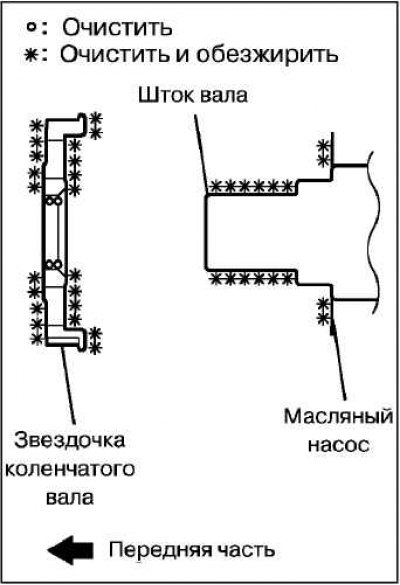


Clean and degrease the face of the oil pump housing, the surface of the crankshaft and the sprocket.


Clean the surface of the crankshaft sprocket that contacts the shaft.

Install the crankshaft position sensor rotor and crankshaft sprocket as shown in the illustration.

Install the timing belt and balancer drive belt.

Adjust the timing belt tension.
This article is available at: russian, bulgarian, belarusian, ukrainian, serbian, croatian, romanian, polish, slovak, hungarian
This article was reviewed by: Arseny Pavlov
Share with friends:
◀ Previous
Outlander 1: Engine repair
Next ▶

Removal and installation camshaft seals (4G63)
Replacing the timing belt and balancer drive belt (4G63)
Replacing the timing belt and balancer drive belt (4G64, 4G69)
Removal, Checking and Installing the Oil Pan (4WD Models)
Removal, Checking and Installing the Oil Pan (2WD Models)
Removal and installation the cylinder head (4G64, 4G69)
Removal and installation the cylinder head (4G63)
Removal, inspection and installation of the distribution mechanism
Removal and disassembly of the connecting rod and piston group
Assembly and installation of the connecting rod and piston group
Similar materials for other Mitsubishi models

➤ Crankshaft Seals (SOHC, 16 valves) Mitsubishi Colt 4 and 5 (1991-2003)
➤ Front side lights, rear side lights, number plate lights… Mitsubishi Lancer 9 (2000-2007, petrol)
➤ Replacing the front crankshaft oil seal Mitsubishi Galant 6 and 7 (1987-1998)
➤ Installing the crankshaft seals and front upper cover Mitsubishi L200 4 (2005-2014, diesel)
➤ Front and rear oil seals — removal and installation Mitsubishi Pajero 1 and 2 (1982-1999)
➤ Crankshaft seals — removal and installation Mitsubishi Carisma (1995-2004)
Link in different formats to this article
Comments and feedback from visitors
No comments yet


Add up two numbers 40 + 48


Outlander 1 (2003-2008) 
  • General information
  • User manual
  • Governing bodies
  • Salon equipment
  • Driving and maintenance
  • Power unit
  • Engine repair
  • Cooling and lubrication system
  • Fuel injection system (MPI)
  • Transmission
  • Clutch
  • Mechanical gearbox
  • Automatic gearbox
  • Drive shafts and cardan
  • Chassis and running gear
  • Wheels and tires
  • Front suspension
  • Rear suspension
  • Steering
  • Brake system
  • Body and interior
  • Exterior (external elements)
  • Doors, locks and windows
  • Electrical equipment
  • Equipment and devices
  • Headlights and lighting
  • Power devices
  • Ignition system
  • Electrical circuits
MitsubishiMan.ru © 2018–2026 • Mobile version • Articles about Mitsubishi • Contacts • Sitemap: EN BG BY UA RS HR RO PL SK HU • Site search • Bookmark
Colt 2 and 3 (1983-1993) · Colt 4 and 5 (1991-2003) · Colt 5 (1995-2003) · Lancer 3 and 5 (1984-1992) · Lancer 9 (2000-2007) · Galant 5 (1983-1989) · Galant 6 and 7 (1987-1998) · L200 4 (2005-2014) · Outlander 1 (2003-2008) · Pajero 1 and 2 (1982-1999) · Pajero 4 (2006-2021) · Carisma (1995-2004) · Space Star (1998-2005) ·
This resource sets cookies 🍪 to avoid bothering you with repeated data entry.