
English Русский
Български
Беларускі
Український
Српски
Hrvatski
Română
Polski
Slovenský
Magyar
Articles Bookmark Contacts Sitemap   
Company Audi Company Ford Company Hyundai Company Kia Company Mazda Company Mercedes-Benz Company Nissan
MitsubishiMan.ru


Home Colt Lancer Galant L200 Outlander Pajero Others
Lancer 9 (2000-2007, petrol) Lancer 3 and 5 (1984-1992)

Front bumper (Mitsubishi Lancer 9)

  • Home
  • Lancer
  • 9 (2000-2007, petrol)
  • Body and interior
  • Exterior (external elements)
  • Front bumper
0
Contents: Removal and installation ⤓ Disassembly and assembly ⤓ Install rivets using a special tool. ⤓

Removal and installation


− The parts are removed in the order of the numbers indicated in the figures "Removing the front bumper".
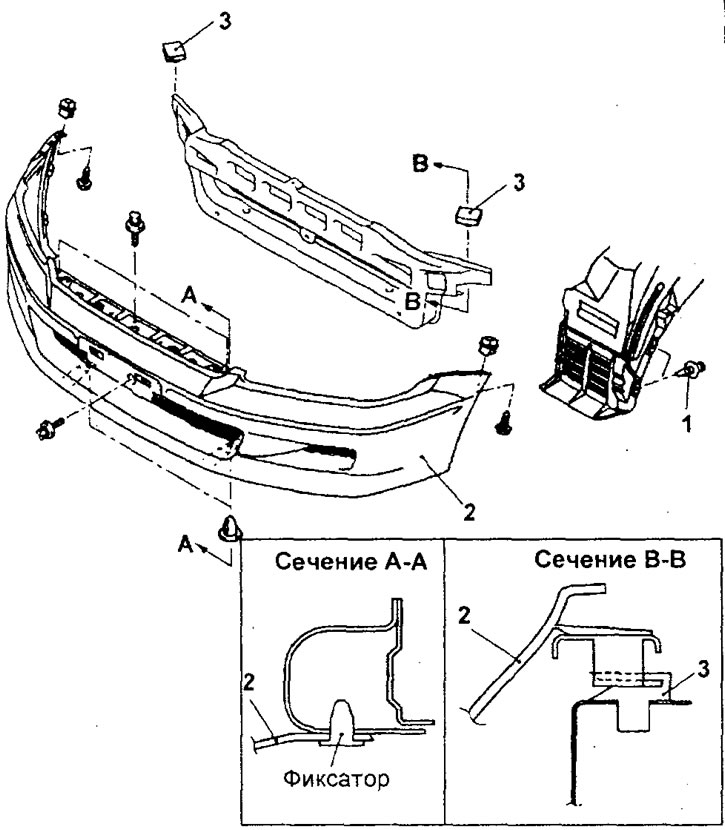

Removal the front bumper. 1 - splash shield fasteners, 2 - front bumper assembly, 3 - mounting plate.


− Installation of parts is carried out in the reverse order of removal.

Disassembly and assembly


− Before you begin removing parts, perform the following operations:
  • a) Remove the front bumper cover.
  • b) Remove the front bumper molding.

− The parts are removed in the order of the numbers indicated in the figure "Disassembling the front bumper".
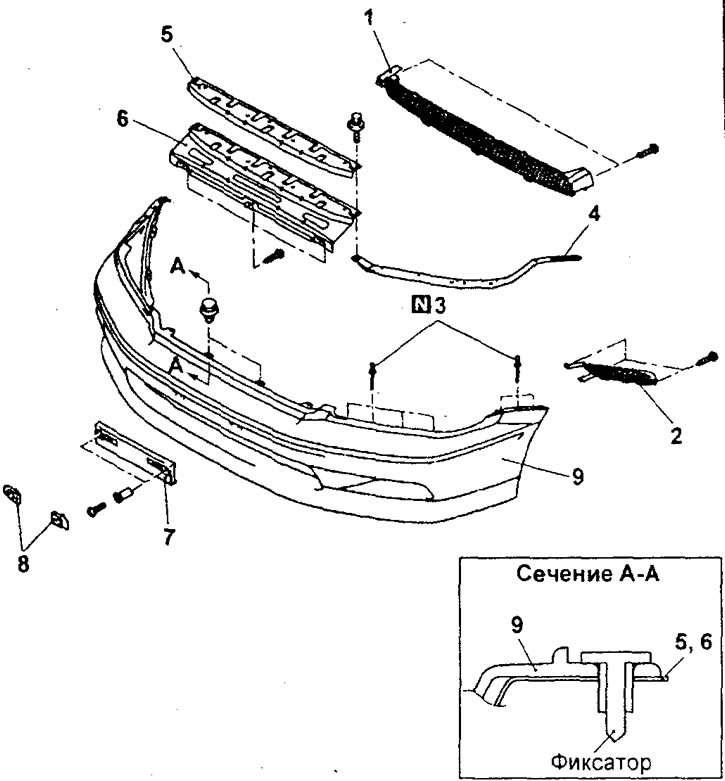


Disassembling the front bumper (sedan).1 - front bumper decorative grille, 2 - air intake deflector, 3 - rivet, 4 - front bumper upper side stiffener, 5 - front bumper central stiffener (models with standard front bumper), 6 - front bumper central stiffener (models with extended front bumper), 7 - license plate mounting bracket (models with extended front bumper), 8 - license plate mounting bracket (models with standard front bumper), 9 - front bumper.


The original article is on [MitsubishiMan.ru]
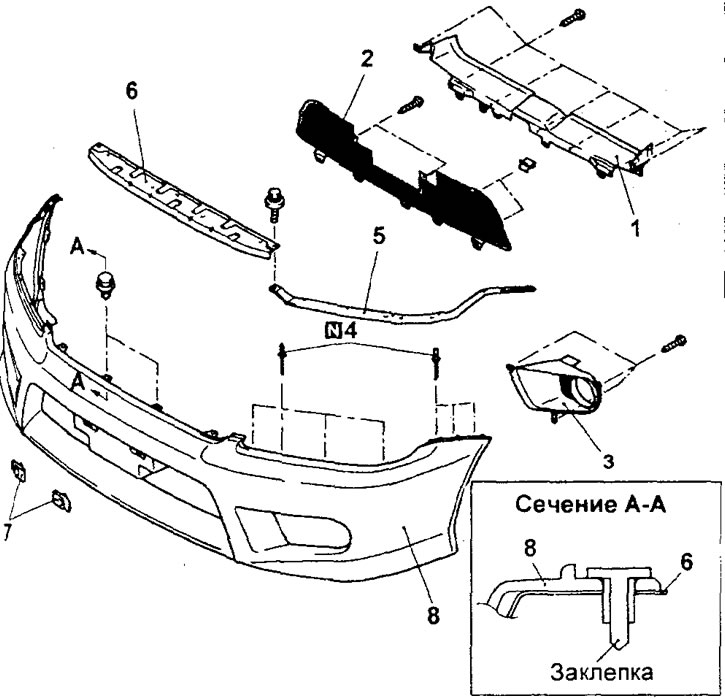


Disassembling the front bumper (station wagon modifications from 05.2001). 1 - fairing, 2 - decorative grille of the front bumper (remove the fog lamp), 3 - bezel of the fog lamp, 4 - rivet, 5 - upper side stiffener of the front bumper, 6 - central stiffener of the front bumper, 7 - license plate mounting bracket, 8 - front bumper.
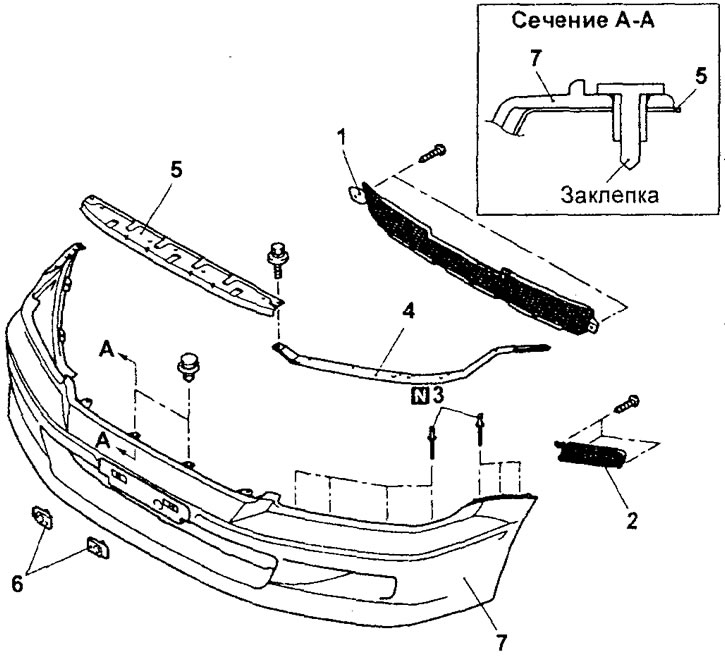


Disassembling the front bumper (station wagon). 1 - decorative grille of the front bumper, 2 - air intake deflector, 3 - rivet, 4 - upper side stiffener of the front bumper, 5 - central stiffener of the front bumper, 6 - license plate mounting bracket, 7 - front bumper.


- When removing parts, pay attention to the following operations:


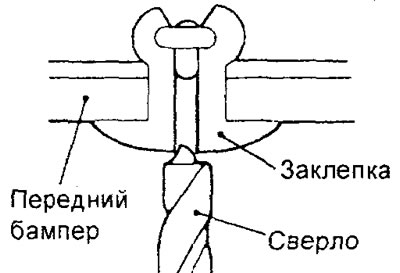
1. Removing rivets.

Use a drill to drill a 4.0mm hole into the rivet and remove it.


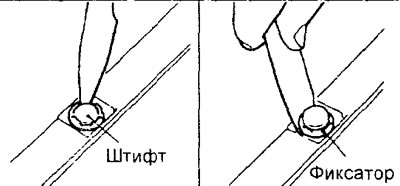
2. Removing the retainer of the central stiffening element of the front bumper.

Using a special tool, remove the pin from the retainer and remove the retainer.


− Installation of parts is carried out in the reverse order of disassembly.

- When installing parts, pay attention to the rivet installation operation.

Install rivets using a special tool.


- After completing the installation of the parts, perform the following operations:
  • a) Install the front bumper molding.
  • b) Install the front bumper cover.
This article is available at: russian, bulgarian, belarusian, ukrainian, serbian, croatian, romanian, polish, slovak, hungarian
This article was reviewed by: Arseny Pavlov
Share with friends:
◀ Previous
Lancer 9: Exterior (external elements)
Next ▶

 
Rear bumper
Radiator grille
Additional external elements
Overlays and moldings
Windscreen wiper and washer
Similar materials for other Mitsubishi models

➤ Front bumper — design description Mitsubishi Colt 5 (1995-2003, petrol)
➤ Front seat adjustment Mitsubishi Galant 6 and 7 (1987-1998)
➤ Front bumper components installation diagram and its… Mitsubishi L200 4 (2005-2014, diesel)
➤ Removal and installation the front bumper Mitsubishi Outlander 1 (2003-2008)
➤ Front bumper Mitsubishi Pajero 4 (2006-2021)
➤ Front bumper — removal and installation Mitsubishi Carisma (1995-2004)
Link in different formats to this article
Comments and feedback from visitors
No comments yet


Add up two numbers 26 + 33


Lancer 9 (2000-2007, petrol) 
  • General information
  • User manual
  • Maintenance
  • Power unit
  • Repair of MPI engines
  • Repair of GDI engines
  • Engine overhaul
  • Cooling and lubrication system
  • MPI fuel injection system
  • GDI fuel injection system
  • Intake and exhaust system
  • Starting and charging system
  • Transmission
  • Automatic gearbox
  • Variator (CVT)
  • Drive shafts and gearbox
  • Chassis and running gear
  • Front suspension
  • Rear suspension
  • Steering
  • Brake system
  • Body and interior
  • Doors, locks and windows
  • Exterior (external elements)
  • Interior (internal elements)
  • Electrical equipment
  • Heater and air conditioner
  • Security system SRS
  • Equipment and devices
  • Wiring diagrams (saloon)
  • Wiring diagrams (wagon)
Lancer 3 and 5 (1984-1992) 
  • General information
  • Maintenance
  • Power unit
  • Engine repair
  • Lubrication system
  • Cooling system
  • Ignition system
  • Fuel system
  • Carburetor
  • Fuel injection
  • Diesel power system
  • Exhaust system
  • Transmission
  • Clutch
  • Car gearbox
  • Chassis and running gear
  • Front suspension
  • Rear suspension
  • Steering
  • Brake system
  • Wheels and tires
  • Body and interior
  • Exterior (external elements)
  • Interior (internal elements)
  • Heating system
  • Electrical equipment
  • Equipment and devices
  • Power devices
  • Electrical circuits
MitsubishiMan.ru © 2018–2026 • Mobile version • Articles about Mitsubishi • Contacts • Sitemap: EN BG BY UA RS HR RO PL SK HU • Site search • Bookmark
Colt 2 and 3 (1983-1993) · Colt 4 and 5 (1991-2003) · Colt 5 (1995-2003) · Lancer 3 and 5 (1984-1992) · Lancer 9 (2000-2007) · Galant 5 (1983-1989) · Galant 6 and 7 (1987-1998) · L200 4 (2005-2014) · Outlander 1 (2003-2008) · Pajero 1 and 2 (1982-1999) · Pajero 4 (2006-2021) · Carisma (1995-2004) · Space Star (1998-2005) ·
This resource sets cookies 🍪 to avoid bothering you with repeated data entry.