Contents: Removal and installation ⤓ Examination ⤓
Removal and installation
Note: Removal of the steering column combination switch is described in the chapter "Steering".
The parts are removed in the order of the numbers indicated in the figure "Removing the windshield wiper and washer".
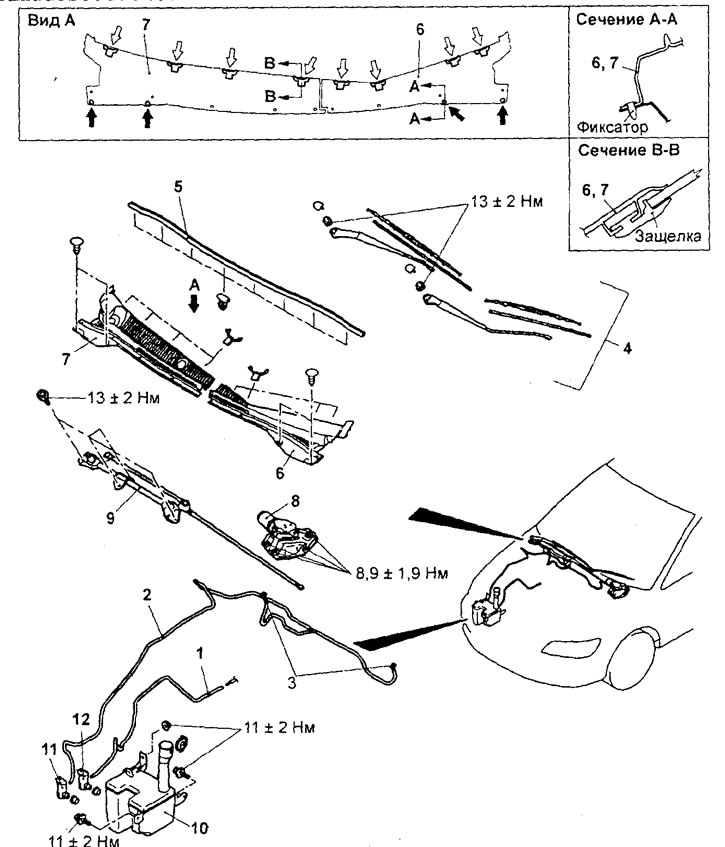
Removal the windshield wiper and washer.1 - rear window washer hose, 2 - windshield washer hose, 3 - washer nozzle, 4 - wiper arm and wiper blade assembly, 5 - seal, 6 - windshield wiper blade cover (left), 7 - windshield wiper blade cover (right), 8 - windshield wiper motor assembly, 9 - wiper arm assembly (remove right side engine guard, splash shield and disconnect windshield wiper motor connector), 10 - washer reservoir assembly, 11 - windshield washer motor, 12 - rear window washer motor.
Note: with arrows "
 " the locations of the latches are indicated; "
 " shows the location of the fasteners.
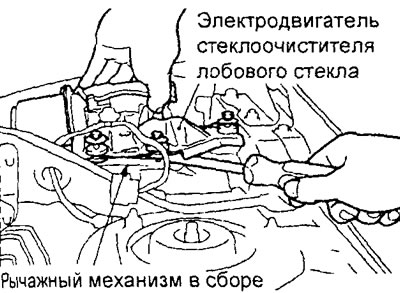
When removing parts, pay attention to the operation of removing the windshield wiper motor.
a) Loosen the windshield wiper motor mounting bolt.
b) Using a flat-head screwdriver, disconnect the wiper crank arm from the linkage assembly.
Note: It is not recommended to disassemble the crankshaft and electric motor without extreme necessity, as they are installed at a certain angle during assembly. If disassembly is necessary, first apply your own installation marks of the relative positions of the parts.
− Installation of parts is carried out in the reverse order of removal.
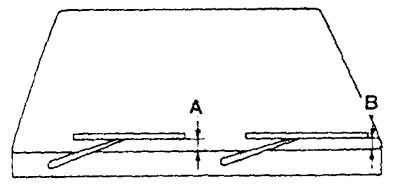
− When installing the parts, pay attention to the installation operation of the wiper arm and the wiper blade.
Install the wiper arms and wiper blade assemblies in the position shown in the illustration.
Nominal value:
- "A" - 34 +5 mm
- "B" - 34 ±5 mm
Examination
1. Checking the windshield wiper motor on a vehicle.
a) Disconnect the wiring harness connector from the electric motor.
6) To check the operation of the wiper motor at low and high speed, connect the battery terminal wires to the motor terminals as shown in the figure.
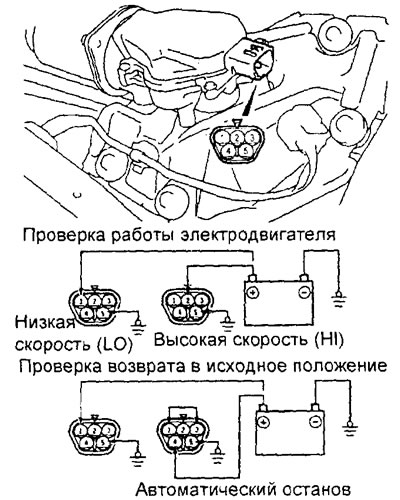
c) Checking the automatic return to the original position.
- Set the wiper motor to low speed (LO), then disconnect the battery cables and stop the motor.
- Connect the power supply (battery) as shown in the figure and check that after the motor starts rotating at low speed (LO), it stops at the automatic stop position (home position).
2. Checking the windshield wiper and washer switch.
The windshield wiper and washer switch can only be tested using a tester.
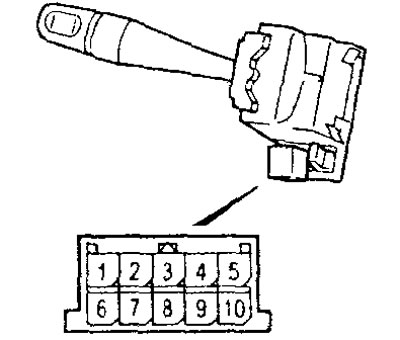
3. Checking the intermittent "INT" mode of the windshield wiper.
Connect an ohmmeter to terminals "4" and "6" of the windshield wiper and washer switch connector. Turn the control knob from the "FAST" position to the "SLOW" position and check that the resistance changes in the range of 0-1 kOhm.
4. Checking the washer motor.
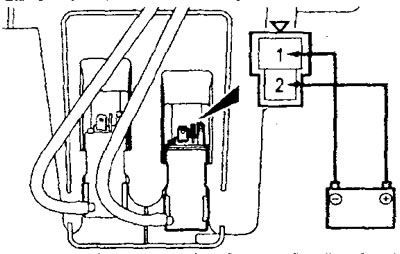
a) Fill the washer reservoir with water when the washer motor is installed on the reservoir.
b) Connect power from the battery to terminals "1" (-) and "2" (+) of the washer motor, as shown in the figure, and check the water jet pressure.
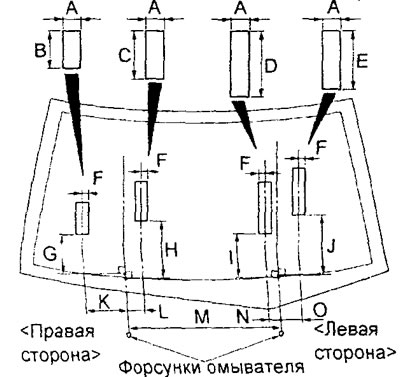
5. Checking the direction of the water jet from the washer nozzles.
Adjust the direction of the water jet by moving the washer nozzle ball.
Nominal values:
- "A" - 50 mm
- "B" - 130 mm
- "C" - 160 mm
- "D" - 210 mm
- "E" - 190 mm
- "F" - 25 mm
- "G" - 225 mm
- "H" - 300 mm
- "I" - 245 mm
- "J" - 310 mm
- "K" - 165 mm
- "L" - 70 mm
- "M" - 600 mm
- "N" — 45 mm
- "O" - 85 mm