



Contents: Removal ⤓ Installation ⤓ Checking the Windshield Wiper Switch ⤓ Checking the windshield wiper motor ⤓ Checking the windshield washer motor ⤓ Checking the fluid level sensor in…⤓
Warning: When removing the driver's airbag and the coil wire, follow the safety precautions when servicing the SRS system.
Removal
- On a right-hand drive vehicle, remove the relay box.
- Remove the multifunction steering column switch with integrated windshield wiper and washer switch and the windshield wiper relay.
- Disconnect and remove the washer hose (Fig. 17.65).
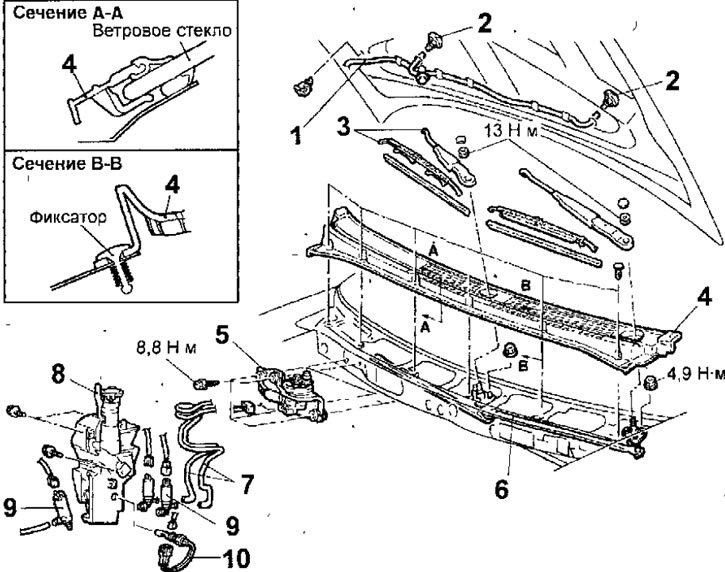
Fig. 17.65. Windscreen wiper and washer: 1 - washer hose; 2 - washer spray; 3 - Windshield wiper arm and blade assembly; 4 - ventilation panel; 5 - Windscreen wiper motor; 7 - washer hose; 8 - washer reservoir; 9 - washer motor; 10 - washer fluid reservoir level sensor
- Remove the washer nozzles.
- Remove the caps from the nuts, unscrew the nuts and remove the wiper arms and windshield wiper blades.
- Loosen the screws by pulling them up, release the clips and remove the ventilation panel.
- Loosen the windshield wiper motor mounting bolts, disconnect the electrical connector and remove the windshield wiper motor assembly.
- Disconnect the levers from the electric motor and remove the windshield wiper linkage (Fig. 17.66).
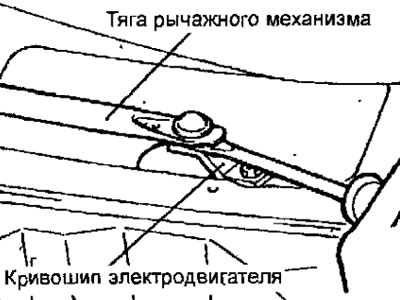
Fig. 17.66. Disconnecting the lever mechanism rod from the electric motor crank
Warning: It is not recommended to disassemble the linkage and electric motor assembly unless absolutely necessary, as they are installed at a certain angle during assembly. If disassembly is necessary, first apply the appropriate installation marks.
- Drain the windshield washer fluid.
- Remove the front bumper.
- Disconnect the washer hoses from the windshield washer motors.
- Loosen the screws and remove the windshield washer reservoir,
- Disconnect the electrical connectors and remove the windshield washer motors from the reservoir.
- Remove the washer fluid level sensor from the reservoir.
Installation
- Installation is carried out in the reverse order of removal, taking into account the following.
- The movement of the left and right windshield wiper arms is different, so when installing them, take into account their position according to the installation marks.
- Set the windscreen wiper blades to the position shown in Figure 17.67.
The article is reprinted from a web resource (www.mitsubishiman.ru)
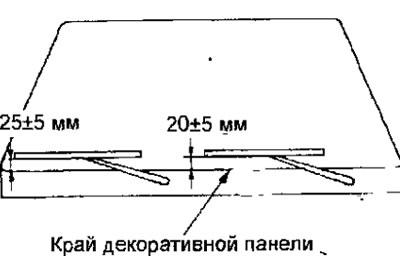
Fig. 17.67. Windscreen wiper blade installation position.
Checking the Windshield Wiper Switch
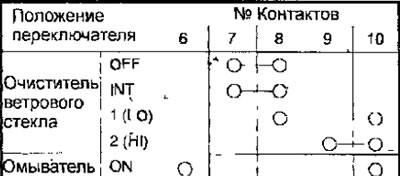
- Using an ohmmeter, check the conductivity between the connector contacts at different positions of the windshield wiper switch (Fig. 17.68).
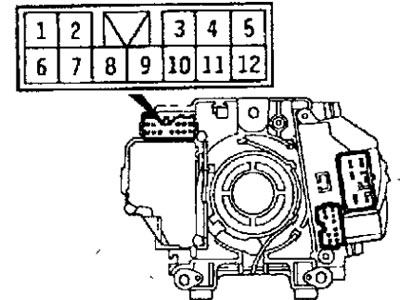
Fig. 17.68. Windshield wiper switch connector pin locations
Checking the windshield wiper motor
- The windshield wiper motor must be installed in the vehicle and the electrical harness connector must be disconnected from the motor.
- Using additional wires, connect the battery terminals to the engine connector terminals as shown in Figure 17.69 (A), and check the operation of the windshield wiper at low and high speeds.
- Using additional wires, connect the battery terminals to the engine connector terminals as shown in Figure 17.69 (B) and let the engine run at low speed. When the engine is running, disconnect the positive battery terminal wire and stop the engine.
- Using additional wires, connect the battery terminals to the engine connector contacts, and also short-circuit connector contacts 1 and 4 as shown in Figure 17.69 (B), and make sure that the engine stops in its original position.
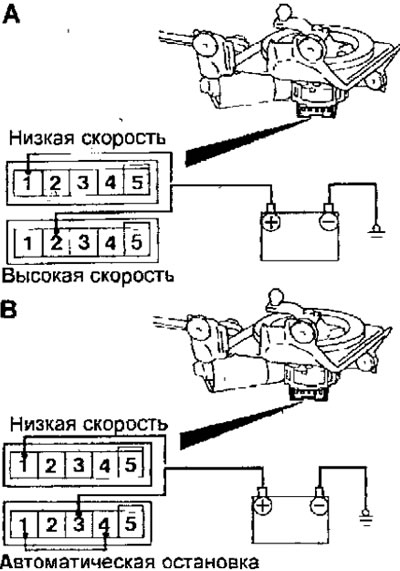
Fig. 17.69. Connecting the battery to the motor connector terminals to check the operation of the windshield wiper at low and high speeds (A) and stopping the windshield wiper motor in the home position (B)
Checking the windshield washer motor
- When checking, the tank must be installed in the car and filled with liquid.
- Using additional wires, connect the positive terminal of the battery to contact 2 of the connector and the negative terminal to contact 1 of the connector, while the liquid should spray onto the windshield (Fig. 17.70).
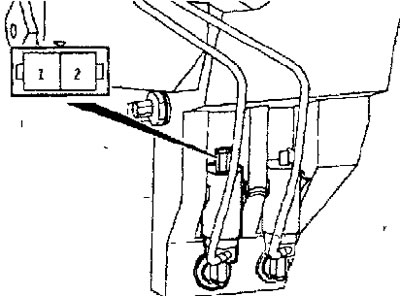
Fig. 17.70. Checking the windshield washer motor
Checking the fluid level sensor in the washer reservoir
- Remove the washer fluid level sensor from the reservoir.
- Connect an ohmmeter to the contacts of the washer fluid level sensor connector in the washer reservoir (Fig. 17.71).
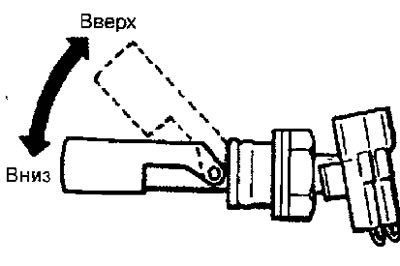
Fig. 17.71. Checking the fluid level sensor in the washer reservoir
- Make sure that when the float moves down, the circuit is closed, and when the float moves up, the circuit is opened.
- Checking the position of the windshield sprayers
- By moving the sprayers in their sockets, achieve correct spraying of liquid jets onto the windshield, as shown in Figure 17.72.
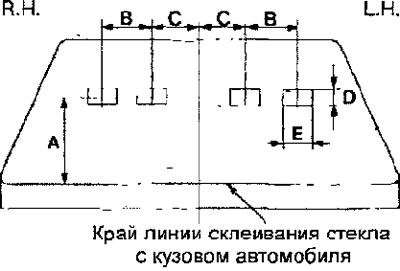
Fig. 17.72. Checking the position of the windshield sprayers: A - 270 mm; B - 250 mm; C, - 100 mm; D - 50 mm; E - 70 mm