



Share with friends:
Vehicle suspension and drive shafts Mitsubishi Space Star

Suspension and Drive Shafts — Technical Data
Front suspension spring Spring rod diameter x spring outer diameter x spring length, mm car with 1.3 l engine - 12x138x354 car with 1.8 l engine - 13x160x383 car with...
Front suspension spring Spring rod diameter x spring outer diameter x spring length, mm car with 1.3 l engine - 12x138x354 car with 1.8 l engine - 13x160x383 car with...

Front suspension
The suspension is the connecting link between the body and the wheels (Fig. 14.1). Fig. 14.1. Front suspension Through it, the forces acting on the wheels are...
The suspension is the connecting link between the body and the wheels (Fig. 14.1). Fig. 14.1. Front suspension Through it, the forces acting on the wheels are...

Checking and adjusting the front wheel alignment angles
Wheel alignment angles have a significant impact on vehicle stability, tire wear and fuel consumption. Before measuring the front wheel alignment angles, place the...
Wheel alignment angles have a significant impact on vehicle stability, tire wear and fuel consumption. Before measuring the front wheel alignment angles, place the...

Camber, longitudinal and transverse tilt of the steering axis
The front wheel camber and longitudinal tilt of the steering axis are adjusted at the factory and cannot be adjusted during operation. Camber: 0°40' ±30' Pivot axis tilt...
The front wheel camber and longitudinal tilt of the steering axis are adjusted at the factory and cannot be adjusted during operation. Camber: 0°40' ±30' Pivot axis tilt...

Checking the front wheel hub play
1. Remove the front disc brake caliper and, without disconnecting the brake hose from the caliper, tie it to the front suspension with soft wire, without stretching or...
1. Remove the front disc brake caliper and, without disconnecting the brake hose from the caliper, tie it to the front suspension with soft wire, without stretching or...

Replacing the wheel mounting bolt
1. Remove the front disc brake caliper and, without disconnecting the brake hose from the caliper, tie it to the front suspension with soft wire, without stretching or...
1. Remove the front disc brake caliper and, without disconnecting the brake hose from the caliper, tie it to the front suspension with soft wire, without stretching or...

Front wheel hub
Warnings On vehicles with ABS, when removing and installing the wheel speed sensor, be careful not to hit the sensor, otherwise it will be damaged. On vehicles with ABS,...
Warnings On vehicles with ABS, when removing and installing the wheel speed sensor, be careful not to hit the sensor, otherwise it will be damaged. On vehicles with ABS,...

Front suspension shock absorber strut
Removal In the engine compartment, remove the relay box. Loosen the front wheel mounting bolts. Apply the parking brake, then raise the front of the vehicle and secure...
Removal In the engine compartment, remove the relay box. Loosen the front wheel mounting bolts. Apply the parking brake, then raise the front of the vehicle and secure...

Repair of the front suspension shock absorber
Disassembly Secure the front suspension strut and, using a special device with grips, compress the spring so that it moves away from the upper plate (Fig. 14.27). Fig....
Disassembly Secure the front suspension strut and, using a special device with grips, compress the spring so that it moves away from the upper plate (Fig. 14.27). Fig....

Lower control arm of the front suspension
Removal Warning: Parts marked with * in Figure 14.32 must be pre-tightened and final tightened after the vehicle has been lowered onto its wheels in an unladen...
Removal Warning: Parts marked with * in Figure 14.32 must be pre-tightened and final tightened after the vehicle has been lowered onto its wheels in an unladen...
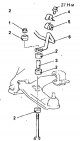
Anti-roll bar
Removal Raise the vehicle and remove the cross member. Loosen the self-locking nut and remove the rubber bushings and the sleeve securing the anti-roll bar to the lower...
Removal Raise the vehicle and remove the cross member. Loosen the self-locking nut and remove the rubber bushings and the sleeve securing the anti-roll bar to the lower...

Drive shafts
Fig. 14.39. Drive shafts of cars with gasoline engines: 1 - Drive shaft fastening nut, 216-255 Nm; 2 - lower arm ball joint; 3 - Ball joint of the steering rod end; 4 -...
Fig. 14.39. Drive shafts of cars with gasoline engines: 1 - Drive shaft fastening nut, 216-255 Nm; 2 - lower arm ball joint; 3 - Ball joint of the steering rod end; 4 -...

Repair of drive shafts
Warnings Do not disassemble the RJ CV joint. Be careful not to damage the rotor attached to the outer ring of the RJ CV joint. Disassembly Remove the drive shaft. Remove...
Warnings Do not disassemble the RJ CV joint. Be careful not to damage the rotor attached to the outer ring of the RJ CV joint. Disassembly Remove the drive shaft. Remove...

Rear suspension
The rear suspension is a multi-link with two longitudinal arms (Fig. 14.46). The rear strut shock absorber assembly is hydraulic, double-acting. Fig. 14.46. Rear...
The rear suspension is a multi-link with two longitudinal arms (Fig. 14.46). The rear strut shock absorber assembly is hydraulic, double-acting. Fig. 14.46. Rear...

Checking and adjusting the rear wheel alignment angles
Place the vehicle on a level, horizontal surface and measure the rear wheel alignment angles. Before measuring, the elements and parts of the rear wheel suspension must...
Place the vehicle on a level, horizontal surface and measure the rear wheel alignment angles. Before measuring, the elements and parts of the rear wheel suspension must...

Checking the rear wheel hub play
1. Remove the brake drum. 2. Secure the measuring stand with the pointer-type indicator as shown in Figure 14.51 and, moving the hub back and forth, measure its axial...
1. Remove the brake drum. 2. Secure the measuring stand with the pointer-type indicator as shown in Figure 14.51 and, moving the hub back and forth, measure its axial...

Checking the force required to turn the rear wheel hub
1. Release the parking brake. 2. Remove the brake drum. 3. To properly self-install the bearing, rotate the rear wheel hub several times. Wind a strong cord around the...
1. Release the parking brake. 2. Remove the brake drum. 3. To properly self-install the bearing, rotate the rear wheel hub several times. Wind a strong cord around the...

Rear wheel hub
Warnings 1. When removing the rear wheel hub, the inner bearing ring may remain on the fastener axis. In this case, replace the rear wheel hub together with the bearing....
Warnings 1. When removing the rear wheel hub, the inner bearing ring may remain on the fastener axis. In this case, replace the rear wheel hub together with the bearing....

Adjustable, upper and lower rear suspension arms
Warning: Parts marked with * in Figure 14.56 must be pre-tightened and final tightened after the vehicle has been lowered onto its wheels in an unladen condition. Fig....
Warning: Parts marked with * in Figure 14.56 must be pre-tightened and final tightened after the vehicle has been lowered onto its wheels in an unladen condition. Fig....

Replacing the lower arm bushing
Press out and press in the lower arm bushing using special tools (Fig. 14.60, 14.61). If the special tool (MB991449) is difficult to install, tap it lightly with a...
Press out and press in the lower arm bushing using special tools (Fig. 14.60, 14.61). If the special tool (MB991449) is difficult to install, tap it lightly with a...

Rear suspension trailing arm
Removal Warning: Parts marked with * in Figure 14.63 must be pre-tightened and final tightened after the vehicle has been lowered onto its wheels in an unloaded...
Removal Warning: Parts marked with * in Figure 14.63 must be pre-tightened and final tightened after the vehicle has been lowered onto its wheels in an unloaded...

Rear suspension shock absorber strut
Removal Raise the rear of the vehicle and support it on jack stands. Remove the appropriate rear wheel. Place a jack under the lower rear suspension arm. Loosen the nut...
Removal Raise the rear of the vehicle and support it on jack stands. Remove the appropriate rear wheel. Place a jack under the lower rear suspension arm. Loosen the nut...
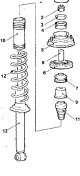
Repair of the rear suspension shock absorber
Disassembly Use a screwdriver blade to lever off the protective cap (Fig. 14.69). Fig. 14.69. Elements of the rear suspension shock absorber strut: 1 - protective cap; 2...
Disassembly Use a screwdriver blade to lever off the protective cap (Fig. 14.69). Fig. 14.69. Elements of the rear suspension shock absorber strut: 1 - protective cap; 2...

Anti-roll bar of the car
Removal Raise the rear of the vehicle and support it on stands, Loosen the nuts and remove the anti-roll bar (Fig. 14.74). Fig. 14.74. Anti-roll bar: 1 - stabilizer bar...
Removal Raise the rear of the vehicle and support it on stands, Loosen the nuts and remove the anti-roll bar (Fig. 14.74). Fig. 14.74. Anti-roll bar: 1 - stabilizer bar...

Wheels and tires
Cars can be equipped with wheels with aluminum or steel rims. The type of wheel rim used depends on the car model. A compact wheel is used as a spare. Checking tire...
Cars can be equipped with wheels with aluminum or steel rims. The type of wheel rim used depends on the car model. A compact wheel is used as a spare. Checking tire...
This section is available on: russian, bulgarian, belarusian, ukrainian, serbian, croatian, romanian, polish, slovak, hungarian
Similar materials for other Mitsubishi models
➤ Chassis and running gear: Car suspension Mitsubishi Colt 2 and 3 (1983-1993)
➤ Chassis and running gear: Car suspension Mitsubishi Galant 6 and 7 (1987-1998)
➤ Chassis and running gear: Car suspension Mitsubishi L200 4 (2005-2014, diesel)
Link in different formats to this section
TEXTHTMLBB Code
- General information
- User manual
- Maintenance
- Power unit
- Petrol engines 4G9
- Diesel engines FBQT
- Diesel engines F9Q
- Cooling system
- Injection system (MPI)
- Injection system (GDI)
- Engine electrical equipment
- Transmission
- Clutch
- Mechanical gearbox
- Automatic gearbox
- Chassis and running gear
- Steering
- Brake system
- Front suspension and shafts
- Rear suspension
- Body and interior
- Exterior (external elements)
- Interior (internal elements)
- Doors, locks and windows
- Air conditioner
- Electrical equipment
- Equipment and devices
- Headlights and lighting
- Electrical circuits
- General information
- User manual
- Maintenance
- Power unit
- Petrol engines 4G9
- Petrol engines 4G1
- Diesel engines F9Q1
- Cooling system
- Fuel injection system GDI
- Fuel injection system MPI
- Diesel supply system F9Q1
- Ignition system
- Diesel preheating
- Transmission
- Clutch
- Mechanical gearbox
- Automatic gearbox
- Chassis and running gear
- Suspension and drive shafts
- Brake system
- Steering
- Body and interior
- Exterior (external elements)
- Interior (internal elements)
- Doors, locks and windows
- Heating and air conditioning
- Electrical equipment
- Power devices
- Equipment and devices