



Share with friends:
Doors, locks and windows of the car Mitsubishi Carisma

Windshield and fixed glass replacement
Replacing the windshield and fixed glass requires the use of a special fast-hardening adhesive or sealant, some tools and special skills. It is recommended that these...
Replacing the windshield and fixed glass requires the use of a special fast-hardening adhesive or sealant, some tools and special skills. It is recommended that these...

Adjusting the door installation position
Fig. 17.7. Using the special tool MB990900 or MB991164 (1) to adjust the door installation position 1. If the gap between the door and the body is uneven, stick...
Fig. 17.7. Using the special tool MB990900 or MB991164 (1) to adjust the door installation position 1. If the gap between the door and the body is uneven, stick...
Adjustment when faults occur in the window lift mechanism
If, when closing the glass, it suddenly begins to move downwards on its own, perform operations to adjust or replace the window lift mechanism. 1. Remove the door trim...
If, when closing the glass, it suddenly begins to move downwards on its own, perform operations to adjust or replace the window lift mechanism. 1. Remove the door trim...

Checking the safety mechanism of the electric window lifter
1. Lower the door glass 50 mm from the fully closed position. Fig. 17.8. Checking the safety mechanism of the electric window lifter 2. Place a wooden board about 4 cm...
1. Lower the door glass 50 mm from the fully closed position. Fig. 17.8. Checking the safety mechanism of the electric window lifter 2. Place a wooden board about 4 cm...
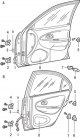
Doors — removal, inspection and installation
Removal To remove the clutch pedal, perform the following operations. 1. Open the door and support it with a jack through a wooden block. Disconnect the electrical...
Removal To remove the clutch pedal, perform the following operations. 1. Open the door and support it with a jack through a wooden block. Disconnect the electrical...
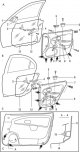
Door trim — removal and installation
Removal Here are the steps for removing the front door trim. The rear door trim is removed in a similar manner, except for the points noted. Fig. 17.11. Door trim: A -...
Removal Here are the steps for removing the front door trim. The rear door trim is removed in a similar manner, except for the points noted. Fig. 17.11. Door trim: A -...

Door glass and window lifter
Front door Removal 1. Remove the front door trim and waterproof film. Fig. 17.17. Glass and window lifter of the front door: A - cars with manual windows; B – cars with...
Front door Removal 1. Remove the front door trim and waterproof film. Fig. 17.17. Glass and window lifter of the front door: A - cars with manual windows; B – cars with...

Rear fixed side glass
Removal To remove the rear fixed side glass, perform the following operations in sequence. 1. Remove the rear door trim and waterproof film. Fig. 17.18. Glass and window...
Removal To remove the rear fixed side glass, perform the following operations in sequence. 1. Remove the rear door trim and waterproof film. Fig. 17.18. Glass and window...

Door lock and handle — removal and installation
Front doors Removal To remove the lock and door handle, follow these steps. 1. Disconnect the cable from the negative terminal of the battery. 2. Remove the door trim....
Front doors Removal To remove the lock and door handle, follow these steps. 1. Disconnect the cable from the negative terminal of the battery. 2. Remove the door trim....

Rear Door Assembly — Removal and Installation
Removal To remove the rear door, follow these steps. 1. Disconnect the cable from the negative terminal of the battery. 2. Remove the rear door trim. 3. Remove the rear...
Removal To remove the rear door, follow these steps. 1. Disconnect the cable from the negative terminal of the battery. 2. Remove the rear door trim. 3. Remove the rear...

Rear Door Trim — Removal
Removal To remove the rear door trim, perform the following steps. 1. Disconnect the cable from the negative terminal of the battery. Fig. 17.26. Rear door trim: A -...
Removal To remove the rear door trim, perform the following steps. 1. Disconnect the cable from the negative terminal of the battery. Fig. 17.26. Rear door trim: A -...

Rear Door Lock — Removal and Installation
Removal To remove the rear door lock, follow these steps. 1. Disconnect the cable from the negative terminal of the battery. 2. Remove the lower trim of the rear door....
Removal To remove the rear door lock, follow these steps. 1. Disconnect the cable from the negative terminal of the battery. 2. Remove the lower trim of the rear door....

Trunk lid — removal and installation
Removal To remove the trunk lid, perform the following operations. 1. Disconnect the cable from the negative terminal of the battery. 2. Remove the license plate light....
Removal To remove the trunk lid, perform the following operations. 1. Disconnect the cable from the negative terminal of the battery. 2. Remove the license plate light....

Trunk lid lock — removal and installation
Removal To remove the rear door lock, follow these steps. 1. Disconnect the cable from the negative terminal of the battery. 2. Remove the lower trim of the trunk lid....
Removal To remove the rear door lock, follow these steps. 1. Disconnect the cable from the negative terminal of the battery. 2. Remove the lower trim of the trunk lid....

Sunroof — Removal and Installation
Removal To remove the hatch, perform the following operations. 1. Disconnect the cable from the negative terminal of the battery. Fig. 17.34. Hatch: 1 – sunroof drive...
Removal To remove the hatch, perform the following operations. 1. Disconnect the cable from the negative terminal of the battery. Fig. 17.34. Hatch: 1 – sunroof drive...

Roof hatch repair
Disassembly To disassemble the hatch, perform the following operations. 1. Remove the hatch. Fig. 17.35. Using a screwdriver to remove the electronic unit (1) for...
Disassembly To disassemble the hatch, perform the following operations. 1. Remove the hatch. Fig. 17.35. Using a screwdriver to remove the electronic unit (1) for...
This section is available on: russian, bulgarian, belarusian, ukrainian, serbian, croatian, romanian, polish, slovak, hungarian
Similar materials for other Mitsubishi models
➤ Body and interior: Doors, locks and windows Mitsubishi Lancer 9 (2000-2007, petrol)
➤ Body and interior: Doors, locks and windows Mitsubishi Galant 5 (1983-1989, petrol)
➤ Body and interior: Doors, locks and windows Mitsubishi L200 4 (2005-2014, diesel)
➤ Body and interior: Doors, locks and windows Mitsubishi Outlander 1 (2003-2008)
➤ Body and interior: Doors, locks and windows Mitsubishi Pajero 4 (2006-2021)
Link in different formats to this section
TEXTHTMLBB Code
- General information
- User manual
- Maintenance
- Power unit
- Petrol engines 4G9
- Diesel engines FBQT
- Diesel engines F9Q
- Cooling system
- Injection system (MPI)
- Injection system (GDI)
- Engine electrical equipment
- Transmission
- Clutch
- Mechanical gearbox
- Automatic gearbox
- Chassis and running gear
- Steering
- Brake system
- Front suspension and shafts
- Rear suspension
- Body and interior
- Exterior (external elements)
- Interior (internal elements)
- Doors, locks and windows
- Air conditioner
- Electrical equipment
- Equipment and devices
- Headlights and lighting
- Electrical circuits
- General information
- User manual
- Maintenance
- Power unit
- Petrol engines 4G9
- Petrol engines 4G1
- Diesel engines F9Q1
- Cooling system
- Fuel injection system GDI
- Fuel injection system MPI
- Diesel supply system F9Q1
- Ignition system
- Diesel preheating
- Transmission
- Clutch
- Mechanical gearbox
- Automatic gearbox
- Chassis and running gear
- Suspension and drive shafts
- Brake system
- Steering
- Body and interior
- Exterior (external elements)
- Interior (internal elements)
- Doors, locks and windows
- Heating and air conditioning
- Electrical equipment
- Power devices
- Equipment and devices