



Contents: Removal ⤓ Installation ⤓
Removal
To remove the trunk lid, perform the following operations.
1. Disconnect the cable from the negative terminal of the battery.
2. Remove the license plate light.
3. Remove the light on the trunk lid.
4. Remove the trunk lid trim.
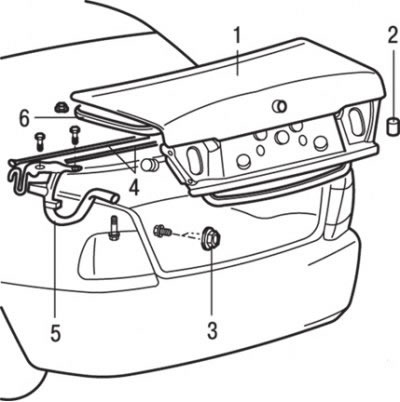
Fig. 17.28. Trunk lid: 1 – trunk lid panel; 2 – buffer; 3 – trunk lid lock retainer; 4 – trunk lid torsion bar; 5 – trunk lid hinge; 6 – trunk lid seal
5. Remove buffer 2 (Fig. 17.28).
6. Disconnect the wires and connector from the lower panel of the rear shelf.
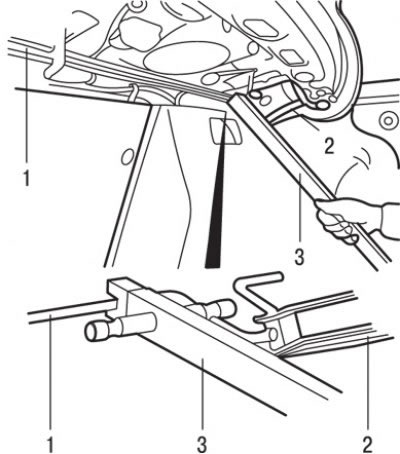
Fig. 17.29. Removing the trunk lid torsion bar: 1 – torsion (opening limiter); 2 – thrust; 3 – special tool МВ991244
7. Install the special tool as shown in Fig. 17.29 and remove torsion bar 4 (see Fig. 17.28) from its guides by moving the tool downwards. Then repeat the operation on the other side of the torsion bar.
Caution! Install the tool correctly, otherwise you may damage body parts and upholstery when removing the torsion bar.
8. Remove panel 1 (see Fig. 17.28) of the trunk lid.
9. Remove the rear shelf trim.
10. Using a marker, mark the position of the hinges on the trunk lid. Have an assistant support the trunk lid, then remove the left and right trunk lid hinge mounting bolts and carefully remove the trunk lid.
11. Remove hinge 5 of the trunk lid.
12. Remove the rear trim.
13. Unscrew the two bolts and remove the retainer 3 of the trunk lid lock.
14. Remove the seal 6 from the trunk lid.
Installation
Installation is carried out in the reverse order of removal, taking into account the following.
1. Install the trunk lid seal so that the marking and connection are aligned with the vehicle body axis.
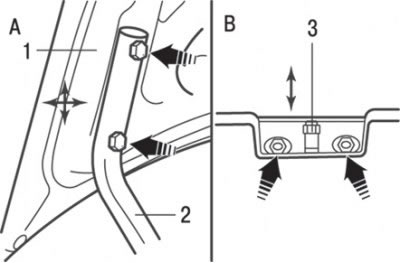
Fig. 17.30. Adjusting the gap between the trunk lid and the body (A) and the lock retainer (B): 1 – trunk lid panel; 2 – trunk lid hinge; 3 – trunk lid lock retainer
2. Install the trunk lid and secure it with bolts. Check the position of the trunk lid relative to the adjacent surfaces. Adjust the position of the trunk lid so that when the lid is closed, the gap around the perimeter of the lid is the same on all sides. To adjust, loosen the bolts securing the trunk lid hinges and, moving the trunk lid, adjust its position (Fig. 17.30).
3. Make sure that the color of the mark in the middle of the torsion bar matches the model of the car on which it is installed:
- cars without rear spoiler - no mark;
- cars with a rear spoiler - blue mark.
4. Insert the end of the torsion bar into the side hole for its installation.
5. Install the special tool as it was done when removing the torsion bar, turn it and install it into the torsion bar mounting earring, then hook the torsion bar onto the holder.
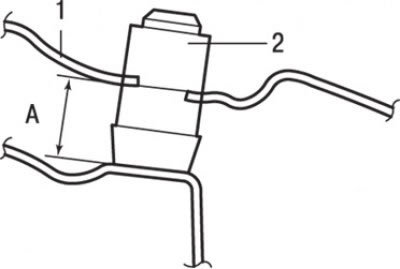
Fig. 17.31. Setting up the buffer: A = 14–16 mm; 1 – inner panel of the trunk lid; 2 – buffer
6. Set the buffer as shown in Fig. 17.31.