



Share with friends:
Car automatic transmission Mitsubishi Carisma

General information about automatic transmission
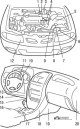
Fig. 12.1. Location of automatic transmission controls: 1 – Throttle position sensor (cars without TCL); 2 – full throttle position sensor; 3 – accelerator pedal...
Fig. 12.1. Location of automatic transmission controls: 1 – Throttle position sensor (cars without TCL); 2 – full throttle position sensor; 3 – accelerator pedal...

Checking the level of working fluid in the gearbox
1. Warm up the transmission fluid in the automatic transmission to operating temperature (70–80°C), for which you need to drive the car some distance. 2. Place the...
1. Warm up the transmission fluid in the automatic transmission to operating temperature (70–80°C), for which you need to drive the car some distance. 2. Place the...

Replacement of working fluid
If you have a quick-change system for the working fluid, you should use it. If you do not have such a system, the working fluid should be changed in the following order....
If you have a quick-change system for the working fluid, you should use it. If you do not have such a system, the working fluid should be changed in the following order....
Replacing the oil filter
1. Using special tool MB991610, unscrew the oil filter. 2. Wipe the surface of the filter mounting bracket. 3. Lubricate the surface of the new filter sealing ring with...
1. Using special tool MB991610, unscrew the oil filter. 2. Wipe the surface of the filter mounting bracket. 3. Lubricate the surface of the new filter sealing ring with...

Checking the starter lock mechanism
Please do the following beforehand. 1. If the brake pedal is pressed all the way down, the ignition key is in the "LOCK" ("OFF") position or removed from the lock, the...
Please do the following beforehand. 1. If the brake pedal is pressed all the way down, the ignition key is in the "LOCK" ("OFF") position or removed from the lock, the...

Checking the automatic transmission mode shift lock mechanism
Please do the following beforehand. 1. If the brake pedal is pressed all the way down and the ignition key is in the "ACC" position, the automatic transmission selector...
Please do the following beforehand. 1. If the brake pedal is pressed all the way down and the ignition key is in the "ACC" position, the automatic transmission selector...

Adjusting the selector cable
1. Move the selector lever to the "N" position. 2. Loosen the adjusting nut on the upper part of the selector lever. 3. Make sure the starter lock switch is in the "N"...
1. Move the selector lever to the "N" position. 2. Loosen the adjusting nut on the upper part of the selector lever. 3. Make sure the starter lock switch is in the "N"...

Adjusting the selector switch and control cable
1. Set the selector lever to the "N" position. 2. Loosen the adjusting nut securing the cable to the control lever. Fig. 12.7. Adjusting the selector switch and selector...
1. Set the selector lever to the "N" position. 2. Loosen the adjusting nut securing the cable to the control lever. Fig. 12.7. Adjusting the selector switch and selector...

Checking the electromagnetic valves
1. Remove the control valve block cover. Fig. 12.9. Location of automatic transmission control solenoid valves: 1 – electromagnetic valve for controlling the brake of...
1. Remove the control valve block cover. Fig. 12.9. Location of automatic transmission control solenoid valves: 1 – electromagnetic valve for controlling the brake of...
Checking the torque converter on a fully braked vehicle (Stall test)
The purpose of this test is to determine the maximum engine crankshaft speed with the gearbox output shaft completely stopped in the "D" and "R" ranges. This frequency...
The purpose of this test is to determine the maximum engine crankshaft speed with the gearbox output shaft completely stopped in the "D" and "R" ranges. This frequency...
Analysis of the test results on a fully braked vehicle
The engine crankshaft speed during Stall Test in positions "D" and "R" is greater than the maximum value in the following cases: low pressure in the main line; first...
The engine crankshaft speed during Stall Test in positions "D" and "R" is greater than the maximum value in the following cases: low pressure in the main line; first...

Adjusting the pressure in the control system
1. Drain the working fluid from the automatic transmission and remove the control valve block cover. Fig. 12.10. Location of the pressure adjustment screw (1) in the...
1. Drain the working fluid from the automatic transmission and remove the control valve block cover. Fig. 12.10. Location of the pressure adjustment screw (1) in the...

Checking the selector lever
1. Check the ease and smoothness of the selector lever movement and its fixation in each position. Check the indications of the selector lever position indicator, which...
1. Check the ease and smoothness of the selector lever movement and its fixation in each position. Check the indications of the selector lever position indicator, which...

Replacing the speedometer drive cable
1. Remove the instrument cluster trim and instrument cluster. 2. Release the adapter lock. 3. Pull the speedometer cable slightly into the vehicle interior and remove...
1. Remove the instrument cluster trim and instrument cluster. 2. Release the adapter lock. 3. Pull the speedometer cable slightly into the vehicle interior and remove...

Automatic transmission control mechanism
Removal To remove, follow these steps in sequence. 1. Remove the air filter assembly. 2. Remove the floor console. Caution: When removing and installing the cable...
Removal To remove, follow these steps in sequence. 1. Remove the air filter assembly. 2. Remove the floor console. Caution: When removing and installing the cable...

Disassembling and assembling the selector lever
Fig. 12.18. Installing the selector cable from the automatic transmission side: 1 – gearbox control cable; 2 – nut Selector lever for models produced since 1995...
Fig. 12.18. Installing the selector cable from the automatic transmission side: 1 – gearbox control cable; 2 – nut Selector lever for models produced since 1995...

Removal and installation of automatic transmission assembly
Removal 1. Drain the working fluid from the gearbox. 2. Remove the lower protective cover. 3. Remove the air filter assembly. 4. Remove the battery and its tray. 5....
Removal 1. Drain the working fluid from the gearbox. 2. Remove the lower protective cover. 3. Remove the air filter assembly. 4. Remove the battery and its tray. 5....
This section is available on: russian, bulgarian, belarusian, ukrainian, serbian, croatian, romanian, polish, slovak, hungarian
Similar materials for other Mitsubishi models
➤ Transmission: Automatic gearbox Mitsubishi Colt 4 and 5 (1991-2003)
➤ Transmission: Automatic gearbox Mitsubishi Lancer 9 (2000-2007, petrol)
➤ Transmission: Automatic gearbox Mitsubishi Galant 6 and 7 (1987-1998)
➤ Transmission: Automatic gearbox Mitsubishi Outlander 1 (2003-2008)
➤ Transmission: Automatic gearbox Mitsubishi Pajero 1 and 2 (1982-1999)
Link in different formats to this section
TEXTHTMLBB Code
- General information
- User manual
- Maintenance
- Power unit
- Petrol engines 4G9
- Diesel engines FBQT
- Diesel engines F9Q
- Cooling system
- Injection system (MPI)
- Injection system (GDI)
- Engine electrical equipment
- Transmission
- Clutch
- Mechanical gearbox
- Automatic gearbox
- Chassis and running gear
- Steering
- Brake system
- Front suspension and shafts
- Rear suspension
- Body and interior
- Exterior (external elements)
- Interior (internal elements)
- Doors, locks and windows
- Air conditioner
- Electrical equipment
- Equipment and devices
- Headlights and lighting
- Electrical circuits
- General information
- User manual
- Maintenance
- Power unit
- Petrol engines 4G9
- Petrol engines 4G1
- Diesel engines F9Q1
- Cooling system
- Fuel injection system GDI
- Fuel injection system MPI
- Diesel supply system F9Q1
- Ignition system
- Diesel preheating
- Transmission
- Clutch
- Mechanical gearbox
- Automatic gearbox
- Chassis and running gear
- Suspension and drive shafts
- Brake system
- Steering
- Body and interior
- Exterior (external elements)
- Interior (internal elements)
- Doors, locks and windows
- Heating and air conditioning
- Electrical equipment
- Power devices
- Equipment and devices