



Contents: Removal ⤓ Installation ⤓
Removal
Here are the steps for removing the front door trim. The rear door trim is removed in a similar manner, except for the points noted.
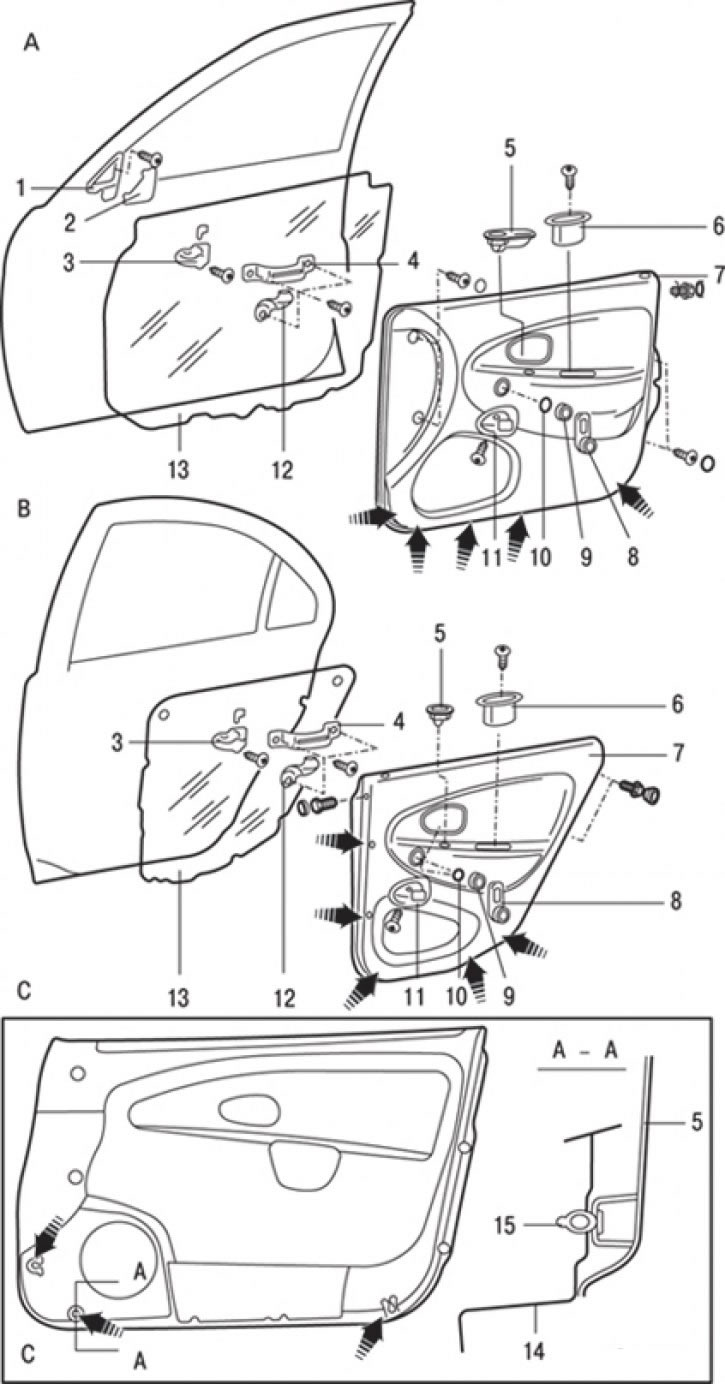
Fig. 17.11. Door trim: A - front door; B - rear door; C – fastening the upholstery with clamps; 1 – frame of the internal decorative delta-shaped cover; 2 – internal decorative delta cover; 3 – inner door lock drive handle; 4 – bracket "A" of the door handle; 5 – Electric window lift switch (cars with electric window lifts); 6 – inner door handle housing (finger recess); 7 – door trim; 8 – window lift handle (cars without electric window lifts); 9 – window lifter handle socket (cars without electric window lifters); 10 – retainer (cars without electric windows); 11 – lid; 12 – bracket "B" of the door handle; 13 – waterproof film; 14 – door panel; 15 – clamp paw (arrows show the location of the plastic clamps)
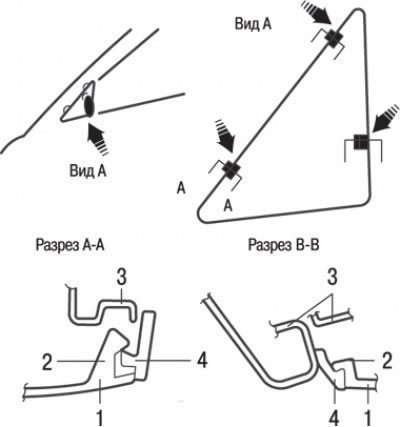
Fig. 17.12. Fastening elements of the internal decorative delta cover: 1 – internal decorative delta cover; 2 – paw; 3 – door panel; 4 – frame of the internal decorative delta-shaped cover
1. Using a screwdriver blade as a lever, remove the inner decorative delta cover 2 (Fig. 17.11), 1 (Fig. 17.12).
2. Loosen the screw and remove the frame of the inner decorative delta cover 1 (Fig. 17.11).
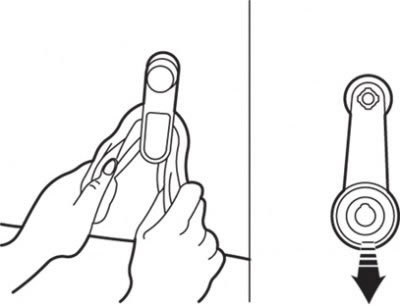
Fig. 17.13. Removing the window lifter handle spring clip
3. On manual window models, close the window completely and mark the position of the window handle. Release the retaining clip and remove the handle. The clip is released by inserting a clean cloth between the handle and the door trim. Pull the cloth opposite the ends of the clip, hook the clip and release it. In this case, it is necessary to pull the handle towards you so that after releasing the clip, it comes off the splines of the window regulator (Fig. 17.13).
4. Remove socket 9 (see Fig. 17.11) of the window lift handle.
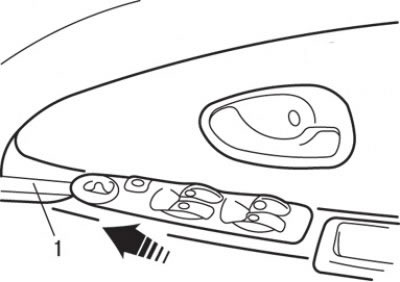
Fig. 17.14. Using a screwdriver (1) and the direction of movement to remove the electric window switch
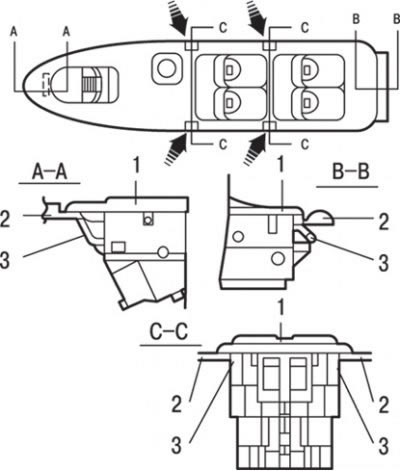
Fig. 17.15. Location of the main window switch mounting tabs: 1 – main window switch; 2 – door trim; 3 – paw
5. On vehicles with electric window lifts, using a screwdriver blade as lever 1 (Fig. 17.14), remove the electric window lift switch from the door trim by moving it forward and releasing the tabs 3 (Fig. 17.15) of its fastening.
6. Loosen the screw and remove the housing 6 (see Fig. 17.11) of the inner door handle (finger recess).
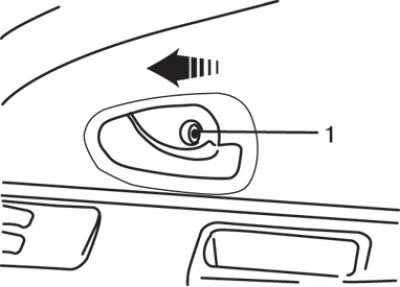
Fig. 17.16. Location of screw (1) and direction of movement for removing the cover
7. Loosen countersunk screw 1 (Fig. 17.16) and remove the cover by moving it in the direction shown in the figure.
8. Loosen the self-tapping screws and, using a wide-blade screwdriver, remove the plastic trim clips from the door and separate the door trim 7 (see Fig. 17.11) from the door.
9. Loosen the self-tapping screws and remove the inner handle 3 of the door lock drive.
10. Loosen the two self-tapping screws and remove the large bracket 4 of the inner door opening handle.
11. Loosen the self-tapping screw and remove the bracket 12 of the inner door opening handle.
12. Remove the protective film 13 from the door.
Installation
Installation is carried out in the reverse order of removal, taking into account the following.
1. Install the inner door handle brackets.
2. Apply a thin layer of 3M ATD Sealant #8625 around the perimeter of the inside of the door.
3. Install the retainer and socket into the window lift handle.
4. Close the front door glass completely and set the window lift handle to the position it was in before removal.
5. Using light blows on the door trim, secure the door trim with plastic fasteners.