
English Русский
Български
Беларускі
Український
Српски
Hrvatski
Română
Polski
Slovenský
Magyar
Articles Bookmark Contacts Sitemap   
Company Audi Company Ford Company Hyundai Company Kia Company Mazda Company Mercedes-Benz Company Nissan
MitsubishiMan.ru


Home Colt Lancer Galant L200 Outlander Pajero Others
Lancer 9 (2000-2007, petrol) Lancer 3 and 5 (1984-1992)

Removal and installation door trim (Mitsubishi Lancer 3)

  • Home
  • Lancer
  • 3 (1984-1992)
  • Body and interior
  • Exterior (external elements)
  • Removal and installation door trim
0
Contents: Removal ⤓ Installation ⤓
Note: This describes the removal of the front door trim. For the rear door, the working techniques are similar.


Removal
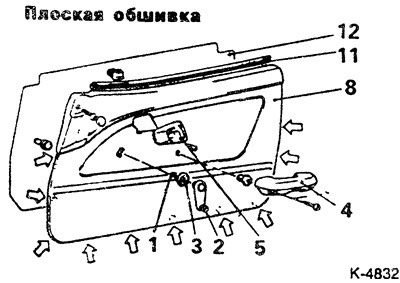


Disconnect the parts in numerical order. Some equipment sets may have a modified door trim handle or power window switch.
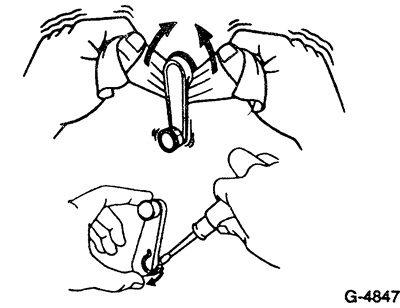


Remove the window lift handle. To do this, insert a screwdriver or cloth between the spacer washer and the handle and press the retaining clips, see the figure. At the same time, remove the window lift handle from the drive axle. If access to the handle is poor, the retaining clip can also be removed with a wire.
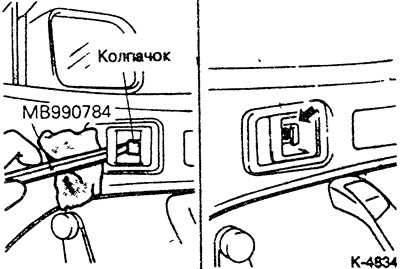


Use a screwdriver to pry the cap off the door handle trim mounting bolt. Service stations use a special tool for this. Move the handle trim forward and remove it.
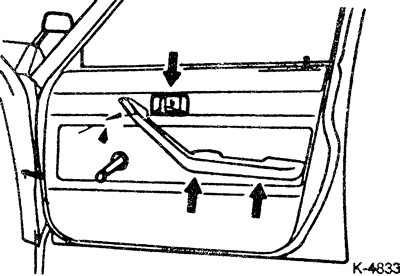


Loosen the armrest mounting screws. The picture shows COLT/LANCER release before 8.88.

If present, unscrew and remove the electric window switch from the door trim. Disconnect the switch connector.
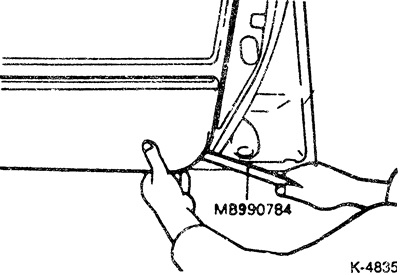


Pry up the lower part of the door trim with a wide plastic or wooden wedge. This will release the fastening buttons from their holes. Remove the door trim.
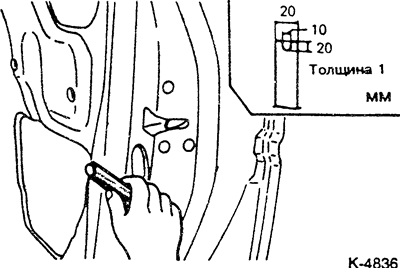


If there are buttons left in the door, make a tool for removing them according to the drawing and pull out the buttons.


If necessary, remove the moisture-proof film in the door cutout, being careful not to tear the film.

Installation
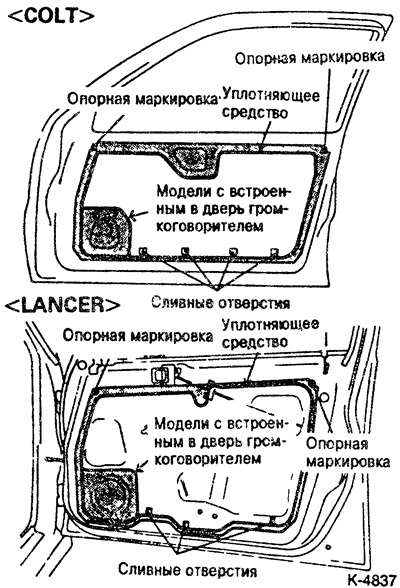


Carefully and without folds, stick the waterproof film to the door frame from the bottom up. The film should isolate the interior from drafts, noise and water penetration. Most often, the film sticks well with the remaining sealant. If the adhesive effect is insufficient, apply MITSUBISHI ЗМ ATD Nr. 8625 sealant (black)

Check the door trim fastening buttons. Replace damaged and bent buttons.

If available, route the power window cable through the hole in the door trim.

First place the door trim on top, then insert it from below and press it down with your palm in the places where the buttons are located.

Attach the armrest. Put the caps on the screw heads, if any.

Insert and screw the door handle.

Place the window lift handle with the locking clip on the axle so that when the window is closed it is in the same position as on the opposite door. Before doing this, insert the plastic ring.
This article is available at: russian, bulgarian, belarusian, ukrainian, serbian, croatian, romanian, polish, slovak, hungarian
This article was reviewed by: Dmitry Vasiliev
Share with friends:
◀ Previous
Lancer 3 and 5: Exterior (external elements)
Next ▶

Removal and installation / adjustment of doors
Removal and installation the cladding of the water collection compartment
Removal and installation/adjustment of the tailgate
Removal and installation/adjustment of the engine compartment hood
Removal and installation front fenders
Removal and installation / adjustment of door window glass / window lifter
Removal and installation a door handle / door lock
Car painting
Repairing damage from stone impacts
Body straightening/repair of rusty holes
Similar materials for other Mitsubishi models

➤ Door trim panel — removal and installation Mitsubishi Colt 2 and 3 (1983-1993)
➤ Removal and installation interior door trim panels Mitsubishi Galant 6 and 7 (1987-1998)
➤ Front door trim panel Mitsubishi L200 4 (2005-2014, diesel)
➤ Remote control door lock system Mitsubishi Outlander 1 (2003-2008)
➤ Luggage compartment door trim Mitsubishi Pajero 4 (2006-2021)
➤ Door trim — removal and installation Mitsubishi Carisma (1995-2004)
Link in different formats to this article
Comments and feedback from visitors
No comments yet


Add up two numbers 20 + 32


Lancer 9 (2000-2007, petrol) 
  • General information
  • User manual
  • Maintenance
  • Power unit
  • Repair of MPI engines
  • Repair of GDI engines
  • Engine overhaul
  • Cooling and lubrication system
  • MPI fuel injection system
  • GDI fuel injection system
  • Intake and exhaust system
  • Starting and charging system
  • Transmission
  • Automatic gearbox
  • Variator (CVT)
  • Drive shafts and gearbox
  • Chassis and running gear
  • Front suspension
  • Rear suspension
  • Steering
  • Brake system
  • Body and interior
  • Doors, locks and windows
  • Exterior (external elements)
  • Interior (internal elements)
  • Electrical equipment
  • Heater and air conditioner
  • Security system SRS
  • Equipment and devices
  • Wiring diagrams (saloon)
  • Wiring diagrams (wagon)
Lancer 3 and 5 (1984-1992) 
  • General information
  • Maintenance
  • Power unit
  • Engine repair
  • Lubrication system
  • Cooling system
  • Ignition system
  • Fuel system
  • Carburetor
  • Fuel injection
  • Diesel power system
  • Exhaust system
  • Transmission
  • Clutch
  • Car gearbox
  • Chassis and running gear
  • Front suspension
  • Rear suspension
  • Steering
  • Brake system
  • Wheels and tires
  • Body and interior
  • Exterior (external elements)
  • Interior (internal elements)
  • Heating system
  • Electrical equipment
  • Equipment and devices
  • Power devices
  • Electrical circuits
MitsubishiMan.ru © 2018–2026 • Mobile version • Articles about Mitsubishi • Contacts • Sitemap: EN BG BY UA RS HR RO PL SK HU • Site search • Bookmark
Colt 2 and 3 (1983-1993) · Colt 4 and 5 (1991-2003) · Colt 5 (1995-2003) · Lancer 3 and 5 (1984-1992) · Lancer 9 (2000-2007) · Galant 5 (1983-1989) · Galant 6 and 7 (1987-1998) · L200 4 (2005-2014) · Outlander 1 (2003-2008) · Pajero 1 and 2 (1982-1999) · Pajero 4 (2006-2021) · Carisma (1995-2004) · Space Star (1998-2005) ·
This resource sets cookies 🍪 to avoid bothering you with repeated data entry.