



Share with friends:
Vehicle Maintenance Mitsubishi Lancer 9

Service intervals
Note: The recommended service intervals must not be exceeded by more than 2000 km or 2 months. If the vehicle is primarily used in severe conditions, as described below,...
Note: The recommended service intervals must not be exceeded by more than 2000 km or 2 months. If the vehicle is primarily used in severe conditions, as described below,...

Rules for performing work in the engine compartment
Precautions when working with oils 1. Long-term and repeated contact with mineral oil will strip the natural fats from human skin, causing dryness, irritation and...
Precautions when working with oils 1. Long-term and repeated contact with mineral oil will strip the natural fats from human skin, causing dryness, irritation and...

Checking the condition of the engine oil
Note: - Before performing this check, place the vehicle on a level, horizontal surface. - Perform the check with the engine not running. If the engine is running, turn...
Note: - Before performing this check, place the vehicle on a level, horizontal surface. - Perform the check with the engine not running. If the engine is running, turn...

Engine oil change
Note: - When operating the vehicle in difficult conditions, change the oil twice as often. - When changing the engine oil, it is recommended to replace the oil filter at...
Note: - When operating the vehicle in difficult conditions, change the oil twice as often. - When changing the engine oil, it is recommended to replace the oil filter at...
Replacing the oil filter
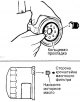
1. Warm up the engine until the coolant temperature reaches 80 - 90°C. Then turn off the engine before draining the engine oil. 2. Remove the engine crankcase protective...
1. Warm up the engine until the coolant temperature reaches 80 - 90°C. Then turn off the engine before draining the engine oil. 2. Remove the engine crankcase protective...

Checking the air filter
Note: Using an incorrect or dirty air filter can cause premature engine wear. 1. If necessary, disconnect the air flow sensor connector (except for 4G15-MPI engine). 2....
Note: Using an incorrect or dirty air filter can cause premature engine wear. 1. If necessary, disconnect the air flow sensor connector (except for 4G15-MPI engine). 2....

Checking the coolant
1. Check that the coolant level in the expansion tank is between the "FULL" and "LOW" marks on the tank wall. If the coolant level is low, check for leaks and add...
1. Check that the coolant level in the expansion tank is between the "FULL" and "LOW" marks on the tank wall. If the coolant level is low, check for leaks and add...

Replacing the coolant
Caution: The coolant contains ethylene glycol and an anti-corrosion additive. Since the radiator, cylinder head and coolant pump housing are cast from aluminum alloy,...
Caution: The coolant contains ethylene glycol and an anti-corrosion additive. Since the radiator, cylinder head and coolant pump housing are cast from aluminum alloy,...

Replacing the fuel filter
1. The fuel filter is an integral part of the fuel pump assembly located on the fuel tank and cannot be replaced without complete disassembly of the fuel pump assembly....
1. The fuel filter is an integral part of the fuel pump assembly located on the fuel tank and cannot be replaced without complete disassembly of the fuel pump assembly....

Checking the battery status
Note: See safety precautions when working with electrical equipment: Do not disconnect the battery while the engine and/or accessories are running. Turn the ignition...
Note: See safety precautions when working with electrical equipment: Do not disconnect the battery while the engine and/or accessories are running. Turn the ignition...

Checking and cleaning spark plugs
Note: Mitsubishi recommends replacing spark plugs with platinum or iridium electrodes every 90,000 km of vehicle mileage, and regular spark plugs every 45,000 km....
Note: Mitsubishi recommends replacing spark plugs with platinum or iridium electrodes every 90,000 km of vehicle mileage, and regular spark plugs every 45,000 km....

Checking High Voltage Wires (MPI Engine)
1. Check the condition (absence of cracks and damage to the insulation) and correct installation of high-voltage wires and their caps. 2. Disconnect the high tension...
1. Check the condition (absence of cracks and damage to the insulation) and correct installation of high-voltage wires and their caps. 2. Disconnect the high tension...

Checking the ignition timing angle
1. Before starting the inspection procedure, prepare the vehicle (see section " Checking the idle speed "). 2. Turn off the ignition and connect the tester to the 16-pin...
1. Before starting the inspection procedure, prepare the vehicle (see section " Checking the idle speed "). 2. Turn off the ignition and connect the tester to the 16-pin...

Checking the idle speed
1. Before starting the inspection procedure, prepare the vehicle according to the following points. a) The coolant temperature is in the range of 80-95°C. b) Lighting,...
1. Before starting the inspection procedure, prepare the vehicle according to the following points. a) The coolant temperature is in the range of 80-95°C. b) Lighting,...
Checking for increased idle speed when the air conditioner is turned on
1. Before starting the inspection procedure, prepare the vehicle (see section " Checking the idle speed "). 2. Check that the idle speed corresponds to the nominal value...
1. Before starting the inspection procedure, prepare the vehicle (see section " Checking the idle speed "). 2. Check that the idle speed corresponds to the nominal value...
Checking the composition of exhaust gases at idle speed
Note: Perform this check after checking the idle speed. 1. Before starting the inspection and adjustment procedures, prepare the vehicle (see section " Checking the idle...
Note: Perform this check after checking the idle speed. 1. Before starting the inspection and adjustment procedures, prepare the vehicle (see section " Checking the idle...

Compression check
1. Before checking, check the level and condition of the engine oil, the condition of the starter and the battery. 2. Before starting the inspection procedure, prepare...
1. Before checking, check the level and condition of the engine oil, the condition of the starter and the battery. 2. Before starting the inspection procedure, prepare...

Checking the vacuum in the intake manifold
1. Before starting the inspection procedure, prepare the vehicle (see section " Checking the idle speed "). 2. Turn off the ignition, then connect the tester to the...
1. Before starting the inspection procedure, prepare the vehicle (see section " Checking the idle speed "). 2. Turn off the ignition, then connect the tester to the...

Checking and adjusting drive belts of attachments
Checking drive belts 1. Check the drive belt for damage and excessive wear and make sure it is installed correctly in the pulley grooves. If the belt "squeals" or slips,...
Checking drive belts 1. Check the drive belt for damage and excessive wear and make sure it is installed correctly in the pulley grooves. If the belt "squeals" or slips,...

Checking the condition of the timing belt
1. If necessary, remove the upper timing belt cover to gain access to the drive belt (see section " Timing Belt Replacement " in chapter " Engine - mechanical part ")....
1. If necessary, remove the upper timing belt cover to gain access to the drive belt (see section " Timing Belt Replacement " in chapter " Engine - mechanical part ")....

Checking the brake fluid level
1. Check the brake fluid level in the brake hydraulic reservoir. The level should be between the "MAX" and "MIN" marks. Brake fluid type - SAE J 1703 or FMVSS 116 DOT3...
1. Check the brake fluid level in the brake hydraulic reservoir. The level should be between the "MAX" and "MIN" marks. Brake fluid type - SAE J 1703 or FMVSS 116 DOT3...

Checking the fluid level in the power steering reservoir
1. Place the car on a level horizontal surface, start the engine and turn the steering wheel a few times until the working fluid temperature rises to approximately 50 -...
1. Place the car on a level horizontal surface, start the engine and turn the steering wheel a few times until the working fluid temperature rises to approximately 50 -...

Checking the Transfer Case Oil Level (4WD Models)
1. Check the transfer case for oil leaks, then check the oil level by removing the filler plug. Note: The oil level should be level with the lower edge of the filler...
1. Check the transfer case for oil leaks, then check the oil level by removing the filler plug. Note: The oil level should be level with the lower edge of the filler...
Transfer Case Oil Change (4WD Models)
1. Loosen the drain plug on the transfer case and drain the oil. 2. Tighten the drain plug to the specified torque. Tightening torque: 30 - 34 Nm 3. Fill with new oil up...
1. Loosen the drain plug on the transfer case and drain the oil. 2. Tighten the drain plug to the specified torque. Tightening torque: 30 - 34 Nm 3. Fill with new oil up...

Checking the condition and level of the working fluid in the variator or automatic transmission
1. Drive the vehicle until the transmission fluid (ATF) reaches normal operating temperature (70 - 80°C). Note: If there is not enough time to warm up the working fluid...
1. Drive the vehicle until the transmission fluid (ATF) reaches normal operating temperature (70 - 80°C). Note: If there is not enough time to warm up the working fluid...

Replacing the working fluid in a variator or automatic transmission
Note: (CVT fluid replacement) Jatco, the CVT manufacturer, does not specify the need to replace the CVT fluid, since its use is designed for the entire service life of...
Note: (CVT fluid replacement) Jatco, the CVT manufacturer, does not specify the need to replace the CVT fluid, since its use is designed for the entire service life of...

Cleaning the CVT or automatic transmission fluid cooler lines
Caution: It is necessary to clean the working fluid cooler lines after replacing the CVT or automatic transmission, overhauling the CVT or automatic transmission, or if...
Caution: It is necessary to clean the working fluid cooler lines after replacing the CVT or automatic transmission, overhauling the CVT or automatic transmission, or if...

Checking the oil level in the rear differential housing (4WD models)
1. Unscrew the filler plug on the rear differential housing. 2. Make sure the oil level is within 8 mm of the lower edge of the filler hole (filler plug hole). 3. If the...
1. Unscrew the filler plug on the rear differential housing. 2. Make sure the oil level is within 8 mm of the lower edge of the filler hole (filler plug hole). 3. If the...

Changing the oil in the rear differential housing (4WD models)
1. Unscrew the drain plug on the differential housing and drain the oil. 2. Tighten the drain plug to the specified torque. Tightening torque: 59 - 69 Nm 3. Unscrew the...
1. Unscrew the drain plug on the differential housing and drain the oil. 2. Tighten the drain plug to the specified torque. Tightening torque: 59 - 69 Nm 3. Unscrew the...

Checking the washer fluid level
1. Check the washer fluid level in the reservoir regularly. If the fluid level in the windshield washer reservoir is low, top it up. Washer reservoir capacity: 4.2 l...
1. Check the washer fluid level in the reservoir regularly. If the fluid level in the windshield washer reservoir is low, top it up. Washer reservoir capacity: 4.2 l...
Air conditioning system refill
The procedure for filling the air conditioning system is described in the relevant section of the chapter " Heater, air conditioner and ventilation system ". Refrigerant...
The procedure for filling the air conditioning system is described in the relevant section of the chapter " Heater, air conditioner and ventilation system ". Refrigerant...

Replacing the cabin filter
Caution: When operating the vehicle in dusty areas or in rough terrain, check and replace the filter element more often than usual. 1. Open the glove box, then remove...
Caution: When operating the vehicle in dusty areas or in rough terrain, check and replace the filter element more often than usual. 1. Open the glove box, then remove...
Additional checks
1. Lubrication of hinges and latches. Check all hinges and latches, and if they require lubrication, clean them first and apply a general purpose lubricant. 2. During...
1. Lubrication of hinges and latches. Check all hinges and latches, and if they require lubrication, clean them first and apply a general purpose lubricant. 2. During...
This section is available on: russian, bulgarian, belarusian, ukrainian, serbian, croatian, romanian, polish, slovak, hungarian
Similar materials for other Mitsubishi models
➤ General information: Maintenance Mitsubishi Colt 2 and 3 (1983-1993)
➤ General information: Maintenance Mitsubishi Galant 6 and 7 (1987-1998)
➤ General information: Maintenance Mitsubishi L200 4 (2005-2014, diesel)
➤ General information: Maintenance Mitsubishi Pajero 4 (2006-2021)
➤ General information: Maintenance Mitsubishi Space Star (1998-2005)
Link in different formats to this section
TEXTHTMLBB Code
- General information
- User manual
- Maintenance
- Power unit
- Repair of MPI engines
- Repair of GDI engines
- Engine overhaul
- Cooling and lubrication system
- MPI fuel injection system
- GDI fuel injection system
- Intake and exhaust system
- Starting and charging system
- Transmission
- Automatic gearbox
- Variator (CVT)
- Drive shafts and gearbox
- Chassis and running gear
- Front suspension
- Rear suspension
- Steering
- Brake system
- Body and interior
- Doors, locks and windows
- Exterior (external elements)
- Interior (internal elements)
- Electrical equipment
- Heater and air conditioner
- Security system SRS
- Equipment and devices
- Wiring diagrams (saloon)
- Wiring diagrams (wagon)
- General information
- Maintenance
- Power unit
- Engine repair
- Lubrication system
- Cooling system
- Ignition system
- Fuel system
- Carburetor
- Fuel injection
- Diesel power system
- Exhaust system
- Transmission
- Clutch
- Car gearbox
- Chassis and running gear
- Front suspension
- Rear suspension
- Steering
- Brake system
- Wheels and tires
- Body and interior
- Exterior (external elements)
- Interior (internal elements)
- Heating system
- Electrical equipment
- Equipment and devices
- Power devices
- Electrical circuits