
English Русский
Български
Беларускі
Український
Српски
Hrvatski
Română
Polski
Slovenský
Magyar
Articles Bookmark Contacts Sitemap   
Company Audi Company Ford Company Hyundai Company Kia Company Mazda Company Mercedes-Benz Company Nissan
MitsubishiMan.ru


Home Colt Lancer Galant L200 Outlander Pajero Others
Lancer 9 (2000-2007, petrol) Lancer 3 and 5 (1984-1992)

Checking and adjusting drive belts of attachments (Mitsubishi Lancer 9)

  • Home
  • Lancer
  • 9 (2000-2007, petrol)
  • General information
  • Maintenance
  • Checking and adjusting drive belts of attachments
0
Contents: Checking drive belts ⤓ Adjusting the alternator drive belt…⤓ Table. Checking and adjusting the…⤓ Table. Checking and adjusting the…⤓ Adjusting the tension of the power…⤓ Engine 4G15 ⤓

Checking drive belts


1. Check the drive belt for damage and excessive wear and make sure it is installed correctly in the pulley grooves. If the belt "squeals" or slips, check the condition of the pulley contact surfaces and the belt tension. If defects are found, replace the drive belt.

Caution: Do not apply oil or grease to drive belts.


Note: separation of the rubber from the cord on the inner (from the side of the ridges) and outer surfaces of the belt, exposure or damage to the cord, separation of the ridges from the rubber base, the presence of cracks, peeling or wear on the side surfaces of the belt and belt ridges is not allowed.


2. Check that the belt does not slip off the tensioner roller. Replace the tensioner if necessary.

3. Check the belt deflection by pressing at the center of the belt span between the pulleys with a force of 100 N, as shown in the figure.

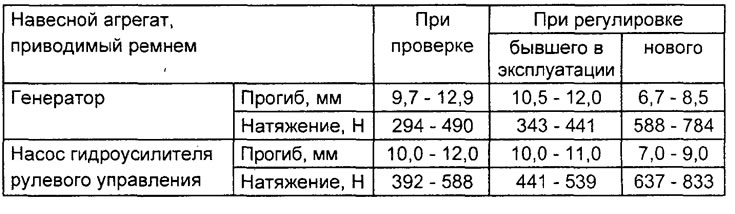
4. Adjust the belt deflection if it does not correspond to the nominal value given in the table "Checking and adjusting the drive belts of attachment units".

Note:
  • The term "used belt" refers to a belt that has been in service for more than 5 minutes.
  • After installing the belt, start the engine and let it run for 5 minutes, then check the belt tension again.
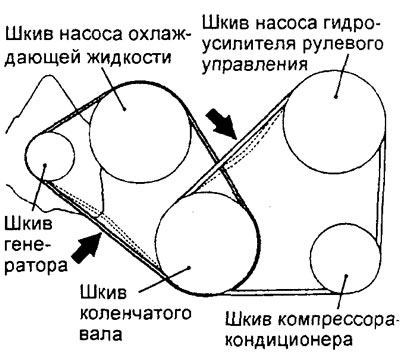


Engine 4G15.
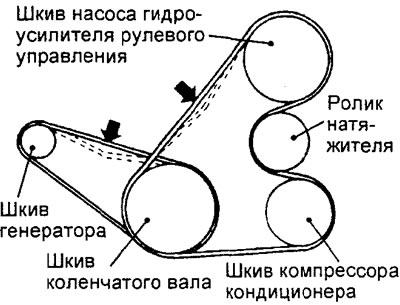


Engine 4G93.


Adjusting the alternator drive belt tension


1. Loosen the generator pivot bolt nut.

Table. Checking and adjusting the drive belts of the 4G15 engine attachments.
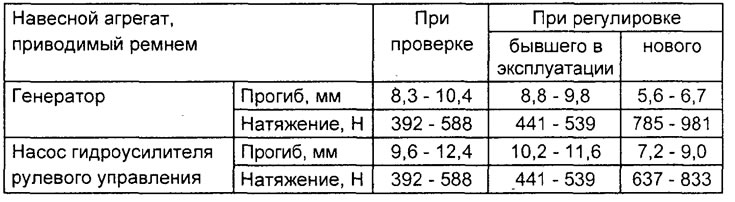


Table. Checking and adjusting the drive belts of the 4G93 engine attachments.


2. Loosen the lock bolt on the adjuster bracket.
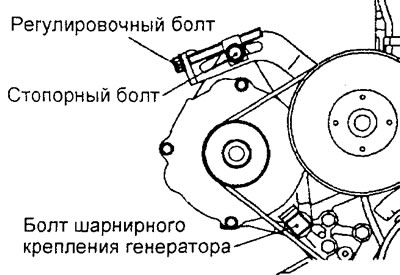


Engine 4G15.
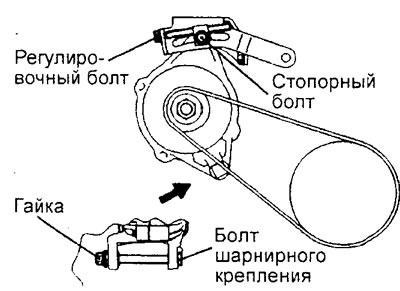


Engine 4G93.


3. Turn the adjusting bolt to adjust the belt tension and deflection to the nominal values (see the table "Checking and adjusting the drive belts of attachments").

4. Tighten the lock bolt.

Tightening torque - 23 ±2 N·m

5. Tighten the generator pivot bolt nut.

Tightening torque - 44+10 Nm

6. Tighten the adjusting bolt.

Tightening torque - 5 Nm

7. Turn the engine crankshaft with the starter one or more times, and then check the belt deflection.
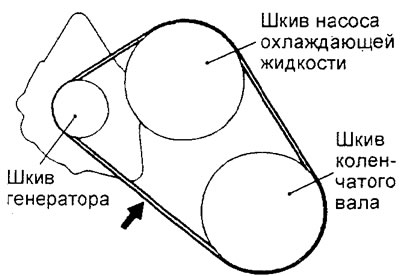


Engine 4G15.
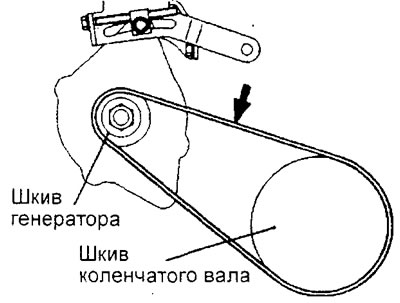


Engine 4G93.


Adjusting the tension of the power steering pump and air conditioning compressor drive belt


Engine 4G93


1. Loosen the tensioner roller lock nut.
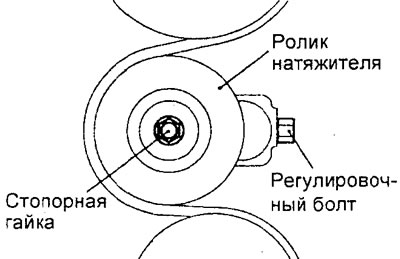


2. Turn the adjusting bolt on the tensioner bracket to adjust the belt tension and deflection so that it corresponds to the nominal value (see the table "Checking and adjusting accessory drive belts").
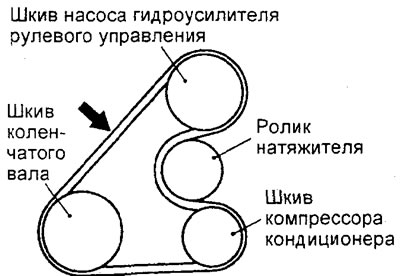


3. Tighten the tensioner roller lock nut.

Tightening torque: 26 ±4 Nm

4. Turn the engine crankshaft one revolution or more in the normal direction of rotation (clockwise), then check the drive belt deflection.

Engine 4G15


1. Loosen the power steering pump bolts "A", "B" and "C" shown in the illustration.
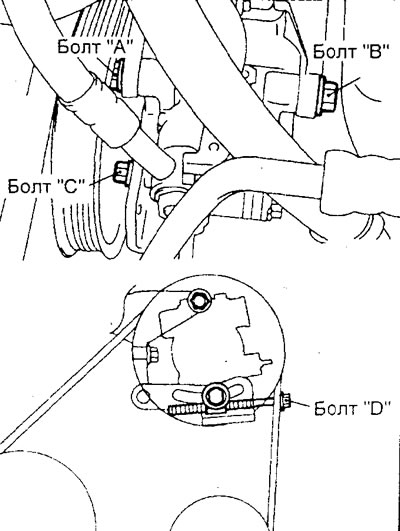


2. Turn the adjusting bolt "D" on the tensioner bracket to adjust the belt tension and deflection so that it corresponds to the nominal value (see the table "Checking and adjusting the accessory drive belts").
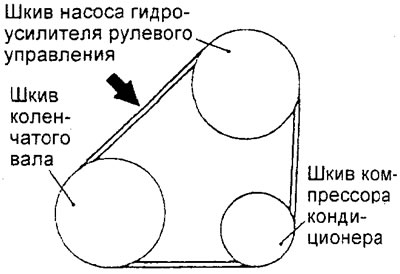


3. Tighten the power steering pump bolts "A", "B" and "C" to the specified torque.

Tightening torque: 40 ±5 Nm

4. Turn the engine crankshaft one revolution or more in the normal direction of rotation (clockwise), then check the drive belt deflection.
This article is available at: russian, bulgarian, belarusian, ukrainian, serbian, croatian, romanian, polish, slovak, hungarian
This article was reviewed by: Arseny Pavlov
Share with friends:
◀ Previous
Lancer 9: Maintenance
Next ▶

Checking the vacuum in the intake manifold
Compression check
Checking the composition of exhaust gases at idle speed
Checking for increased idle speed when the air conditioner is turned on
Checking the idle speed
Checking the condition of the timing belt
Checking the brake fluid level
Checking the fluid level in the power steering reservoir
Checking the Transfer Case Oil Level (4WD Models)
Transfer Case Oil Change (4WD Models)
Similar materials for other Mitsubishi models

➤ Camshaft Drive Belt — Checking and Adjusting (4D65T, Diesel) Mitsubishi Colt 4 and 5 (1991-2003)
➤ Checking the condition, adjusting the tension force and… Mitsubishi Galant 6 and 7 (1987-1998)
➤ Checking and adjusting the tension of auxiliary drive belts Mitsubishi L200 4 (2005-2014, diesel)
➤ Checking the level of working fluid in the clutch hydraulic… Mitsubishi Outlander 1 (2003-2008)
➤ Drive Belts — Checking and Adjusting Tension Mitsubishi Pajero 1 and 2 (1982-1999)
➤ Checking and adjusting the tension of the generator drive… Mitsubishi Carisma (1995-2004)
Link in different formats to this article
Comments and feedback from visitors
No comments yet


Add up two numbers 36 + 39


Lancer 9 (2000-2007, petrol) 
  • General information
  • User manual
  • Maintenance
  • Power unit
  • Repair of MPI engines
  • Repair of GDI engines
  • Engine overhaul
  • Cooling and lubrication system
  • MPI fuel injection system
  • GDI fuel injection system
  • Intake and exhaust system
  • Starting and charging system
  • Transmission
  • Automatic gearbox
  • Variator (CVT)
  • Drive shafts and gearbox
  • Chassis and running gear
  • Front suspension
  • Rear suspension
  • Steering
  • Brake system
  • Body and interior
  • Doors, locks and windows
  • Exterior (external elements)
  • Interior (internal elements)
  • Electrical equipment
  • Heater and air conditioner
  • Security system SRS
  • Equipment and devices
  • Wiring diagrams (saloon)
  • Wiring diagrams (wagon)
Lancer 3 and 5 (1984-1992) 
  • General information
  • Maintenance
  • Power unit
  • Engine repair
  • Lubrication system
  • Cooling system
  • Ignition system
  • Fuel system
  • Carburetor
  • Fuel injection
  • Diesel power system
  • Exhaust system
  • Transmission
  • Clutch
  • Car gearbox
  • Chassis and running gear
  • Front suspension
  • Rear suspension
  • Steering
  • Brake system
  • Wheels and tires
  • Body and interior
  • Exterior (external elements)
  • Interior (internal elements)
  • Heating system
  • Electrical equipment
  • Equipment and devices
  • Power devices
  • Electrical circuits
MitsubishiMan.ru © 2018–2026 • Mobile version • Articles about Mitsubishi • Contacts • Sitemap: EN BG BY UA RS HR RO PL SK HU • Site search • Bookmark
Colt 2 and 3 (1983-1993) · Colt 4 and 5 (1991-2003) · Colt 5 (1995-2003) · Lancer 3 and 5 (1984-1992) · Lancer 9 (2000-2007) · Galant 5 (1983-1989) · Galant 6 and 7 (1987-1998) · L200 4 (2005-2014) · Outlander 1 (2003-2008) · Pajero 1 and 2 (1982-1999) · Pajero 4 (2006-2021) · Carisma (1995-2004) · Space Star (1998-2005) ·
This resource sets cookies 🍪 to avoid bothering you with repeated data entry.