



Share with friends:
Exterior (external elements) of the car Mitsubishi Lancer 3 and 5

Body — general information
COLT/LANCER have a monocoque body. The bottom, sides, roof and rear fenders are welded together. Both the windshield and rear window, as well as the fixed glass of the...
COLT/LANCER have a monocoque body. The bottom, sides, roof and rear fenders are welded together. Both the windshield and rear window, as well as the fixed glass of the...

COLT/LANCER body variants
COLT release from 1.84 to 8.88 LANCER release from 9.84 to 8.88 COLT release from 9.88 to 3.92 LANCER from 9.88 to 8.92 (and hatchback)
COLT release from 1.84 to 8.88 LANCER release from 9.84 to 8.88 COLT release from 9.88 to 3.92 LANCER from 9.88 to 8.92 (and hatchback)
Removal and installation the front bumper
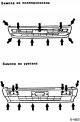
COLT/LANCER release before 8.88 Removal Remove the front turn signals, see item 24.2 . Loosen the bumper mounting bolts, located depending on the bumper version...
COLT/LANCER release before 8.88 Removal Remove the front turn signals, see item 24.2 . Loosen the bumper mounting bolts, located depending on the bumper version...

Removal and installation the rear bumper
COLT/LANCER release before 8.88 Removal LANCER: Remove the bumper extension mounting bolts and clips and pull the extension forward, toward the front of the vehicle....
COLT/LANCER release before 8.88 Removal LANCER: Remove the bumper extension mounting bolts and clips and pull the extension forward, toward the front of the vehicle....

Removal and installation the radiator grille
Removal Open the engine compartment hood. COLT/LANCER production before 8.88: Loosen 3 bolts on the top of the radiator grille and remove the grille. COLT/LANCER from...
Removal Open the engine compartment hood. COLT/LANCER production before 8.88: Loosen 3 bolts on the top of the radiator grille and remove the grille. COLT/LANCER from...

Removal and installation side molding
Removal The side protective molding is attached with clips. To release the clips, you can use a wide spatula or a screwdriver. Note: COLT/LANCER produced since 9.88 has...
Removal The side protective molding is attached with clips. To release the clips, you can use a wide spatula or a screwdriver. Note: COLT/LANCER produced since 9.88 has...

Removal and installation front fenders
COLT/LANCER release since 9.88 Removal Mark the position of the wheel disk on the wheel hub with paint. This ensures that the balanced wheel can be reinstalled in its...
COLT/LANCER release since 9.88 Removal Mark the position of the wheel disk on the wheel hub with paint. This ensures that the balanced wheel can be reinstalled in its...

Removal and installation/adjustment of the engine compartment hood
Removal Open the engine compartment hood. Disconnect the windshield washer nozzle water hose. Mark the position of the hood by outlining the hinge bolts with a felt-tip...
Removal Open the engine compartment hood. Disconnect the windshield washer nozzle water hose. Mark the position of the hood by outlining the hinge bolts with a felt-tip...

Removal and installation/adjustment of the tailgate
Removal Remove the windshield washer nozzle hose. Disconnect the connector "6", see figure below. 1 - gas-guided stop, 2 - steering buffer, 3 - sealing rubber, 6 - cable...
Removal Remove the windshield washer nozzle hose. Disconnect the connector "6", see figure below. 1 - gas-guided stop, 2 - steering buffer, 3 - sealing rubber, 6 - cable...

Removal and installation the cladding of the water collection compartment
The lining of the water collection compartment under the windshield should be removed when removing the windshield wiper or heater mechanism. Removal Remove the brush...
The lining of the water collection compartment under the windshield should be removed when removing the windshield wiper or heater mechanism. Removal Remove the brush...

Removal and installation / adjustment of doors
Removal Disconnect electrical connectors, such as the electric window motor, electrically controlled exterior mirror, central locking device. To do this, remove the door...
Removal Disconnect electrical connectors, such as the electric window motor, electrically controlled exterior mirror, central locking device. To do this, remove the door...

Removal and installation door trim
Note: This describes the removal of the front door trim. For the rear door, the working techniques are similar. Removal Disconnect the parts in numerical order. Some...
Note: This describes the removal of the front door trim. For the rear door, the working techniques are similar. Removal Disconnect the parts in numerical order. Some...

Removal and installation / adjustment of door window glass / window lifter
Removal Remove the inner door trim. Lower the glass down until the window mounting bolts appear in the door cutout. COLT/LANCER release before 8.88 Hook the window seal...
Removal Remove the inner door trim. Lower the glass down until the window mounting bolts appear in the door cutout. COLT/LANCER release before 8.88 Hook the window seal...

Removal and installation a door handle / door lock
From the door lock, 3 rods extend to the inner and outer door handles, as well as to the central locking device button. Removal Remove the door window glass. Central...
From the door lock, 3 rods extend to the inner and outer door handles, as well as to the central locking device button. Removal Remove the door window glass. Central...

Car painting
Body straightening and painting work requires experience and knowledge of materials and processing methods. This is usually achieved only through many years of practice....
Body straightening and painting work requires experience and knowledge of materials and processing methods. This is usually achieved only through many years of practice....
Repairing damage from stone impacts
Regularly repairing minor paint damage pays off as it can prevent the spread of rust and larger repairs. For small scratches and stone marks that have only affected the...
Regularly repairing minor paint damage pays off as it can prevent the spread of rust and larger repairs. For small scratches and stone marks that have only affected the...

Body straightening/repair of rusty holes
Small dents can be removed using a straightening hammer and a suitable hand anvil; for rust holes on the body, it is recommended, depending on the size of the damage, to...
Small dents can be removed using a straightening hammer and a suitable hand anvil; for rust holes on the body, it is recommended, depending on the size of the damage, to...

Preparing for painting
Before painting, wash the car to avoid dirt inclusions. Work only at temperatures above 12°C, but not in direct sunlight or strong wind. Rust removal Cover the outline...
Before painting, wash the car to avoid dirt inclusions. Work only at temperatures above 12°C, but not in direct sunlight or strong wind. Rust removal Cover the outline...

Coloring
To avoid problems when painting, use a "Primer" from the same manufacturer as the aerosol paint can, applied before painting. Otherwise, the paint will bubble and...
To avoid problems when painting, use a "Primer" from the same manufacturer as the aerosol paint can, applied before painting. Otherwise, the paint will bubble and...
This section is available on: russian, bulgarian, belarusian, ukrainian, serbian, croatian, romanian, polish, slovak, hungarian
Similar materials for other Mitsubishi models
➤ Body: Exterior (external elements) Mitsubishi Colt 5 (1995-2003, petrol)
➤ Body and interior: Exterior (external elements) Mitsubishi Galant 5 (1983-1989, petrol)
➤ Body and interior: Exterior (external elements) Mitsubishi L200 4 (2005-2014, diesel)
➤ Body and interior: Exterior (external elements) Mitsubishi Outlander 1 (2003-2008)
➤ Body and interior: Exterior (external elements) Mitsubishi Pajero 1 and 2 (1982-1999)
➤ Body and interior: Exterior (external elements) Mitsubishi Carisma (1995-2004)
Link in different formats to this section
TEXTHTMLBB Code
- General information
- User manual
- Maintenance
- Power unit
- Repair of MPI engines
- Repair of GDI engines
- Engine overhaul
- Cooling and lubrication system
- MPI fuel injection system
- GDI fuel injection system
- Intake and exhaust system
- Starting and charging system
- Transmission
- Automatic gearbox
- Variator (CVT)
- Drive shafts and gearbox
- Chassis and running gear
- Front suspension
- Rear suspension
- Steering
- Brake system
- Body and interior
- Doors, locks and windows
- Exterior (external elements)
- Interior (internal elements)
- Electrical equipment
- Heater and air conditioner
- Security system SRS
- Equipment and devices
- Wiring diagrams (saloon)
- Wiring diagrams (wagon)
- General information
- Maintenance
- Power unit
- Engine repair
- Lubrication system
- Cooling system
- Ignition system
- Fuel system
- Carburetor
- Fuel injection
- Diesel power system
- Exhaust system
- Transmission
- Clutch
- Car gearbox
- Chassis and running gear
- Front suspension
- Rear suspension
- Steering
- Brake system
- Wheels and tires
- Body and interior
- Exterior (external elements)
- Interior (internal elements)
- Heating system
- Electrical equipment
- Equipment and devices
- Power devices
- Electrical circuits