
English Русский
Български
Беларускі
Український
Српски
Hrvatski
Română
Polski
Slovenský
Magyar
Articles Bookmark Contacts Sitemap   
Company Audi Company Ford Company Hyundai Company Kia Company Mazda Company Mercedes-Benz Company Nissan
MitsubishiMan.ru


Home Colt Lancer Galant L200 Outlander Pajero Others
Lancer 9 (2000-2007, petrol) Lancer 3 and 5 (1984-1992)

Removal and installation the rear bumper (Mitsubishi Lancer 3)

  • Home
  • Lancer
  • 3 (1984-1992)
  • Body and interior
  • Exterior (external elements)
  • Removal and installation the rear bumper
0
Contents: COLT/LANCER release before 8.88 ⤓ COLT/LANCER release since 9.88 ⤓

COLT/LANCER release before 8.88


Removal
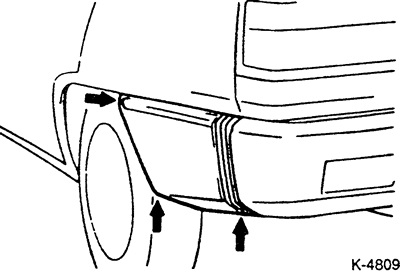


LANCER: Remove the bumper extension mounting bolts and clips and pull the extension forward, toward the front of the vehicle. Remove the reversing light, see item 24.6.
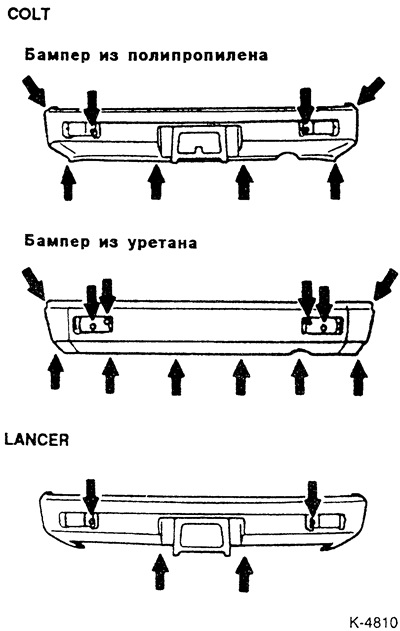


Unscrew the bolts and remove the clamps in the places marked with arrows.
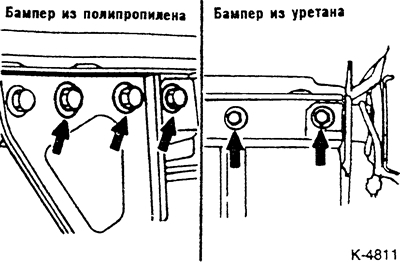


Unscrew the bolts from the bumper beam and pull the bumper out a little. For a polypropylene bumper, disconnect the cable harness from the rear of the bumper.


Remove the bumper with an assistant.

COLT/LANCER release since 9.88


Removal


Remove the license plate light, reversing light and, if present, rear fog light from the rear bumper, see item 24.2.

LANCER: Remove the side trim in the luggage compartment to gain access to the bumper mounting bolts from the inside.
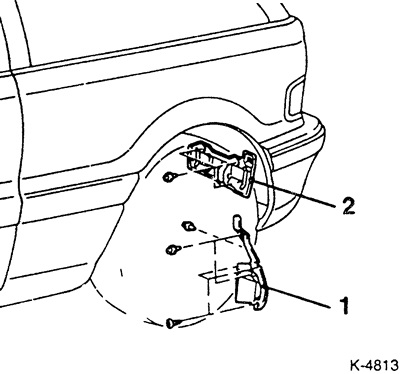


Disconnect and remove the aprons "1" from the wheel arches, as well as (only for COLT) the rear trim "2".
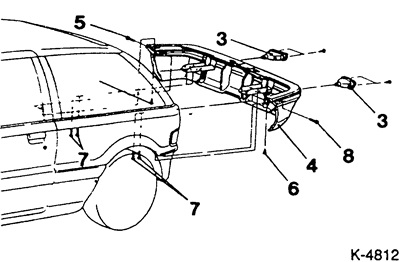


Remove the rear bolts "4" securing the bumper.
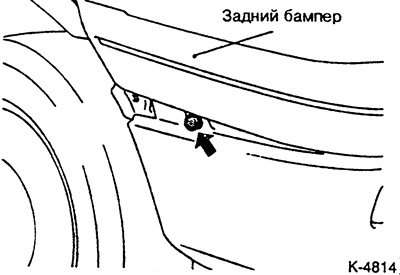


COLT only: Lift the top of the bumper from the side, being careful not to damage the body, and remove the side bolts securing the rear bumper.


LANCER: Loosen the side bumper mounting bolts from the inside of the trunk.

GTI variants: Remove bolts at bottom edge of bumper.

Loosen the mounting bolts "7" from the bottom side and remove the bumper with an assistant, see Fig. K-4812.

If necessary, disassemble the bumper in the same way as described for the front bumper.

Installation


If removed, route the cable harness along the bumper.

Insert and secure the rear bumper.

Install the cladding.

Install exterior lighting fixtures into the bumper.
This article is available at: russian, bulgarian, belarusian, ukrainian, serbian, croatian, romanian, polish, slovak, hungarian
This article was reviewed by: Dmitry Vasiliev
Share with friends:
◀ Previous
Lancer 3 and 5: Exterior (external elements)
Next ▶

Removal and installation the front bumper
COLT/LANCER body variants
Body — general information
Removal and installation the radiator grille
Removal and installation side molding
Removal and installation front fenders
Removal and installation/adjustment of the engine compartment hood
Removal and installation/adjustment of the tailgate
Similar materials for other Mitsubishi models

➤ Rear bumper — design description Mitsubishi Colt 5 (1995-2003, petrol)
➤ Rear window/external rear view mirror heating switch Mitsubishi Galant 6 and 7 (1987-1998)
➤ Rear bumper components installation diagram and its… Mitsubishi L200 4 (2005-2014, diesel)
➤ Removal and installation the rear bumper Mitsubishi Outlander 1 (2003-2008)
➤ Rear bumper Mitsubishi Pajero 4 (2006-2021)
➤ Rear bumper Mitsubishi Space Star (1998-2005)
Link in different formats to this article
Comments and feedback from visitors
No comments yet


Add up two numbers 17 + 17


Lancer 9 (2000-2007, petrol) 
  • General information
  • User manual
  • Maintenance
  • Power unit
  • Repair of MPI engines
  • Repair of GDI engines
  • Engine overhaul
  • Cooling and lubrication system
  • MPI fuel injection system
  • GDI fuel injection system
  • Intake and exhaust system
  • Starting and charging system
  • Transmission
  • Automatic gearbox
  • Variator (CVT)
  • Drive shafts and gearbox
  • Chassis and running gear
  • Front suspension
  • Rear suspension
  • Steering
  • Brake system
  • Body and interior
  • Doors, locks and windows
  • Exterior (external elements)
  • Interior (internal elements)
  • Electrical equipment
  • Heater and air conditioner
  • Security system SRS
  • Equipment and devices
  • Wiring diagrams (saloon)
  • Wiring diagrams (wagon)
Lancer 3 and 5 (1984-1992) 
  • General information
  • Maintenance
  • Power unit
  • Engine repair
  • Lubrication system
  • Cooling system
  • Ignition system
  • Fuel system
  • Carburetor
  • Fuel injection
  • Diesel power system
  • Exhaust system
  • Transmission
  • Clutch
  • Car gearbox
  • Chassis and running gear
  • Front suspension
  • Rear suspension
  • Steering
  • Brake system
  • Wheels and tires
  • Body and interior
  • Exterior (external elements)
  • Interior (internal elements)
  • Heating system
  • Electrical equipment
  • Equipment and devices
  • Power devices
  • Electrical circuits
MitsubishiMan.ru © 2018–2026 • Mobile version • Articles about Mitsubishi • Contacts • Sitemap: EN BG BY UA RS HR RO PL SK HU • Site search • Bookmark
Colt 2 and 3 (1983-1993) · Colt 4 and 5 (1991-2003) · Colt 5 (1995-2003) · Lancer 3 and 5 (1984-1992) · Lancer 9 (2000-2007) · Galant 5 (1983-1989) · Galant 6 and 7 (1987-1998) · L200 4 (2005-2014) · Outlander 1 (2003-2008) · Pajero 1 and 2 (1982-1999) · Pajero 4 (2006-2021) · Carisma (1995-2004) · Space Star (1998-2005) ·
This resource sets cookies 🍪 to avoid bothering you with repeated data entry.