



Contents: Headlights ⤓ Front parking light ⤓ Fog lights, reversing lights ⤓ Side direction indicators ⤓ Rear lights ⤓ License plate lighting ⤓
Turn off the corresponding switch.
Headlights
Open the engine compartment hood.
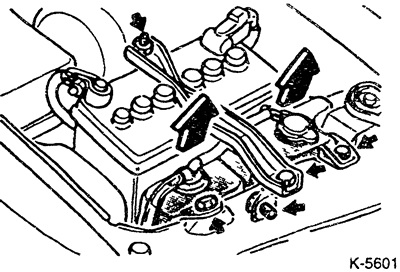
Only in cars produced since 9.88. Remove the battery retaining bar next to the right headlight and pull the expansion tank of the cooling system and the windshield washer tank upwards and put aside. Do not spill any liquid, do not place the tanks on the engine or battery.
(The text of the article was taken from the website: «www.mitsubishiman.ru»)
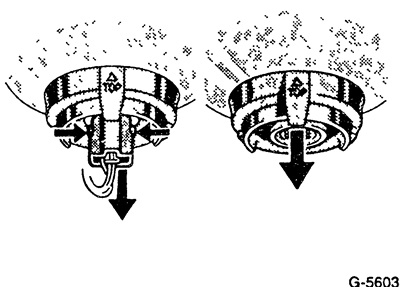
Remove the connector and remove the rubber cap.
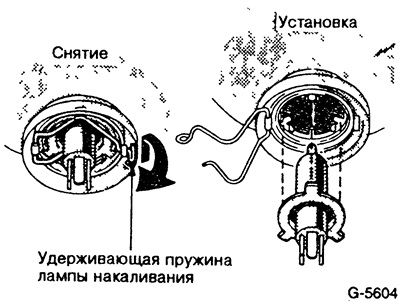
Disconnect the lamp retaining spring from the latch and fold it back.
Remove the burnt-out lamp.
Insert the new lamp so that the projections fit into the corresponding holes in the housing. In this case, hold the lamp only by the socket, not by the glass.
Place and snap the spring clip onto the lamp.
Place the rubber cap on the back of the headlight bulb.
Insert the socket into the cartridge.
If removed, install the coolant and windshield washer reservoirs. Secure the battery.
Check the headlight adjustment at a service station.
Front direction indicators
Cars manufactured before 8.88: Remove the lamp glass. Press lightly on the lamp holder, turn 90° (M turns) to the left and pull it out.
Insert the new bulb, press it lightly and screw it in. Before doing this, replace the damaged gasket.
Vehicles from 9.88: Only right-hand direction indicator on 1.5/1.8 l and diesel models: Release the battery holder and move the battery slightly towards the middle of the vehicle to gain access to the back of the direction indicator.
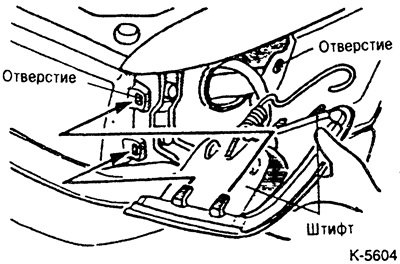
Disconnect the spring from the rear of the engine compartment light and pull the indicator light forward.
Remove the socket from the rear of the indicator lamp and replace the bulb.
Insert the projections of the flashlight with the inserted socket into the corresponding fasteners, see the figure. Connect the spring from the back side.
Front parking light
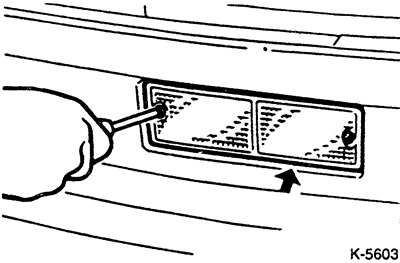
Cars produced before 8.88: Remove the screws securing the protective glass.
Remove all the bulbs from their sockets, they are simply inserted into them.
Insert and press the new bulbs lightly.
Secure the protective glass. Replace the damaged rubber gasket first.
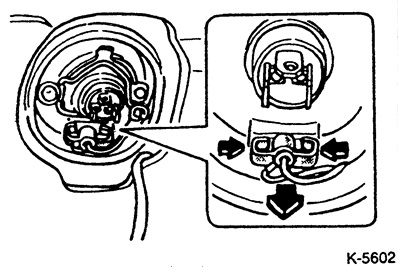
Cars produced since 9.88: Pull out the socket from the rear of the headlight, squeezing the side clamps. Lightly press the bulb into the socket, turn 90° (¼ turn) to the left and remove.
Insert a new bulb, press it lightly and turn it to the right. Insert the socket.
Fog lights, reversing lights
Remove the screws securing the protective glass.
Remove all the bulbs from their sockets, they are simply inserted into them.
Insert and press the new bulbs lightly.
Secure the protective glass. Replace the damaged rubber gasket first.
Side direction indicators
Cars manufactured before 8.88: Unscrew the 2 screws securing the glass and remove the glass. Pull the bulb out of the socket, insert a new bulb. Secure the protective glass.
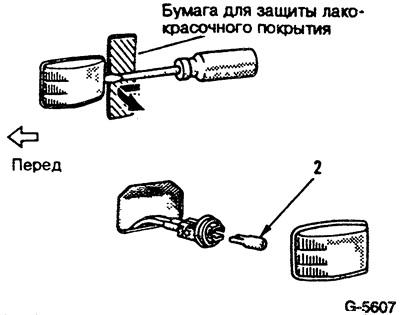
Cars produced since 9.88: Pry up and remove the glass, place paper under the screwdriver for protection. Release the socket with a left turn and remove the bulb. Insert a new bulb and snap the socket into place. Snap the glass into place.
Rear lights
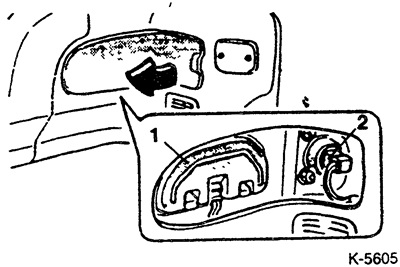
Remove the trim in the rear. The picture shows the model produced since 9.88.
- 1 - holder for reverse light and rear side light bulbs;
- 2 - direction indicator lamp socket.
On early models, all 3 lamps are installed on one holder.
Remove the connector from the lamp holder, pull back the locking tab and remove the lamp holder.
Lightly press the burnt-out lamp into the socket, turn it 90° (¼ turn) and remove it.
Insert the new bulb, press lightly and turn to the left.
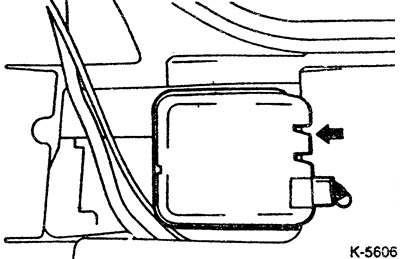
Only rear direction indicators from 9.88: Remove connector "2", see Fig. K-5605. Turn the socket to the left and remove. Lightly press the burnt-out bulb into the socket, turn 90° (14 turns) and remove.
Install a new lamp, snap the glass into place.
License plate lighting
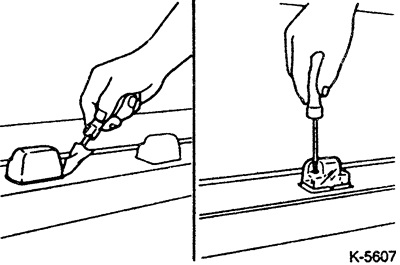
Pry up the light cover. Place a gasket under the screwdriver to protect the paint. Then remove the mounting screws with a Phillips head screwdriver.
Cars produced since 9.88: Lightly press the burnt-out bulb into the socket, turn it 90° (¼ turn) to the left and remove it. Insert a new bulb, lightly press it and turn it to the right.
Cars produced before 8.88: Remove the bulb, insert a new bulb.
Secure the glass of the lantern, then press the cover until it snaps into place.