



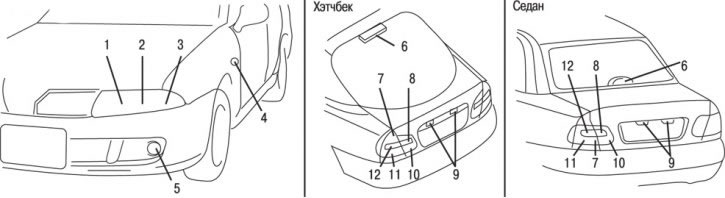
Fig. 2.17. Location of lamps in the car: 1 – front side lights; 2 – headlight, high/low beam; 3 – front turn signal; 4 – side direction indicator; 5 – front fog light; 6 – central brake light; 7 – rear side light; 8 – reversing light; 9 – license plate lights; 10 – rear fog light; 11 – brake light and tail light (sedan), brake light (hatchback); 12 – rear direction indicator
Turn on all positions of the headlamp, exterior lamp and direction indicator switch to check that all the bulbs are working properly (Fig. 2.17). If any of them do not light, the most likely cause is blown fuses or faulty bulbs. First check the fuses. If they are OK, check the bulbs.
If the fuses and bulbs are OK, take the vehicle to an authorized Mitsubishi dealer for inspection and repair.
Replacing lamps
1. Before replacing the bulb, make sure it is turned off. Do not touch the bulb of the new bulb with bare hands. The skin fat remaining on the glass will begin to evaporate after the bulb heats up, its vapors will settle on the headlight reflector and make the surface of the latter dull.
2. Burnt-out lamps must be replaced with new ones of the same power and the same type. The lamp characteristics are indicated on its base.
Headlights and parking lights
1. Remove the protective cover from the rear of the headlight by turning it counterclockwise and disconnect the electrical connector.
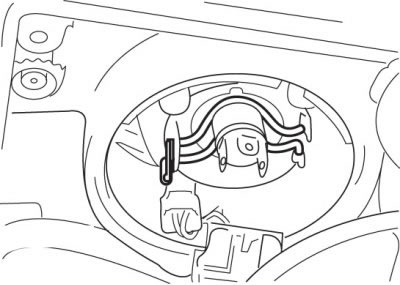
Fig. 2.18. Removing the headlight bulb
2. Squeeze and push aside the lamp mounting spring and then remove the lamp (Fig. 2.18).
Warning! Do not touch the halogen bulb with bare hands, dirty gloves, etc. The oil from your hands will cause the bulbs to burn out when you turn on the headlights or parking lights. If the surface of the bulb is dirty, it must be cleaned with alcohol, paint thinner, etc. and installed only after the bulb is completely dry.
Front side lights
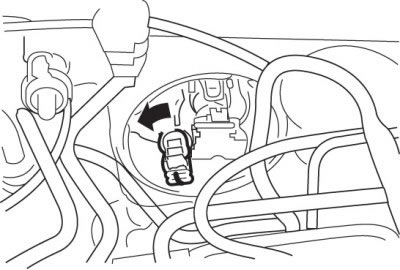
Fig. 2.19. Removing the front parking light bulb
Remove the parking light bulb socket by turning it counterclockwise, and then pull the bulb out of the socket (Fig. 2.19).
(Original material on the website: mitsubishiman.ru)
Front direction indicators for petrol and diesel vehicles (right side)
1. Turn the lamp holder counterclockwise and remove it.
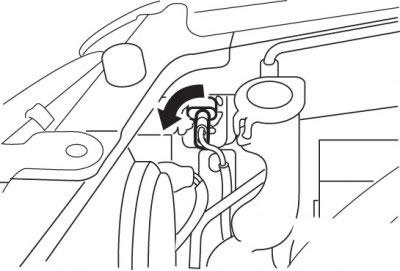
Fig. 2.20. Removing the front turn signal lamp
2. Remove the lamp from the socket by turning it counterclockwise and pressing it into the socket (Fig. 2.20).
Front direction indicators for vehicles with diesel engines (left side)
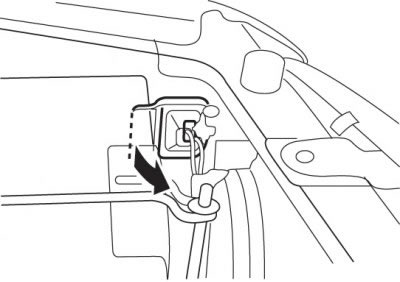
Fig. 2.21. Removing the protective cover of the front direction indicator of vehicles with diesel engines
1. Remove the protective cover (Fig. 2.21).
2. Turn the lamp holder counterclockwise and remove it.
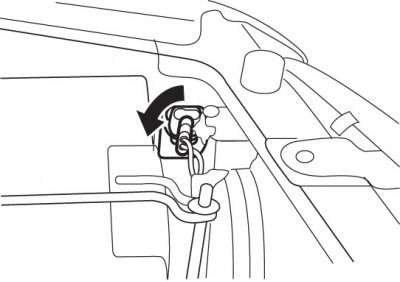
Fig. 2.22. Removing the front turn signal lamp for vehicles with diesel engines
3. Remove the lamp from the socket by turning it counterclockwise and pressing it into the socket (Fig. 2.22).
Side direction indicators
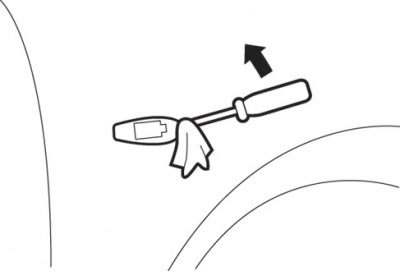
Fig. 2.23. Removing the side turn signal lamp
Insert the blade of a flat-head screwdriver under the edge of the turn signal lens and remove the lens assembly with the bulb by turning it counterclockwise (Fig. 2.23). Remove the bulb.
Caution: Wrap the blade of the flat-head screwdriver in a cloth to avoid scratching the diffuser and body.
Front fog lights
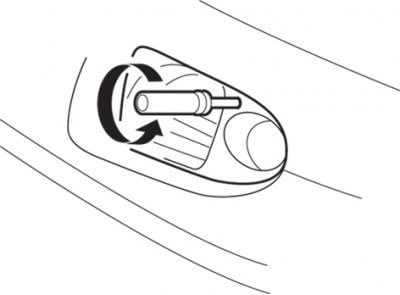
Fig. 2.24. Unscrewing the casing mounting screw
1. Use a screwdriver to unscrew the casing mounting screw (Fig. 2.24).
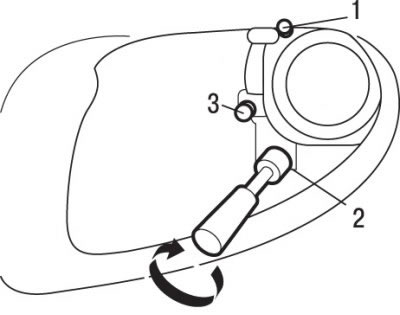
Fig. 2.25. Unscrewing the headlight housing mounting screws: 1, 2 – screws; 3 – adjusting screw
2. Unscrew screws 1 (Fig. 2.25) and 2 and pull the headlight housing towards you.
Caution! Do not turn adjusting screw 3 (see Fig. 2.25).
3. Remove the connector attached to the bracket.
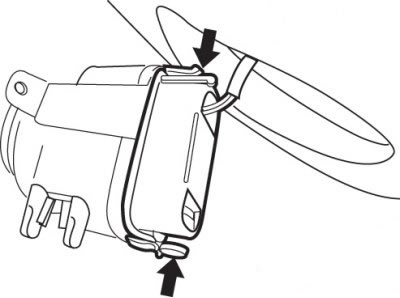
Fig. 2.26. Location of the protective cover mounting ears
4. Pressing on the ears, remove the protective cover and disconnect the electrical connector (Fig. 2.26).
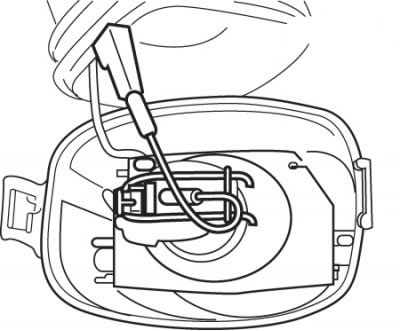
Fig. 2.27. Location of the front fog lamp mounting spring
5. Compress and fold aside the lamp mounting spring and then remove the lamp (Fig. 2.27).
Rear lights
Hatchback
1. Remove the cover.
2. Turn the lamp holder counterclockwise and remove it.
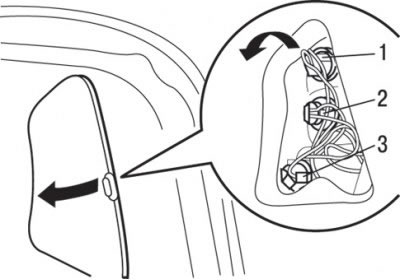
Fig. 2.28. Location of lamps in the rear lights of hatchback cars: 1 – rear side light; 2 – rear turn signal; 3 – brake light
3. Remove the lamp from the socket by turning it counterclockwise and pressing it into the socket (Fig. 2.28).
Sedan
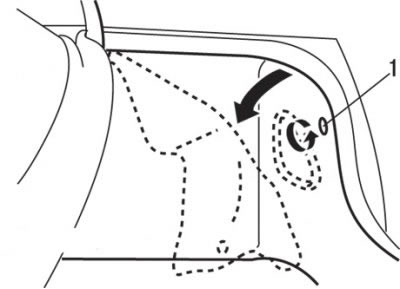
Fig. 2.29. Direction of rotation of button (1) before removing the upholstery
1. Turn and remove button 1 (Fig. 2.29), then turn the trim down.
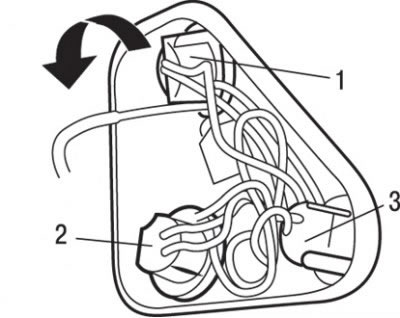
Fig. 2.30. Location of lamps in the rear lights of cars with a sedan body: 1 – rear turn signal; 2 – brake light and side light; 3 – rear side light
2. Turn the lamp holder counterclockwise and remove it. Remove the lamp from the holder by turning it counterclockwise and pressing it into the holder (Fig. 2.30).
Reversing light and rear fog light
Hatchback
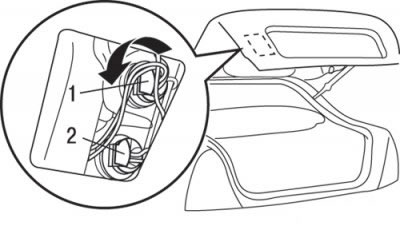
Fig. 2.31. Location of lamps in the reversing lights of hatchback vehicles: 1 – reversing light; 2 – rear fog light
Use a screwdriver to remove the cover. Turn the lamp holder counterclockwise and remove it. Remove the lamp from the holder by turning it counterclockwise and pressing it into the holder (Fig. 2.31).
Sedan
1. Remove the clips and fold back the trim (cover).
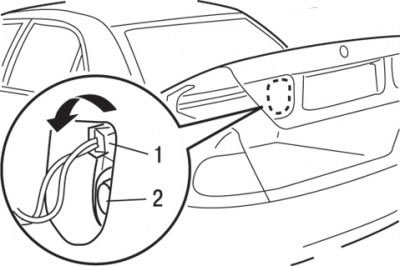
Fig. 2.32. Location of lamps in reversing lights of cars with a sedan body: 1 – reversing light; 2 – rear fog light
2. Turn the lamp holder counterclockwise and remove it. Remove the lamp from the holder by turning it counterclockwise and pressing it into the holder (Fig. 2.32).
License plate lights
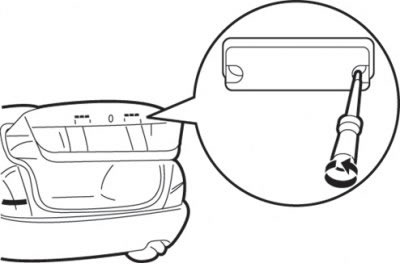
Fig. 2.33. Unscrewing the license plate light mounting screws
Loosen the screws securing the lamp diffuser and remove the diffuser (Fig. 2.33). Then remove the lamp by pulling it out of the socket.
Interior lighting lamps
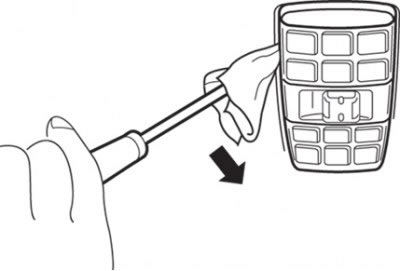
Fig. 2.34. Removing the interior light
Insert the blade of a flat-head screwdriver into the groove of the lamp assembly and, carefully prying up the diffuser, remove it (Fig. 2.34). Remove the lamp from the socket.
Caution: To avoid scratching the diffuser, wrap the screwdriver blade in a cloth.
Luggage compartment light
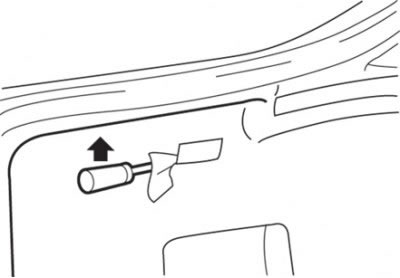
Fig. 2.35. Removing the luggage compartment light
Insert the blade of a flat-head screwdriver into the groove of the lampshade and, carefully prying it off, remove the lampshade diffuser (Fig. 2.35). Remove the lamp from the holder.
Caution: To avoid scratching the diffuser, wrap the screwdriver blade in a cloth.