
English Русский
Български
Беларускі
Український
Српски
Hrvatski
Română
Polski
Slovenský
Magyar
Articles Bookmark Contacts Sitemap   
Company Audi Company Ford Company Hyundai Company Kia Company Mazda Company Mercedes-Benz Company Nissan
MitsubishiMan.ru


Home Colt Lancer Galant L200 Outlander Pajero Others
Lancer 9 (2000-2007, petrol) Lancer 3 and 5 (1984-1992)

Removal and installation / adjustment of doors (Mitsubishi Lancer 3)

  • Home
  • Lancer
  • 3 (1984-1992)
  • Body and interior
  • Exterior (external elements)
  • Removal and installation / adjustment of doors
0
Contents: Removal ⤓ Installation ⤓

Removal


Disconnect electrical connectors, such as the electric window motor, electrically controlled exterior mirror, central locking device. To do this, remove the door trim, see item 20.11.
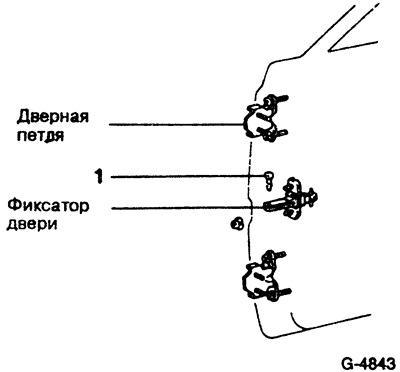


Using a punch and a hammer, knock pin "1" upwards.

Loosen the bolts on the door hinges. Before doing this, mark the installation position by outlining the bolt heads with a felt-tip pen. Remove the door with an assistant.

Installation


Install the door, straighten it and screw in the bolts.

The original material is here: MITSUBISHIMAN

Insert the door retainer pin from above.

Connect the electrical connectors and install the door trim.

After this, adjust the door.

Door adjustment


The door position is adjusted if it is skewed or after the door has been removed.

Loosen the door locking wedge fastening enough to allow it to be moved with light blows from a rubber mallet.
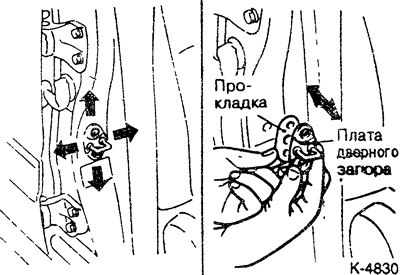


The adjustment is made by loosening the hinge bolts and moving the door. The hinges have holes larger than the diameter of the mounting bolts, so the hinge can move.
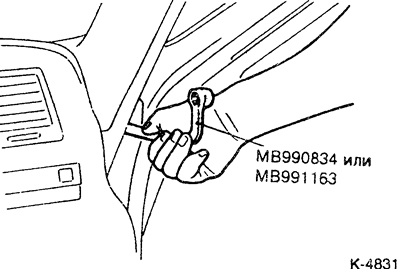


To adjust the mating dimensions, loosen the bolts on the body (front or middle pillar), without unscrewing. Adjust the mating size by moving the door. Since access to the bolts is difficult, use a special MITSUBISHI tool.

Align the door to the body contour: If the front door is not flush with the adjacent part of the body when closed, loosen the hinge bolts on the door and move the door accordingly. The rear door may be recessed inward by no more than 1 mm compared to the front door.

Adjust the locking wedge at the rear of the door. To do this, loosen the locking wedge so that it can be moved by light blows of a rubber mallet. Close and adjust the position of the door. Then carefully open the door and tighten both screws of the locking wedge with a force of 10 Nm. For better control of the wedge displacement, outline the locking wedge with a felt-tip pen.

If the door does not close because the locking wedge does not latch properly, place spacer washers underneath, see Fig. K-4830.

If the door fits perfectly in the closed position, tighten the hinge bolts to 25 Nm.
This article is available at: russian, bulgarian, belarusian, ukrainian, serbian, croatian, romanian, polish, slovak, hungarian
This article was reviewed by: Dmitry Vasiliev
Share with friends:
◀ Previous
Lancer 3 and 5: Exterior (external elements)
Next ▶

Removal and installation the cladding of the water collection compartment
Removal and installation/adjustment of the tailgate
Removal and installation/adjustment of the engine compartment hood
Removal and installation front fenders
Removal and installation side molding
Removal and installation door trim
Removal and installation / adjustment of door window glass / window lifter
Removal and installation a door handle / door lock
Car painting
Repairing damage from stone impacts
Similar materials for other Mitsubishi models

➤ Doors — adjustment Mitsubishi Colt 4 and 5 (1991-2003)
➤ Removal, installation and adjustment of the side doors Mitsubishi Galant 6 and 7 (1987-1998)
➤ Transfer case adjustment parameters Mitsubishi L200 4 (2005-2014, diesel)
➤ Locking and unlocking doors Mitsubishi Outlander 1 (2003-2008)
➤ Front seat adjustment Mitsubishi Pajero 1 and 2 (1982-1999)
➤ Front seat adjustment Mitsubishi Carisma (1995-2004)
Link in different formats to this article
Comments and feedback from visitors
No comments yet


Add up two numbers 12 + 29


Lancer 9 (2000-2007, petrol) 
  • General information
  • User manual
  • Maintenance
  • Power unit
  • Repair of MPI engines
  • Repair of GDI engines
  • Engine overhaul
  • Cooling and lubrication system
  • MPI fuel injection system
  • GDI fuel injection system
  • Intake and exhaust system
  • Starting and charging system
  • Transmission
  • Automatic gearbox
  • Variator (CVT)
  • Drive shafts and gearbox
  • Chassis and running gear
  • Front suspension
  • Rear suspension
  • Steering
  • Brake system
  • Body and interior
  • Doors, locks and windows
  • Exterior (external elements)
  • Interior (internal elements)
  • Electrical equipment
  • Heater and air conditioner
  • Security system SRS
  • Equipment and devices
  • Wiring diagrams (saloon)
  • Wiring diagrams (wagon)
Lancer 3 and 5 (1984-1992) 
  • General information
  • Maintenance
  • Power unit
  • Engine repair
  • Lubrication system
  • Cooling system
  • Ignition system
  • Fuel system
  • Carburetor
  • Fuel injection
  • Diesel power system
  • Exhaust system
  • Transmission
  • Clutch
  • Car gearbox
  • Chassis and running gear
  • Front suspension
  • Rear suspension
  • Steering
  • Brake system
  • Wheels and tires
  • Body and interior
  • Exterior (external elements)
  • Interior (internal elements)
  • Heating system
  • Electrical equipment
  • Equipment and devices
  • Power devices
  • Electrical circuits
MitsubishiMan.ru © 2018–2026 • Mobile version • Articles about Mitsubishi • Contacts • Sitemap: EN BG BY UA RS HR RO PL SK HU • Site search • Bookmark
Colt 2 and 3 (1983-1993) · Colt 4 and 5 (1991-2003) · Colt 5 (1995-2003) · Lancer 3 and 5 (1984-1992) · Lancer 9 (2000-2007) · Galant 5 (1983-1989) · Galant 6 and 7 (1987-1998) · L200 4 (2005-2014) · Outlander 1 (2003-2008) · Pajero 1 and 2 (1982-1999) · Pajero 4 (2006-2021) · Carisma (1995-2004) · Space Star (1998-2005) ·
This resource sets cookies 🍪 to avoid bothering you with repeated data entry.