
English Русский
Български
Беларускі
Український
Српски
Hrvatski
Română
Polski
Slovenský
Magyar
Articles Bookmark Contacts Sitemap   
Company Audi Company Ford Company Hyundai Company Kia Company Mazda Company Mercedes-Benz Company Nissan
MitsubishiMan.ru


Home Colt Lancer Galant L200 Outlander Pajero Others
Lancer 9 (2000-2007, petrol) Lancer 3 and 5 (1984-1992)

Replacing the working fluid in a variator or automatic transmission (Mitsubishi Lancer 9)

  • Home
  • Lancer
  • 9 (2000-2007, petrol)
  • General information
  • Maintenance
  • Replacing the working fluid in a variator or automatic transmission
0
Note:
  • (CVT fluid replacement) Jatco, the CVT manufacturer, does not specify the need to replace the CVT fluid, since its use is designed for the entire service life of the gearbox. However, given the operation in the CIS countries, it is recommended to replace the CVT fluid under normal operating conditions every 40,000 - 60,000 km. When operating under severe conditions, it is recommended to reduce the intervals for replacing the fluid.
  • This procedure is carried out only if there is no special device for draining the working fluid.


Attention: when replacing or overhauling the CVT or automatic transmission, it is necessary to clean the working fluid cooler lines and replace the working fluid in the CVT or automatic transmission.


1. Disconnect the hose shown in the figure, connecting the CVT/AT and the working fluid cooler built into the radiator of the cooling system.
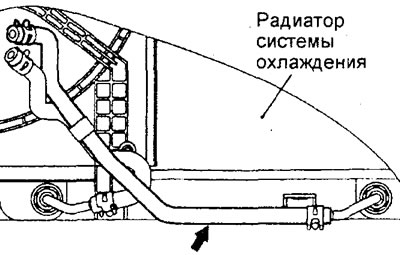


2. Start the engine and drain the working fluid through the hose when the engine is idling and the CVT or automatic transmission selector lever is in the "N" position.

Note: After starting, let the engine run for no more than 1 minute. If the working fluid drains before this point, stop the engine immediately.


The volume of drained working fluid is approximately 3.5 l

3. Unscrew the drain plug on the bottom of the variator or automatic transmission housing and let the working fluid drain into the prepared container.

The volume of drained working fluid is approximately 2.0 l
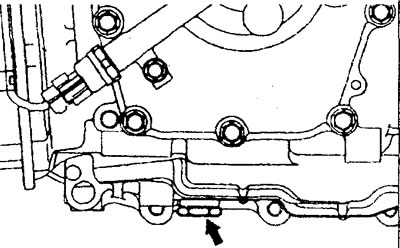


Variator.
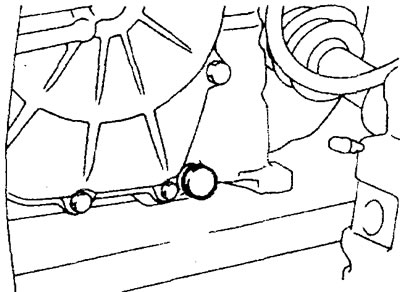


Automatic transmission


4. Install the drain plug with a new gasket and tighten the plug to the specified torque.

Tightening torque - 32 +2 Nm

5. Fill the CVT or automatic transmission with fresh working fluid (ATF) through the guide tube of the working fluid level dipstick.

Recommended working fluid - DiaQueen ATF SP-III or equivalent

Filling volume: approximately 5.5 l

Attention: stop pouring working fluid into the variator or automatic transmission if it is impossible to fill the volume specified above.


6. Repeat the procedure in point "2". Note: drain at least 8 liters (CVT) or 7 liters (AT) through the cooler hose of the working fluid when performing the procedures in points "2" and "6". Then drain some more working fluid and check for signs of contamination of the working fluid. If the working fluid is contaminated, repeat the operations in points "5" - "6".

7. Fill with fresh working fluid through the guide tube of the working fluid level dipstick.

Filling volume: approximately 3.5 l

8. Connect the CVT or automatic transmission fluid cooler hose (disconnected in step "1"), clean the dipstick and its installation location from dirt, then securely insert the dipstick into place.

9. Start the engine and let it idle for one to two minutes.

10. Move the CVT or automatic transmission selector through all positions, then set it to the "N" position.

11. Make sure that the working fluid level is at the "COLD" mark on the working fluid level dipstick. If the level is below this mark, add the required amount of working fluid.
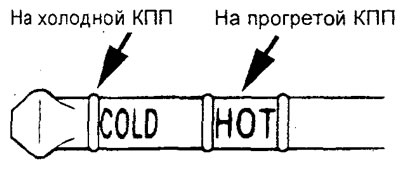


12. Drive the car until the working fluid (ATF) in the CVT or automatic transmission reaches normal operating temperature (70 - 80°C), then recheck the working fluid level. The working fluid level should be within the "HOT" range.


Total filling capacity:
  • Variator - 8.1 l
  • Automatic transmission - 7.7 l

Note:
  • The "COLD" mark on the working fluid level dipstick is for reference only. Always check the working fluid level in the variator or automatic transmission in the "HOT" range on a warmed-up variator or warmed-up automatic transmission.
  • It is recommended to read the temperature of the working fluid (ATF) using the MUT-II tester.


13. If the working fluid level is above the "HOT" range of the dipstick, drain the excess working fluid through the drain plug. If the working fluid level is below the "HOT" range of the dipstick, add working fluid to the variator or automatic transmission.

14. Insert the fluid level dipstick securely into its guide tube.
This article is available at: russian, bulgarian, belarusian, ukrainian, serbian, croatian, romanian, polish, slovak, hungarian
This article was reviewed by: Arseny Pavlov
Share with friends:
◀ Previous
Lancer 9: Maintenance
Next ▶

Checking the condition and level of the working fluid in the variator or automatic transmission
Transfer Case Oil Change (4WD Models)
Checking the Transfer Case Oil Level (4WD Models)
Checking the fluid level in the power steering reservoir
Checking the brake fluid level
Cleaning the CVT or automatic transmission fluid cooler lines
Checking the oil level in the rear differential housing (4WD models)
Changing the oil in the rear differential housing (4WD models)
Checking the washer fluid level
Air conditioning system refill
Similar materials for other Mitsubishi models

➤ Checking the fluid level in the automatic transmission Mitsubishi Colt 2 and 3 (1983-1993)
➤ Replacing the working fluid and filter of the automatic… Mitsubishi Galant 5 (1983-1989, petrol)
➤ Flushing the automatic transmission fluid cooling lines Mitsubishi L200 4 (2005-2014, diesel)
➤ Checking the fluid level in the automatic transmission… Mitsubishi Outlander 1 (2003-2008)
➤ Automatic transmission fluid level Mitsubishi Pajero 1 and 2 (1982-1999)
➤ Automatic transmission fluid (ATF) Mitsubishi Carisma (1995-2004)
Link in different formats to this article
Comments and feedback from visitors
No comments yet


Add up two numbers 15 + 24


Lancer 9 (2000-2007, petrol) 
  • General information
  • User manual
  • Maintenance
  • Power unit
  • Repair of MPI engines
  • Repair of GDI engines
  • Engine overhaul
  • Cooling and lubrication system
  • MPI fuel injection system
  • GDI fuel injection system
  • Intake and exhaust system
  • Starting and charging system
  • Transmission
  • Automatic gearbox
  • Variator (CVT)
  • Drive shafts and gearbox
  • Chassis and running gear
  • Front suspension
  • Rear suspension
  • Steering
  • Brake system
  • Body and interior
  • Doors, locks and windows
  • Exterior (external elements)
  • Interior (internal elements)
  • Electrical equipment
  • Heater and air conditioner
  • Security system SRS
  • Equipment and devices
  • Wiring diagrams (saloon)
  • Wiring diagrams (wagon)
Lancer 3 and 5 (1984-1992) 
  • General information
  • Maintenance
  • Power unit
  • Engine repair
  • Lubrication system
  • Cooling system
  • Ignition system
  • Fuel system
  • Carburetor
  • Fuel injection
  • Diesel power system
  • Exhaust system
  • Transmission
  • Clutch
  • Car gearbox
  • Chassis and running gear
  • Front suspension
  • Rear suspension
  • Steering
  • Brake system
  • Wheels and tires
  • Body and interior
  • Exterior (external elements)
  • Interior (internal elements)
  • Heating system
  • Electrical equipment
  • Equipment and devices
  • Power devices
  • Electrical circuits
MitsubishiMan.ru © 2018–2026 • Mobile version • Articles about Mitsubishi • Contacts • Sitemap: EN BG BY UA RS HR RO PL SK HU • Site search • Bookmark
Colt 2 and 3 (1983-1993) · Colt 4 and 5 (1991-2003) · Colt 5 (1995-2003) · Lancer 3 and 5 (1984-1992) · Lancer 9 (2000-2007) · Galant 5 (1983-1989) · Galant 6 and 7 (1987-1998) · L200 4 (2005-2014) · Outlander 1 (2003-2008) · Pajero 1 and 2 (1982-1999) · Pajero 4 (2006-2021) · Carisma (1995-2004) · Space Star (1998-2005) ·
This resource sets cookies 🍪 to avoid bothering you with repeated data entry.