
Share with friends:
Vehicle Maintenance Mitsubishi L200 4

General recommendations for maintenance work
1. When carrying out maintenance or repair work on the car (to avoid dirt and damage to the paintwork of the body) cover seats and body parts with protective covers. 2....
1. When carrying out maintenance or repair work on the car (to avoid dirt and damage to the paintwork of the body) cover seats and body parts with protective covers. 2....
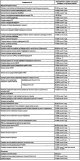
Maintenance interval
Maintenance interval *3 - normal operating conditions; *2 - severe operating conditions; *3 - quality standards for the used oil according to ACEA or API classification:...
Maintenance interval *3 - normal operating conditions; *2 - severe operating conditions; *3 - quality standards for the used oil according to ACEA or API classification:...

Checking and adjusting the tension of the auxiliary drive belts
Inspect the belts and make sure there are no mechanical damages (cracks, breaks, cord delamination, etc.) and excessive wear. If the V-belt slips on the pulleys with a...
Inspect the belts and make sure there are no mechanical damages (cracks, breaks, cord delamination, etc.) and excessive wear. If the V-belt slips on the pulleys with a...

Checking and adjusting the tension of the V-belt drive of the air conditioning compressor
Checking the belt tension by vibration frequency using a frequency tester and a measuring microphone. Checking the belt tension by vibration frequency with the...
Checking the belt tension by vibration frequency using a frequency tester and a measuring microphone. Checking the belt tension by vibration frequency with the...

Checking the V-ribbed belt for the generator drive and steering pump
Turn the crankshaft clockwise (one or more times) and make sure that the mark on the tensioner is within the zone «A», as it shown on the picture. Otherwise, the belt...
Turn the crankshaft clockwise (one or more times) and make sure that the mark on the tensioner is within the zone «A», as it shown on the picture. Otherwise, the belt...

Inspection of the hoses of the lubrication system and the vacuum pump
1. Inspect the surface of the hose and make sure there are no defects from heat or mechanical damage.
1. Inspect the surface of the hose and make sure there are no defects from heat or mechanical damage.

Inspection of the air intake pipes
1. Inspect the air inlets for cracks or damage.
1. Inspect the air inlets for cracks or damage.

Toothed timing belts
Replacement operations (removal - installation) these belts and adjusting the belt tension «IN» described in chapter « Engine. Mechanical ». The tension of the camshaft...
Replacement operations (removal - installation) these belts and adjusting the belt tension «IN» described in chapter « Engine. Mechanical ». The tension of the camshaft...

Inspection of radiator pipes
Inspect all fittings and clamps, using a mirror if necessary, and make sure there are no coolant leaks.
Inspect all fittings and clamps, using a mirror if necessary, and make sure there are no coolant leaks.

Checking the coolant level
Check that the coolant level in the expansion tank is within the FULL and LOW marks. If the coolant level is low, making sure there are no leaks, add fluid to the FULL...
Check that the coolant level in the expansion tank is within the FULL and LOW marks. If the coolant level is low, making sure there are no leaks, add fluid to the FULL...

Coolant replacement
1. Warm up the engine to operating temperature and shut it off. 2. Carefully open the radiator filler cap and expansion tank cap. If the coolant is heavily contaminated,...
1. Warm up the engine to operating temperature and shut it off. 2. Carefully open the radiator filler cap and expansion tank cap. If the coolant is heavily contaminated,...

Checking and replacing the air filter element
1. Release the housing latches and remove the filter element (1). 2. Inspect the filter element for mechanical damage and severe clogging. 3. If the filter element has...
1. Release the housing latches and remove the filter element (1). 2. Inspect the filter element for mechanical damage and severe clogging. 3. If the filter element has...

Checking the brake fluid levels in the GTZ reservoir and in the clutch cylinder reservoir
1. The liquid level in the tank must be between the marks «MAX» And «MIN». 2. If the level is below the mark «MIN», must be topped up to the mark «MAX». Note: If the...
1. The liquid level in the tank must be between the marks «MAX» And «MIN». 2. If the level is below the mark «MIN», must be topped up to the mark «MAX». Note: If the...

Changing the brake fluid and removing air from the hydraulic brake drive
Filling with GTZ fluid Since the GTZ is not equipped with a check valve, in the absence of brake fluid in it (before bleeding the brake, it is necessary to remove air...
Filling with GTZ fluid Since the GTZ is not equipped with a check valve, in the absence of brake fluid in it (before bleeding the brake, it is necessary to remove air...

Checking the level and density of the battery electrolyte
Make sure the electrolyte level is between the maximum (UPPER LEVEL) and minimum (LOWER LEVEL) level. Top up with distilled water if necessary. Using a hydrometer and...
Make sure the electrolyte level is between the maximum (UPPER LEVEL) and minimum (LOWER LEVEL) level. Top up with distilled water if necessary. Using a hydrometer and...

Fuel filter replacement
1. Unscrew the fuel filler cap (to relieve pressure in the tank). 2. Disconnect water sensor connector and fuel line heater connector (in the presence of). 3. Disconnect...
1. Unscrew the fuel filler cap (to relieve pressure in the tank). 2. Disconnect water sensor connector and fuel line heater connector (in the presence of). 3. Disconnect...

Removal of air from fuel lines
1. Unscrew the plug, close the hole with a cloth and, pressing the manual priming pump, pump the system until fuel begins to flow through the cloth without air bubbles....
1. Unscrew the plug, close the hole with a cloth and, pressing the manual priming pump, pump the system until fuel begins to flow through the cloth without air bubbles....

Removing water from the fuel filter
The presence of iodine in the fuel filter housing is indicated by the glow of the indicator in the instrument cluster. 1. To remove water from the filter, loosen the...
The presence of iodine in the fuel filter housing is indicated by the glow of the indicator in the instrument cluster. 1. To remove water from the filter, loosen the...

Inspection of front and rear suspension components
During an external inspection of the suspension, attention should be paid to the condition of the elements on which traffic safety depends. First of all, these are wheel...
During an external inspection of the suspension, attention should be paid to the condition of the elements on which traffic safety depends. First of all, these are wheel...

Checking the condition of ball joints and anthers
Check the condition of the ball joints by shaking the wheel manually in the direction of the arrows, as shown in the figures. At the same time, there should be no...
Check the condition of the ball joints by shaking the wheel manually in the direction of the arrows, as shown in the figures. At the same time, there should be no...

Lubrication of universal joint shafts
The crosses are lubricated with a syringe through grease fittings with general purpose grease. Checking the condition of the anthers of the drive shafts Check the...
The crosses are lubricated with a syringe through grease fittings with general purpose grease. Checking the condition of the anthers of the drive shafts Check the...

Steering check
By swinging the steering wheel left and right, make sure that there are no knocks in the steering mechanism, in the steering rod joints and in the integrity of the...
By swinging the steering wheel left and right, make sure that there are no knocks in the steering mechanism, in the steering rod joints and in the integrity of the...

Checking the oil level in the manual transmission and transfer case (4WD)
Inspect the manual transmission and transfer case for oil leaks. After unscrewing the filler plug, check the level and condition of the oil (no pollution and metal...
Inspect the manual transmission and transfer case for oil leaks. After unscrewing the filler plug, check the level and condition of the oil (no pollution and metal...

Oil change in manual transmission and transfer case (4WD)
Note: change the oil when the engine is warmed up to operating temperature, placing the car on a horizontal section. The manufacturer recommends using gear oil of the...
Note: change the oil when the engine is warmed up to operating temperature, placing the car on a horizontal section. The manufacturer recommends using gear oil of the...

Checking the oil level in the crankcase of the front (4WD) and rear axle gearbox
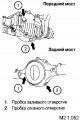
For final drive gearboxes, the manufacturer recommends using gear oil of GL-5 or higher API classification. SAE Viscosity: at ambient temperature above 10°C - SAE90W; at...
For final drive gearboxes, the manufacturer recommends using gear oil of GL-5 or higher API classification. SAE Viscosity: at ambient temperature above 10°C - SAE90W; at...
Changing the oil in the crankcase of the front (4WD) and rear axle gearbox
Having installed a suitable container under the axle housing, first unscrew the filler and then the drain plugs and drain all the oil. Screw in the drain plug,...
Having installed a suitable container under the axle housing, first unscrew the filler and then the drain plugs and drain all the oil. Screw in the drain plug,...
Exhaust system check
1. Make sure that the exhaust pipes of the system do not touch any structural elements of the vehicle. 2. Check the exhaust pipes for damage from stones, curbs, etc. 3....
1. Make sure that the exhaust pipes of the system do not touch any structural elements of the vehicle. 2. Check the exhaust pipes for damage from stones, curbs, etc. 3....

Checking the free play of the brake pedal
The free play of the brake pedal is checked with the vacuum brake booster not working (To do this, press the brake pedal several times with the engine off). The free...
The free play of the brake pedal is checked with the vacuum brake booster not working (To do this, press the brake pedal several times with the engine off). The free...
Checking and adjusting the free play of the clutch pedal
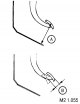
free running (IN) clutch pedal, caused by the gap in the connection of the pedal and the rod, should be within 1-3 mm. Pedal Height (distance A) should be between...
free running (IN) clutch pedal, caused by the gap in the connection of the pedal and the rod, should be within 1-3 mm. Pedal Height (distance A) should be between...

Checking and adjusting the travel of the lever or pull rod of the parking brake
Checking the travel of the lever or pull rod of the parking brake Tighten lever (cravings) to the stop with a force of 200 N (20 kg), and count the number of clicks of...
Checking the travel of the lever or pull rod of the parking brake Tighten lever (cravings) to the stop with a force of 200 N (20 kg), and count the number of clicks of...
Tire wear and wheel alignment monitoring
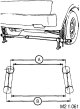
Tire wear monitoring Check the wheel tires for even wear. The presence of uneven wear may be due to a malfunction of the steering rods, improper adjustment of the wheel...
Tire wear monitoring Check the wheel tires for even wear. The presence of uneven wear may be due to a malfunction of the steering rods, improper adjustment of the wheel...

Checking the front and rear wheel bearings
Front wheel bearings 1. Remove the front wheel brake caliper and hang it out of the way. 2. Remove the brake disc from the hub. 3. Install a dial gauge and measure the...
Front wheel bearings 1. Remove the front wheel brake caliper and hang it out of the way. 2. Remove the brake disc from the hub. 3. Install a dial gauge and measure the...

Check brake pads and brake discs for wear
Check the thickness of the brake pads through the inspection hole. Normal thickness value: 9.5 mm, minimum allowable thickness: 1.5 mm. The pads should be replaced as a...
Check the thickness of the brake pads through the inspection hole. Normal thickness value: 9.5 mm, minimum allowable thickness: 1.5 mm. The pads should be replaced as a...

Checking the thickness of the rear drum brake pads and the brake drum
The place for measuring the thickness of the pads is shown in the figure. Normal thickness value (A): 5.0 mm. The minimum allowable thickness of the overlays: 1.0 mm....
The place for measuring the thickness of the pads is shown in the figure. Normal thickness value (A): 5.0 mm. The minimum allowable thickness of the overlays: 1.0 mm....

Checking the condition of the fuel lines
Figure M2 1.075 shows the locations of the fuel lines in the vehicle. Fuel lines with external damage. signs of aging of the material, as well as fuel leakage, must be...
Figure M2 1.075 shows the locations of the fuel lines in the vehicle. Fuel lines with external damage. signs of aging of the material, as well as fuel leakage, must be...

Checking the fluid level in the automatic transmission
1. The automatic transmission should be warmed up by driving the car until the fluid temperature reaches 70-80°C. 2. Install the car on a horizontal platform. 3....
1. The automatic transmission should be warmed up by driving the car until the fluid temperature reaches 70-80°C. 2. Install the car on a horizontal platform. 3....

Fluid change in automatic transmission
Fluid type Amount of liquid Note DIA QUEEN ATF SP III 9,7 L R4A5A, V4A5A In the absence of a special device for changing the fluid in the automatic transmission, the...
Fluid type Amount of liquid Note DIA QUEEN ATF SP III 9,7 L R4A5A, V4A5A In the absence of a special device for changing the fluid in the automatic transmission, the...
Flushing the automatic transmission fluid cooling lines
1. Disconnect the tube connecting the oil cooler to the automatic transmission. 2. Start the engine. This will drain the liquid. Conditions for draining liquid Gear...
1. Disconnect the tube connecting the oil cooler to the automatic transmission. 2. Start the engine. This will drain the liquid. Conditions for draining liquid Gear...

Changing engine oil and oil filter
1. Start the engine and warm it up to a temperature between 80°C and 90°C. 2. Remove the oil filler cap. 3. Remove the drain plug from the oil pan. 4. After draining the...
1. Start the engine and warm it up to a temperature between 80°C and 90°C. 2. Remove the oil filler cap. 3. Remove the drain plug from the oil pan. 4. After draining the...

Valve clearance adjustment
Clearance adjustment is carried out on a cold engine in two steps. The first measurement and adjustment of the gaps is made when the piston of the first cylinder is...
Clearance adjustment is carried out on a cold engine in two steps. The first measurement and adjustment of the gaps is made when the piston of the first cylinder is...
This section is available on: russian, bulgarian, belarusian, ukrainian, serbian, croatian, romanian, polish, slovak, hungarian
Similar materials for other Mitsubishi models
➤ General information: Maintenance Mitsubishi Colt 2 and 3 (1983-1993)
➤ General information: Maintenance Mitsubishi Lancer 3 and 5 (1984-1992)
➤ General information: Maintenance Mitsubishi Galant 6 and 7 (1987-1998)
➤ General information: Maintenance Mitsubishi Pajero 1 and 2 (1982-1999)
➤ General information: Maintenance Mitsubishi Carisma (1995-2004)
Link in different formats to this section
TEXTHTMLBB Code
- General information
- User manual
- Maintenance
- Power unit
- Diesel engine
- Lubrication system
- Fuel system
- Control system
- Transmission
- Clutch
- Mechanical gearbox
- Transfer case
- Front axle
- Rear axle
- Chassis and running gear
- Car suspension
- Steering
- Brake system
- Body and interior
- Exterior (external elements)
- Interior (internal elements)
- Doors, locks and windows
- Electrical equipment
- Equipment and devices
- Electrical circuits
MitsubishiMan.ru © 2018–2024 • Mobile version • Articles about Mitsubishi • Contacts • Sitemap: EN BG BY UA RS HR RO PL SK HU • Site search • Bookmark
Colt 2 and 3 (1983-1993) · Colt 4 and 5 (1991-2003) · Colt 5 (1995-2003) · Lancer 3 and 5 (1984-1992) · Lancer 9 (2000-2007) · Galant 6 and 7 (1987-1998) · L200 4 (2005-2014) · Outlander 1 (2003-2008) · Pajero 1 and 2 (1982-1999) · Carisma (1995-2004) · Space Star (1998-2005) ·
Colt 2 and 3 (1983-1993) · Colt 4 and 5 (1991-2003) · Colt 5 (1995-2003) · Lancer 3 and 5 (1984-1992) · Lancer 9 (2000-2007) · Galant 6 and 7 (1987-1998) · L200 4 (2005-2014) · Outlander 1 (2003-2008) · Pajero 1 and 2 (1982-1999) · Carisma (1995-2004) · Space Star (1998-2005) ·