
English Русский
Български
Беларускі
Український
Српски
Hrvatski
Română
Polski
Slovenský
Magyar
Articles Bookmark Contacts Sitemap   
Company Audi Company Ford Company Hyundai Company Kia Company Mazda Company Mercedes-Benz Company Nissan
MitsubishiMan.ru


Home Colt Lancer Galant L200 Outlander Pajero Others
Carisma (1995-2004) Space Star (1998-2005)

Checking and adjusting the rear wheel alignment angles (Mitsubishi Space Star)

  • Home
  • Mitsubishi
  • Space Star (1998-2005)
  • Chassis and running gear
  • Suspension and drive shafts
  • Checking and adjusting the rear wheel alignment angles
0
Contents: Convergence ⤓ Collapse ⤓
  • Place the vehicle on a level, horizontal surface and measure the rear wheel alignment angles.
  • Before measuring, the elements and parts of the rear wheel suspension must be brought to normal technical condition.

Convergence


  • If the toe-in value is not within the nominal value, adjust it as follows:
  • Before adjusting the toe, adjust the camber.
  • Adjust the rear wheel alignment by turning the adjusting bolt (the mounting bolt on the inside of the suspension adjusting arm) (Fig. 14.48).
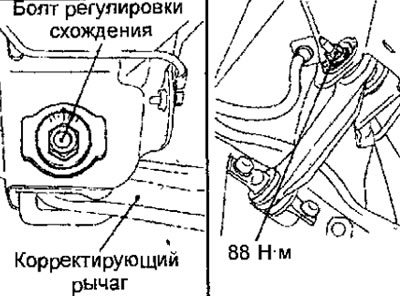


Fig. 14.48. Location of rear wheel alignment bolt


Left side: turning the bolt clockwise increases the toe-in.

Right side: turning the bolt clockwise will decrease the toe-in.

One division of the scale corresponds to a movement of approximately 2.6 mm, which is equivalent to a toe angle of one wheel of 0°16'.

Collapse


Camber: - 0°40' ±30'

The difference between the left and right wheels: no more than 30'

Note: On vehicles with aluminum wheels, measure the camber on each wheel using the special tool MB991004, tightening it to a torque of 180 N·m.

  • If the rear wheel camber is not within the specified value, adjust it as follows.
  • Disconnect the adjuster arm from the rear suspension trailing arm.
  • Adjust the camber by turning the adjusting bolt (the bolt that secures the lower arm to the rear cross member) (Fig. 14.49).
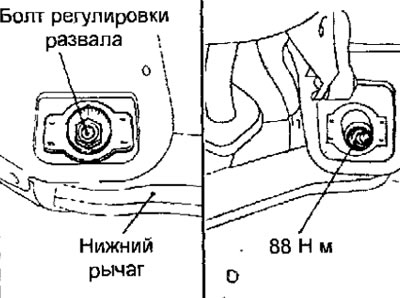


Fig. 14.49. Location of rear wheel camber adjustment bolt


Left wheel: turning clockwise increases camber.

Right wheel: turning clockwise decreases camber.

One division of the scale is approximately equal to 0°14'
  • Tighten the bolts securing the adjusting lever to the trailing arm to a torque of 34 Nm (Fig. 14.50).
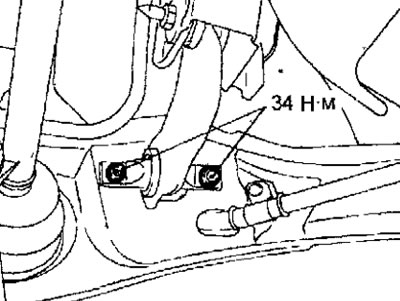


Fig. 14.50. Location of bolts securing the adjusting lever to the trailing arm


(The article is reprinted from a web resource: «MitsubishiMan.ru»)
  • After adjusting the camber, be sure to adjust the rear wheel toe.
This article is available at: russian, bulgarian, belarusian, ukrainian, serbian, croatian, romanian, polish, slovak, hungarian
This article was reviewed by: Miroslav Rakov
Share with friends:
◀ Previous
Space Star: Suspension and drive shafts
Next ▶

Rear suspension
Repair of drive shafts
Drive shafts
Anti-roll bar
Lower control arm of the front suspension
Checking the rear wheel hub play
Checking the force required to turn the rear wheel hub
Rear wheel hub
Adjustable, upper and lower rear suspension arms
Replacing the lower arm bushing
Similar materials for other Mitsubishi models

➤ Checking and adjusting the rear wheel alignment angles Mitsubishi Colt 5 (1995-2003, petrol)
➤ Checking and adjusting the rear wheel alignment angles Mitsubishi Lancer 9 (2000-2007, petrol)
➤ Checking, lubricating and adjusting rear wheel bearings… Mitsubishi Galant 5 (1983-1989, petrol)
➤ Checking the front and rear wheel hub bearings Mitsubishi L200 4 (2005-2014, diesel)
➤ Checking the oil level in the front and rear axle… Mitsubishi Outlander 1 (2003-2008)
➤ Checking and adjusting the front wheel alignment angles Mitsubishi Pajero 4 (2006-2021)
Link in different formats to this article
Comments and feedback from visitors
No comments yet


Add up two numbers 12 + 30


Carisma (1995-2004) 
  • General information
  • User manual
  • Maintenance
  • Power unit
  • Petrol engines 4G9
  • Diesel engines FBQT
  • Diesel engines F9Q
  • Cooling system
  • Injection system (MPI)
  • Injection system (GDI)
  • Engine electrical equipment
  • Transmission
  • Clutch
  • Mechanical gearbox
  • Automatic gearbox
  • Chassis and running gear
  • Steering
  • Brake system
  • Front suspension and shafts
  • Rear suspension
  • Body and interior
  • Exterior (external elements)
  • Interior (internal elements)
  • Doors, locks and windows
  • Air conditioner
  • Electrical equipment
  • Equipment and devices
  • Headlights and lighting
  • Electrical circuits
Space Star (1998-2005) 
  • General information
  • User manual
  • Maintenance
  • Power unit
  • Petrol engines 4G9
  • Petrol engines 4G1
  • Diesel engines F9Q1
  • Cooling system
  • Fuel injection system GDI
  • Fuel injection system MPI
  • Diesel supply system F9Q1
  • Ignition system
  • Diesel preheating
  • Transmission
  • Clutch
  • Mechanical gearbox
  • Automatic gearbox
  • Chassis and running gear
  • Suspension and drive shafts
  • Brake system
  • Steering
  • Body and interior
  • Exterior (external elements)
  • Interior (internal elements)
  • Doors, locks and windows
  • Heating and air conditioning
  • Electrical equipment
  • Power devices
  • Equipment and devices
MitsubishiMan.ru © 2018–2026 • Mobile version • Articles about Mitsubishi • Contacts • Sitemap: EN BG BY UA RS HR RO PL SK HU • Site search • Bookmark
Colt 2 and 3 (1983-1993) · Colt 4 and 5 (1991-2003) · Colt 5 (1995-2003) · Lancer 3 and 5 (1984-1992) · Lancer 9 (2000-2007) · Galant 5 (1983-1989) · Galant 6 and 7 (1987-1998) · L200 4 (2005-2014) · Outlander 1 (2003-2008) · Pajero 1 and 2 (1982-1999) · Pajero 4 (2006-2021) · Carisma (1995-2004) · Space Star (1998-2005) ·
This resource sets cookies 🍪 to avoid bothering you with repeated data entry.