



Removal
Warning: Parts marked with * in Figure 14.63 must be pre-tightened and final tightened after the vehicle has been lowered onto its wheels in an unloaded condition.
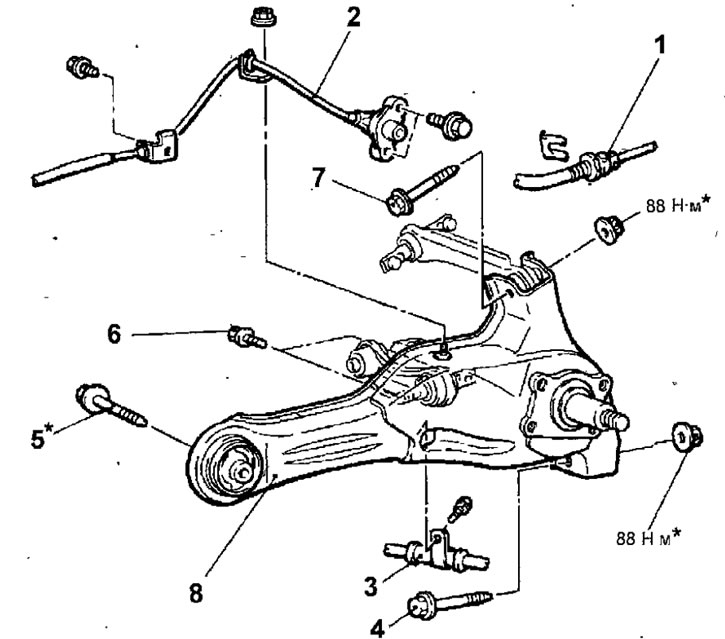
Fig. 14.63. Rear suspension trailing arm:1 - brake hose; 2 - rear wheel speed sensor (cars with ABS); 3 - parking brake cable; 4 - bolt connecting the lower and longitudinal arms; 5 - bolt for fastening the longitudinal arm to the body, 88 N·m; 6 - bolt connecting the adjusting lever and the longitudinal lever, 34 N·m; 7 - bolt connecting the upper arm and the longitudinal arm; 8 - Rear suspension trailing arm
- Raise the rear of the vehicle and support it on jack stands. Remove the appropriate rear wheel.
- Remove the rear drum brake.
- Remove the rear wheel hub.
- When removing the rear suspension trailing arm, move the lift arm closer to the front of the vehicle so that it does not interfere with the operation (Fig. 14.62).
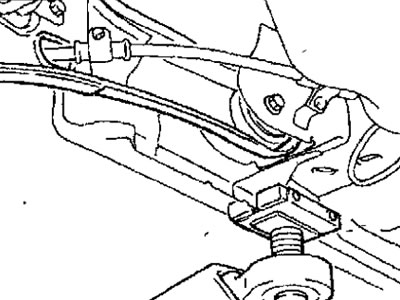
Fig. 14.62. Position of the lift paw when removing the rear suspension trailing arm
- Remove the spring clip and disconnect the brake hose from the lever (Fig. 14.63).
- On a vehicle with ABS, remove the 2 bolts and rear wheel speed sensor.
- Remove the bolt and disconnect the parking brake cable.
- Place a jack under the lower arm of the rear suspension (Fig. 14.64).
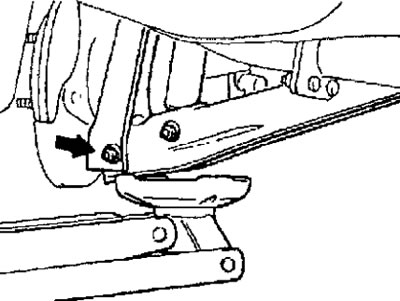
Fig. 14.64. Installing the jack under the lower arm of the rear suspension and positioning the bolt for fastening the lower and longitudinal arms
- Loosen the nut and remove the bolt connecting the lower and longitudinal arms.
- Loosen the nut and remove the bolt securing the trailing arm to the body.
- Unscrew and remove the bolts connecting the adjusting lever and the longitudinal lever.
- Loosen the nut and remove the bolt securing the upper arm to the trailing arm.
- Remove the rear suspension trailing arm.
- Using special tools, press out the bushing from the trailing arm (Fig. 14.65).
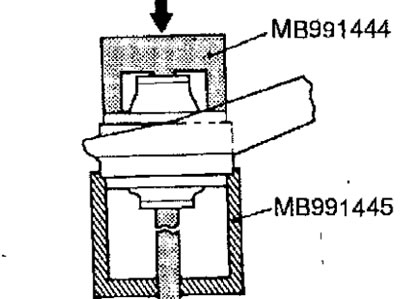
Fig. 14.65. Using special tools to press out the bushing from the rear suspension trailing arm
Examination
- Check the trailing arm for cracks and deformation.
- Check the bushings for cracks, wear and damage.
Installation
- Installation is carried out in the reverse order of removal, taking into account the following.
- Correctly orient and position the trailing arm bushing.
- Position the long, exposed edge of the trailing arm inner bushing tube so that it faces the inside of the vehicle (Fig. 14.66).
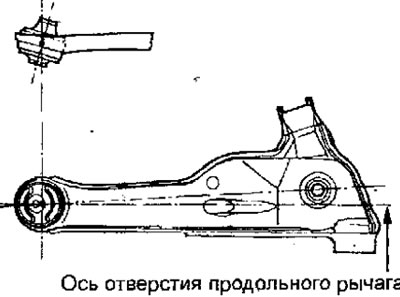
Fig. 14.66. When installing, the long protruding edge of the inner tube of the trailing arm bushing should be directed towards the inside of the vehicle
- Install the trailing arm bushing so that the bushing axis aligns with the longitudinal arm bore axis.
- Using special tools, press the bushing into the trailing arm (Fig. 14.67).
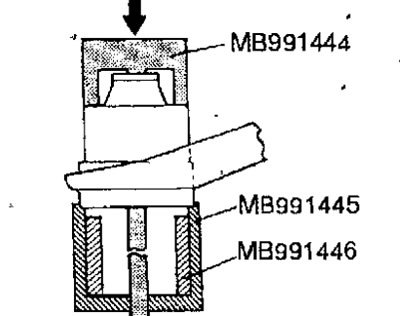
Fig. 14.67. Using special tools to press the bushing into the rear suspension trailing arm
- Install the rear wheel hub.
- Install the rear drum brake.