



Contents: Removal ⤓ Installation ⤓
Removal
- Remove the front bumper.
- Open the hood and place a clean rag under the corners of the hood to protect the vehicle's paintwork when removing the hood.
- Remove the bolts, disconnect the cable and remove the hood lock (Fig. 17.1)
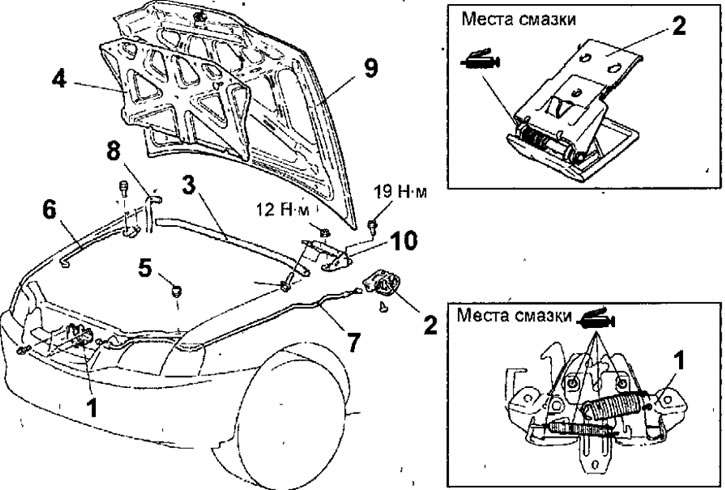
Fig. 17.1. Hood fastening elements: 1 - hood lock; 2 - hood lock release handle; 3 - hood seal; 4 - hood soundproofing (car with 4G9 engine); 5 - rubber buffer; 6 - hood stop; 7 - hood lock release cable; 8 - Windshield washer hose; 9 - hood; 10 - hood hinge
- In the car interior, unscrew the screws, disconnect the cable from the handle and the cable sheath from the bracket, then the hood release handle.
- Remove the hood seal by pulling it up.
- On a vehicle with a 4G9 engine, remove the hood sound insulation.
- Turn out the rubber buffers.
- Remove the bolts and hood support.
- Disconnect the windshield washer hose.
- Use a marker to mark the position of the hinges on the hood.
- Have an assistant support the hood, then remove the left and right hood hinge bolts and carefully remove the hood.
- Remove the bolts and hood hinges.
- If you need to remove the hood release cable, first remove the mudguard (on the driver's side). Using a screwdriver blade as a lever, release the clamps and remove the cable.
- Remove the cable sealing ring from the engine compartment bulkhead and remove the cable into the engine compartment.
Installation
- Installation is carried out in the reverse order of removal, taking into account the following.
- Before installing the lock and the hood release handle, apply consistent grease to their moving parts.
- If new parts are to be installed.
- Close the hood and check its position relative to adjacent surfaces. Adjust the hood position so that when the hood is closed, the gap around the hood perimeter is the same on all sides. To adjust, loosen the hood hinge mounting bolts and, moving the hood, adjust its position (Fig. 17.2). To adjust the front of the hood in height, screw in or unscrew the rubber buffers.
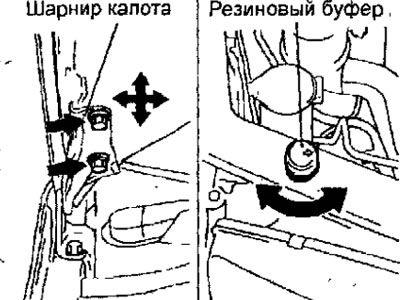
Fig. 17.2. Adjusting the clearance around the perimeter and height of the hood
- Adjust the cable so that there is a slight slack in the cable when the hood release lever is released. Check that the hood lock opens when an assistant pulls the hood release lever.
- By moving the hood lock in a vertical or horizontal plane, adjust its position (Fig. 17.3).
(The article was obtained from this portal: «MitsubishiMan.ru»)
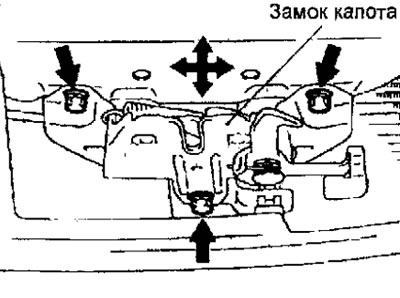
Fig. 17.3. Directions of movement when adjusting the position of the hood lock