Contents: Removal and installation ⤓ Examination ⤓
Removal and installation
Note: Removal of the steering column combination switch is described in the chapter "Steering".
Before you begin removing parts, remove the rear window washer motor assembly and the washer reservoir assembly.
The parts are removed in the order of the numbers shown in the figure "Removing the rear door windshield wiper and washer".
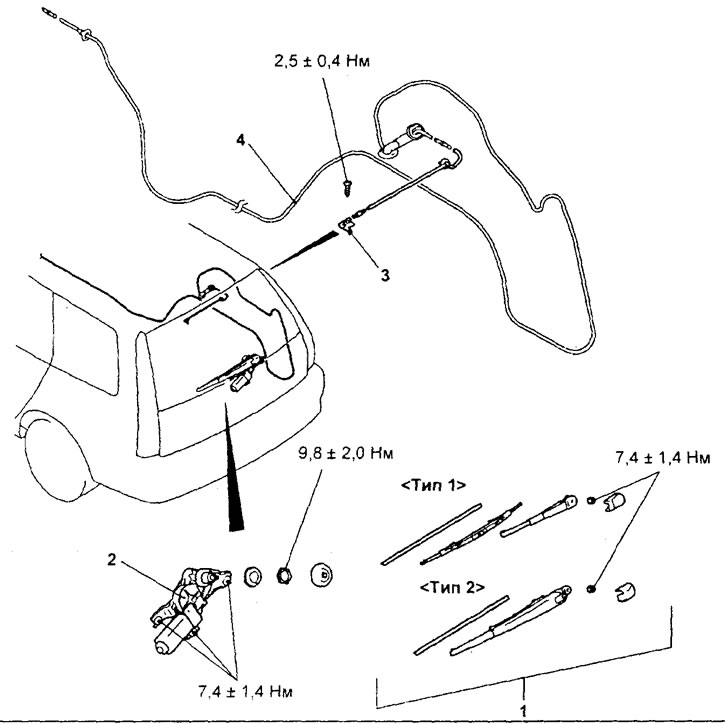
Removal the rear door windshield wiper and washer. 1 - windshield wiper arm and blade assembly (remove rear door trim and waterproof film), 2 - rear door windshield wiper motor assembly (remove additional brake light), 3 - nozzle (remove front and rear side door sill trim, front side interior trim, rear pillar trim, rear body side trim and rear seat assembly), 4 - washer hose.
Installation of parts is carried out in the reverse order of removal.
When installing the parts, pay attention to the installation operation of the wiper blade arm and the wiper blade assembly.
Before installing the wiper arm and blade assembly, operate the wiper motor so that the motor stops at the automatic stop position. Install the wiper arm and blade assembly and adjust the position of the blade assembly so that the automatic stop position corresponds to the rated value "A".
Nominal value "A" - 42 ±5 mm
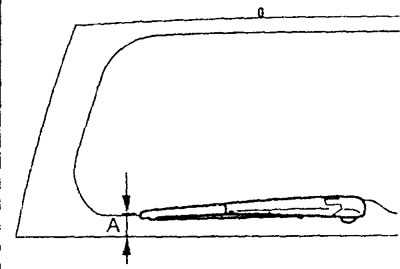
After completing the installation of the parts, install the rear window washer motor assembly and the washer reservoir assembly.
Examination
1. Checking the rear door windshield wiper motor on the vehicle.
a) Disconnect the wiring harness connector from the electric motor.
b) To check the operation of the windshield wiper motor, connect the wires from the battery terminals to the terminals of the windshield wiper motor as shown in the figure.
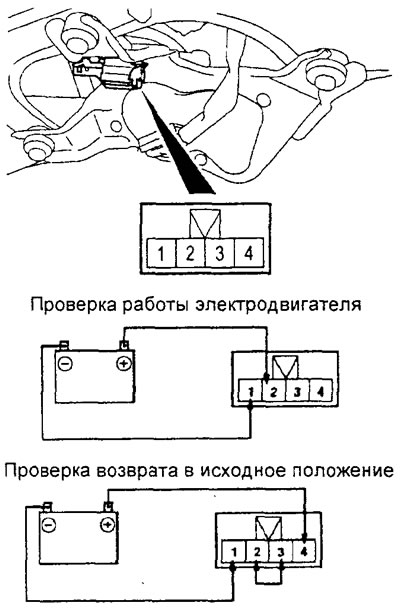
c) Checking the automatic return to the original position.
- Turn on the wiper motor by connecting the power as above, then disconnect the battery terminal wires and stop the motor.
- Connect power (from the battery) to the terminals of the electric motor as shown in the figure, and make sure that after the electric motor starts rotating, it stops in the automatic stop position (home position).
2. Checking the washer motor.
a) Fill the washer reservoir with fluid while the washer motor is installed on the reservoir.
b) Connect power from the battery to terminals "1" (-) and "2" (+) of the washer motor, as shown in the figure, and check the fluid jet pressure.
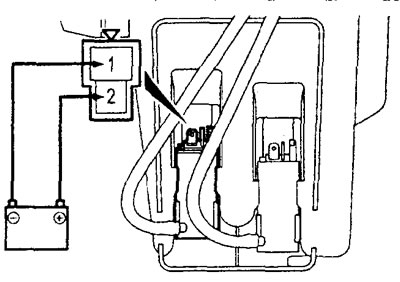
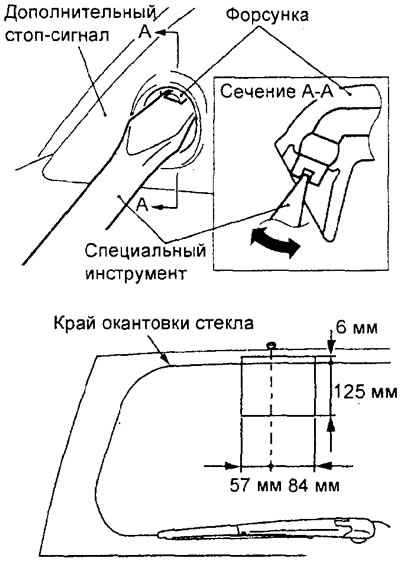
3. Checking the direction of the water jet from the washer nozzle.
Adjust the direction of the water jet by moving the washer nozzle ball using a special tool.
(The material was borrowed from the website: MitsubishiMan)