



Contents: Windshield Wiper and Washer Parts…⤓ Windshield Wiper and Washer Parts…⤓ Rear Window Wiper and Washer…⤓ Rear Window Wiper and Washer…⤓ Removal and installation ⤓
Windshield Wiper and Washer Parts (1987-91)
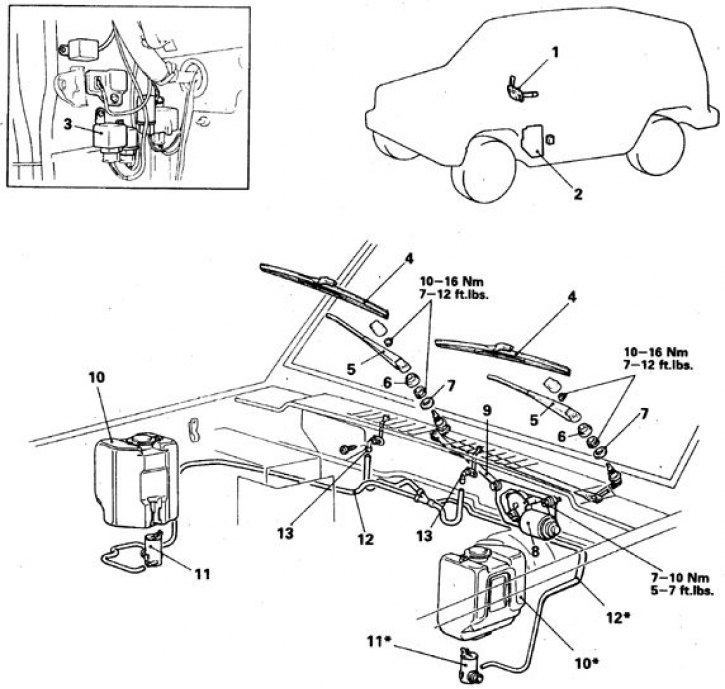
1. Steering column switch; 2. Side cladding; 3. Relay for combined operation of wiper and washer; 4. Brush; 5. Lever; 6. Caps; 7. Bushing; 8. Electric motor; 9. Traction; 10. Tank; 11. Electric motor and pump; 12. Hose; 13. Nozzle
Windshield Wiper and Washer Parts (1992-98)
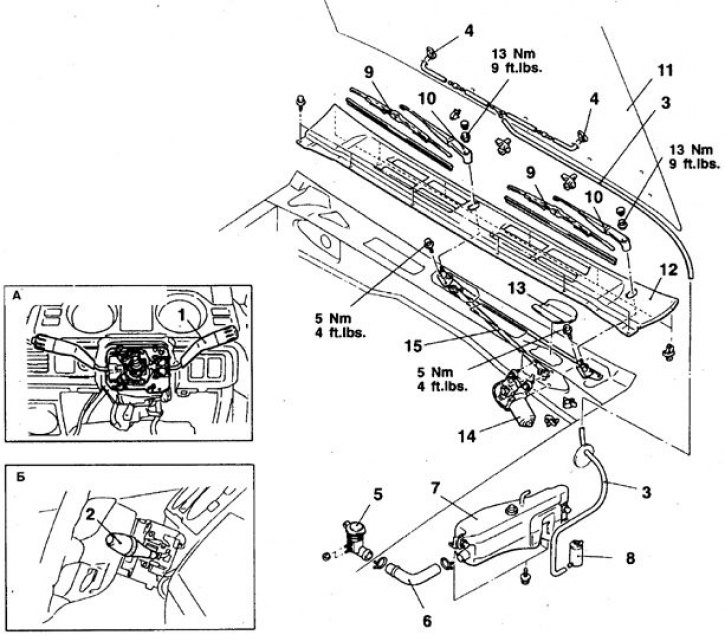
a. Before 1993.; b. After 1993.;
1. Steering column switch (combined with the washer switch and the relay for combined operation of the wiper and washer); 2. Wiper and washer switch; 3. Hose; 4. Nozzle; 5. Cap; 6. Hose; 7. Tank; 8. Pump; 9. Brush holder; 10. Lever; 11. Hood; 12. Panel; 13. Hatch cover; 14. Electric motor; 15. Traction
Rear Window Wiper and Washer (1983-91)
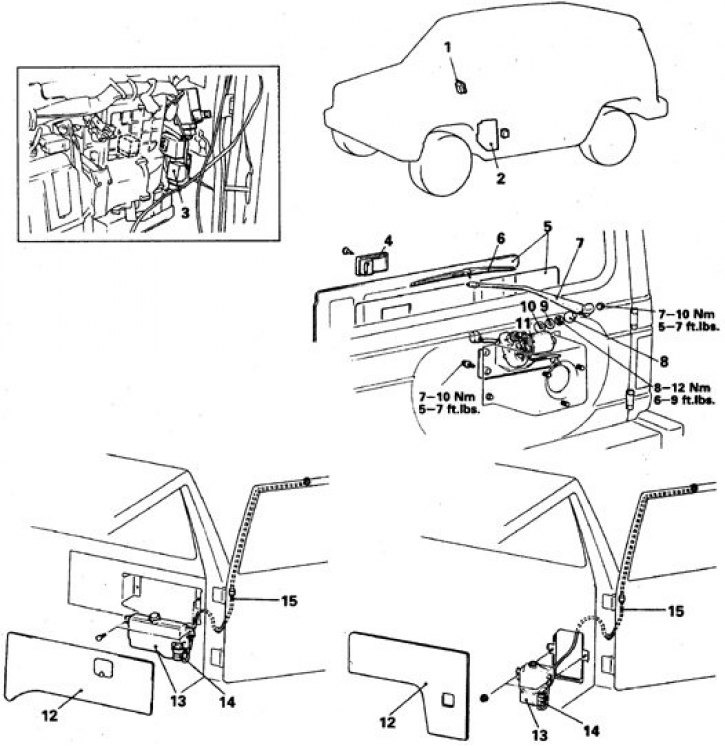
1. Switch; 2. Mudguard trim panel; 3. Relay; 4. Inner handle; 5. Inner door panel and water protection screen; 6. Brush; 7. Lever; 8. Cap; 9. Washer; 10. Seal; 11. Wiper motor; 12. Side panel; 13. Tank; 14. Washer motor; 15. Hoses and nozzle
Rear Window Wiper and Washer (1992-98)
[Article reprinted from the website MITSUBISHIMAN]
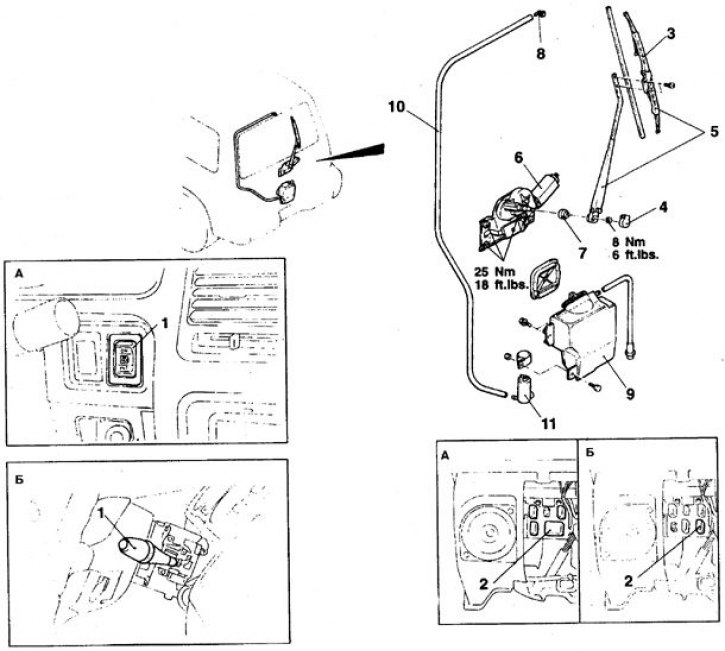
a. Before 1993.; b. After 1993.
1. Switch; 2. Relay; 3. Brush; 4. Lid; 5. Brush with lever; 6. Electric motor; 7. Seal; 8. Nozzle; 9. Tank; 10. Hose; 11. Electric motor
Removal and installation
Cars 1983-91.
1. Disconnect the battery from ground.
2. Loosen the screws and remove the rear door handle trim.
3. Remove the rear compartment door trim (see subsection 12.25).
4. Remove the cap and unscrew the brush lever nut.
5. Remove the lever.
6. Unscrew the nut and remove the washer and seal from the engine shaft.
7. Disconnect the wires, unscrew the bolts and remove the electric motor from the door.
8. Remove the rear side trim panel.
9. Disconnect the wires, unscrew the bolts, and remove the reservoir with the rear window washer pump and electric motor.
10. Installation is carried out in reverse order.
11. Tighten the wiper motor bolts to 10 Nm, the drive nut to 8–12 Nm, and the motor shaft nut to 7–10 Nm.
12. Position the brush so that it is parallel to the bottom edge of the window.
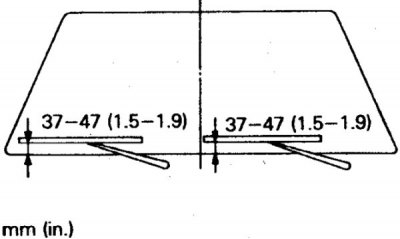
13. When installing the brushes, the following dimensions must be maintained (dimensions outside the brackets are in mm).
Cars 1992-98.
1. Disconnect the battery from ground.
2. Remove the cap, unscrew the brush lever nut and remove the lever.
3. Remove the rear compartment door trim (see subsection 12.25).
4. Disconnect the wires, unscrew the bolts and remove the electric motor from the door.
5. Disconnect the wires, unscrew the bolts, and remove the reservoir with the rear window washer pump and electric motor.
6. Installation is carried out in reverse order.
7. Tighten the wiper motor bolts to a torque of 25 N·m, the lever nut to a torque of 8–12 N·m, and the motor shaft nut to a torque of 8 N·m.
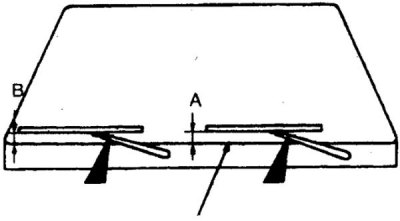
8. When installing the brushes, the following dimensions must be maintained: A – 25–35 mm, B – 35–45 mm (R and L – marks for the left and right brushes).
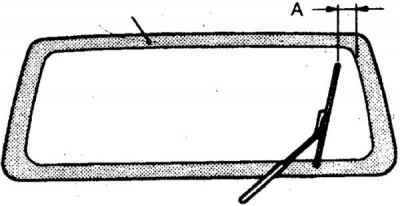
9. When installing the brush, dimension A should be 65–75 mm.