



Share with friends:
Automatic transmission of the car Mitsubishi Pajero 4

Gear shift mechanism
Removal the gear shift mechanism Caution: When removing and installing the shift cables and linkages, be careful not to touch or hit the SRS control unit. 1. Set the...
Removal the gear shift mechanism Caution: When removing and installing the shift cables and linkages, be careful not to touch or hit the SRS control unit. 1. Set the...

Removal the gearbox assembly
Attention: To avoid damage to the paintwork, it is necessary to cover the body fenders with some material. 1. Remove the front and rear engine crankcase guards. 2. Drain...
Attention: To avoid damage to the paintwork, it is necessary to cover the body fenders with some material. 1. Remove the front and rear engine crankcase guards. 2. Drain...

Installing the gearbox assembly
Code Name of the connector A Battery Wiring and Gearbox Wiring IN Input shaft speed sensor WITH Left rear oxygen sensor D Right rear oxygen sensor E Starter interlock...
Code Name of the connector A Battery Wiring and Gearbox Wiring IN Input shaft speed sensor WITH Left rear oxygen sensor D Right rear oxygen sensor E Starter interlock...

Automatic Transmission Fluid (ATF) Cooler
Removal the Automatic Transmission Fluid Cooler 1. Remove the front and rear engine crankcase guards. 2. Drain the automatic transmission fluid (ATF). 3. Remove the...
Removal the Automatic Transmission Fluid Cooler 1. Remove the front and rear engine crankcase guards. 2. Drain the automatic transmission fluid (ATF). 3. Remove the...

Gearbox assembly
Disassembling the gearbox 1. Remove the transfer case (1). 2. Remove the wiring bracket (2). 3. Remove the wiring bracket (3). 4. Remove the transfer case housing...
Disassembling the gearbox 1. Remove the transfer case (1). 2. Remove the wiring bracket (2). 3. Remove the wiring bracket (3). 4. Remove the transfer case housing...

Transfer case housing adapter
Disassembling the transfer case housing adapter 1. Remove the parking strut shaft (1). 2. Remove the parking strut spring (2). 3. Remove the parking spacer (3). 4....
Disassembling the transfer case housing adapter 1. Remove the parking strut shaft (1). 2. Remove the parking strut spring (2). 3. Remove the parking spacer (3). 4....

Disassembling the gearbox
Note: Mark the wires and tubes to avoid incorrect installation. 1. Remove the torque converter (1). 2. Remove the cable end bracket (2). 3. Remove the clamp (3). 4....
Note: Mark the wires and tubes to avoid incorrect installation. 1. Remove the torque converter (1). 2. Remove the cable end bracket (2). 3. Remove the clamp (3). 4....

Gearbox assembly
Note: When assembling, tighten the bolts to the tightening torques shown in the figure. 1. Install the gearbox housing (100). 2. Install the output shaft support gasket...
Note: When assembling, tighten the bolts to the tightening torques shown in the figure. 1. Install the gearbox housing (100). 2. Install the output shaft support gasket...

Oil pump
Disassembling the oil pump 1. Remove the sealing ring (1). 2. Remove the sealing ring (2). 3. Remove the oil seal (3). 4. Remove the oil pump (4). Assembling the oil...
Disassembling the oil pump 1. Remove the sealing ring (1). 2. Remove the sealing ring (2). 3. Remove the oil seal (3). 4. Remove the oil pump (4). Assembling the oil...

Reverse/overdrive clutch
Reverse/overdrive clutch disassembly 1. Remove the sealing ring (1). 2. Remove the spring ring (2). 3. Remove the input shaft (3). 4. Remove the spring ring (4). 5....
Reverse/overdrive clutch disassembly 1. Remove the sealing ring (1). 2. Remove the spring ring (2). 3. Remove the input shaft (3). 4. Remove the spring ring (4). 5....

Second gear brake
Disassembling the second gear brake mechanism 1. Remove the second gear brake lock (1). 2. Remove the second gear brake piston (2). 3. Remove the sealing ring (3). 4....
Disassembling the second gear brake mechanism 1. Remove the second gear brake lock (1). 2. Remove the second gear brake piston (2). 3. Remove the sealing ring (3). 4....

Low speed reverse ring gear
Disassembling the low speed reverse ring gear 1. Remove the spring ring (1). 2. Remove the overdrive planetary carrier (2). 3. Remove thrust bearing No. 5 (3). 4. Remove...
Disassembling the low speed reverse ring gear 1. Remove the spring ring (1). 2. Remove the overdrive planetary carrier (2). 3. Remove thrust bearing No. 5 (3). 4. Remove...

Central support
Disassembling the central support 1. Remove the spring ring (1). 1) Install special tools MB991630 and MD998924 as shown in the figure so that they compress the inner...
Disassembling the central support 1. Remove the spring ring (1). 1) Install special tools MB991630 and MD998924 as shown in the figure so that they compress the inner...

Downshift clutch
Disassembling the downshift clutch 1. Remove the spring ring (1). 2. Remove the reaction plate (2). 3. Remove the clutch disc (3). 4. Remove the coupling plate (4). 5....
Disassembling the downshift clutch 1. Remove the spring ring (1). 2. Remove the reaction plate (2). 3. Remove the clutch disc (3). 4. Remove the coupling plate (4). 5....

Ring gear wheel
Disassembling the ring gear 1. Remove the spring ring (1). 2. Remove the outlet flange (2). 3. Remove thrust bearing No. 10 (3). 4. Remove the downshift clutch sleeve...
Disassembling the ring gear 1. Remove the spring ring (1). 2. Remove the outlet flange (2). 3. Remove thrust bearing No. 10 (3). 4. Remove the downshift clutch sleeve...
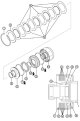
Direct acting coupling
Disassembling the direct acting coupling 1. Remove the spring ring (1). 2. Remove the reaction plate (2). 3. Remove the clutch disc (3). 4. Remove the coupling plate...
Disassembling the direct acting coupling 1. Remove the spring ring (1). 2. Remove the reaction plate (2). 3. Remove the clutch disc (3). 4. Remove the coupling plate...

Output shaft support
Disassembling the output shaft support 1. Remove the spring ring (1). 2. Remove the one-way clutch (2). 3. Remove the sealing ring (3). 4. Remove the output shaft...
Disassembling the output shaft support 1. Remove the spring ring (1). 2. Remove the one-way clutch (2). 3. Remove the sealing ring (3). 4. Remove the output shaft...

Counter shaft
Disassembling the counter shaft Note: The operations for disassembling the counter shaft of an automatic transmission are similar to the operations for disassembling the...
Disassembling the counter shaft Note: The operations for disassembling the counter shaft of an automatic transmission are similar to the operations for disassembling the...
Transfer case
Disassembling the transfer case Note: The operations for disassembling the transfer case of an automatic transmission are similar to those for disassembling the transfer...
Disassembling the transfer case Note: The operations for disassembling the transfer case of an automatic transmission are similar to those for disassembling the transfer...
Transfer case housing plate
Disassembling the transfer case housing plate Note: The disassembly operations for the automatic transmission transfer case plate are the same as those for the manual...
Disassembling the transfer case housing plate Note: The disassembly operations for the automatic transmission transfer case plate are the same as those for the manual...
Transfer case input gear
Disassembling the input gear of the transfer case Note: The operations for disassembling the input gear of the automatic transmission transfer case are similar to the...
Disassembling the input gear of the transfer case Note: The operations for disassembling the input gear of the automatic transmission transfer case are similar to the...
Rear output shaft
Disassembling the rear output shaft Note: The procedures for disassembling the rear output shaft of an automatic transmission are the same as those for disassembling the...
Disassembling the rear output shaft Note: The procedures for disassembling the rear output shaft of an automatic transmission are the same as those for disassembling the...
Front output shaft
Disassembling the front output shaft Note: The procedures for disassembling the front output shaft of an automatic transmission are the same as those for disassembling...
Disassembling the front output shaft Note: The procedures for disassembling the front output shaft of an automatic transmission are the same as those for disassembling...
This section is available on: russian, bulgarian, belarusian, ukrainian, serbian, croatian, romanian, polish, slovak, hungarian
Similar materials for other Mitsubishi models
➤ Transmission: Automatic gearbox Mitsubishi Colt 4 and 5 (1991-2003)
➤ Transmission: Automatic gearbox Mitsubishi Lancer 9 (2000-2007, petrol)
➤ Transmission: Automatic gearbox Mitsubishi Galant 5 (1983-1989, petrol)
➤ Transmission: Automatic gearbox Mitsubishi Outlander 1 (2003-2008)
➤ Transmission: Automatic gearbox Mitsubishi Carisma (1995-2004)
Link in different formats to this section
TEXTHTMLBB Code
- General information
- User manual
- Troubleshooting
- Maintenance
- Technical specifications
- Power unit
- Engine repair
- Cooling system
- Lubrication system
- Fuel system
- Engine management system
- Intake and exhaust system
- Engine electrical equipment
- Transmission
- Clutch
- Manual gearbox
- Automatic gearbox
- Drive shafts
- Chassis and running gear
- Front suspension
- Rear suspension
- Brake system
- Steering
- Body and interior
- Exterior (external elements)
- Interior (internal elements)
- Doors, locks and windows
- Body dimensions
- Electrical equipment
- Safety system (SRS)
- Air conditioner
- Equipment and devices
- Electrical diagrams
- General information
- User manual
- Seats and seat belts
- Instruments and controls
- Driving and operation
- Maintenance
- Power unit
- Gasoline engines
- Diesel engines
- Ignition system
- Engine electrical equipment
- Cooling and lubrication system
- Power and exhaust system
- Fuel system (gasoline)
- Fuel system (diesel)
- Transmission
- Clutch
- Mechanical gearbox
- Automatic gearbox
- Drive shafts and axles
- Chassis and running gear
- Front suspension
- Rear suspension
- Steering
- Brake system
- Body and interior
- Exterior (external elements)
- Interior (internal elements)
- Doors, locks and windows
- Electrical equipment
- Equipment and devices
- Heater and air conditioner
- Cruise control
- Headlights and lighting
- Electrical circuits