



Contents: Reverse/overdrive clutch disassembly ⤓ Reverse/overdrive clutch assembly ⤓ Disassembling the second gear brake…⤓
Reverse/overdrive clutch disassembly
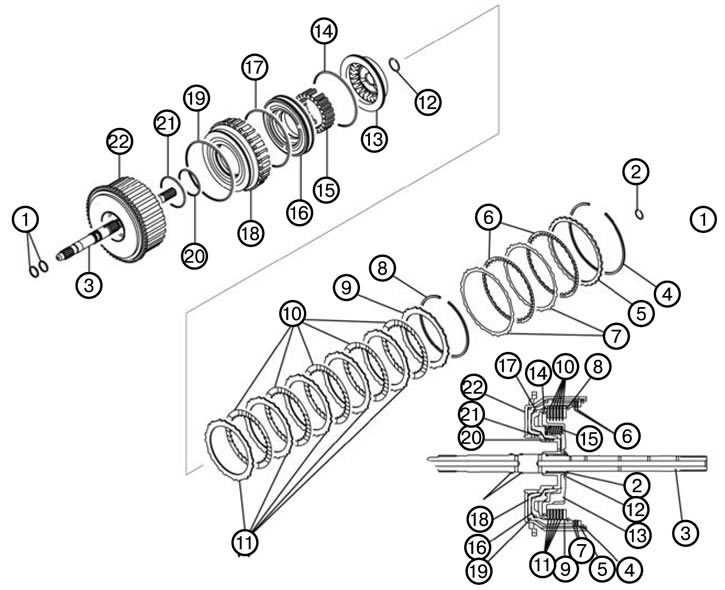
1. Remove the sealing ring (1).
2. Remove the spring ring (2).
3. Remove the input shaft (3).
4. Remove the spring ring (4).
5. Remove the reaction disk (5).
6. Remove the clutch disc (6).
7. Remove the coupling plate (7).
8. Remove the spring ring (8).
9. Remove the reaction plate (9).
10. Remove the clutch disc (10).
11. Remove the coupling plate (11).
12. Remove the spring ring (12).
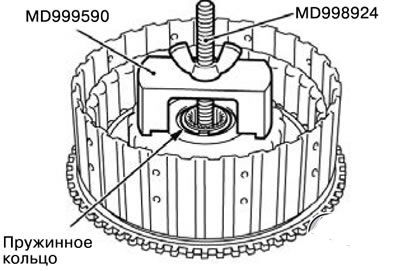
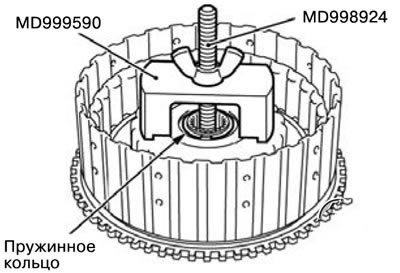
1) Install special tools MD999590 and MD998924 as shown in the figure.
2) Compress the return spring and remove the spring ring.
13. Remove the spring retainer (13).
14. Remove the sealing ring (14).
15. Remove the return spring (15).
16. Remove the overdrive clutch piston (16).
17. Remove the sealing ring (17).
18. Remove the reverse clutch piston (18).
19. Remove the sealing ring (19).
20. Remove the sealing ring (20).
21. Remove the sealing ring (21).
22. Remove the reverse clutch retainer (22).
Reverse/overdrive clutch assembly
1. Install the reverse clutch retainer (22).
2. Install the sealing ring (21).
3. Install the sealing ring (20).
4. Install the sealing ring (19).
Note:
- Lubricate the O-ring with automatic transmission fluid before installation.
- Be careful not to damage the sealing ring during installation.
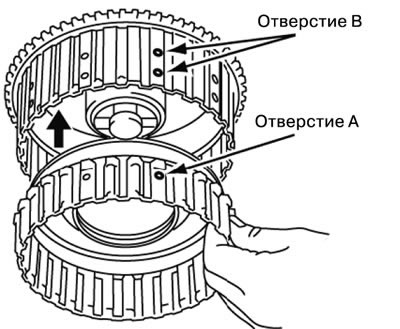
5. Install the reverse clutch piston (18).
1) Align the holes (A and B) in the reverse clutch piston and the reverse clutch retainer, and then assemble them.
6. Install the sealing ring (17).
7. Install the overdrive clutch piston (16).
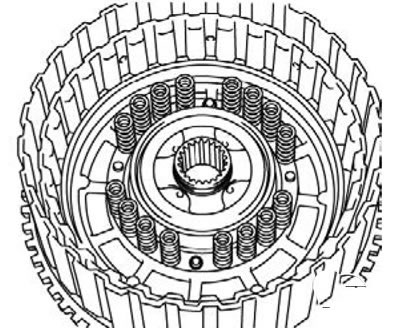
8. Install the return spring (15).
1) Align the holes of the two return springs with the two projections on the overdrive clutch piston, and then install the return springs.
9. Install the sealing ring (14).
10. Install the spring retainer (13).
11. Install the spring ring (12).
1) Install special tools MD999590 and MD998924 as shown in the figure.
2) Tighten the nut of the special tool and compress the spring retainer opposite the reverse clutch retainer.
3) Install the thickest snap ring that can fit into the snap ring groove of the reverse clutch retainer.
4) Make sure that the gap between the spring ring and the spring retainer is within the standard value.
Standard value: 0 - 0.09 mm.
12. Install the coupling plate (11).
13. Install the clutch disc (10).
14. Install the reaction plate (9).
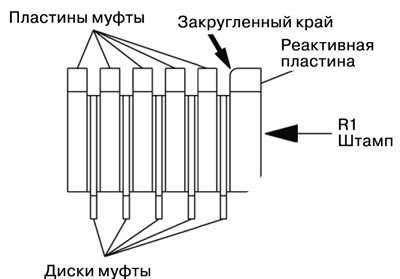
1) Install the clutch plates and discs into the reverse clutch piston one by one.
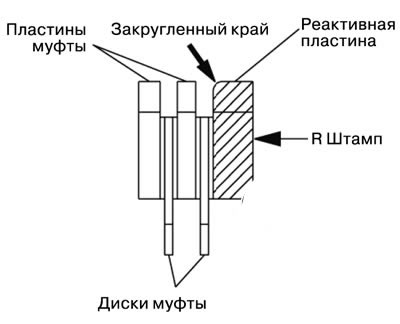
2) Install the reaction plate as shown in the figure.
15. Install the spring ring (8).
1) Install the spring ring into the groove of the reverse clutch piston.
2) Install special tools MB991629 and MD998924 as shown in the figure and compress the coupling.
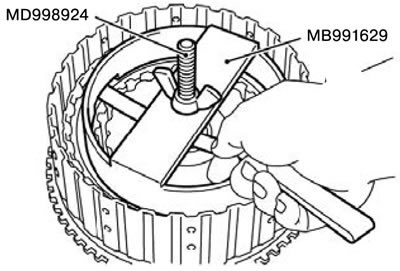
3) Make sure the gap between the spring ring and the reaction plate is within the standard value, select the appropriate spring ring.
Standard value: 2.0 - 2.2 mm.
16. Install the coupling plate (7).
17. Install the clutch disc (6).
18. Install the reaction disk (5).
1) Install the clutch plates and clutch discs into the reverse clutch retainer one by one.
Note: When installing the clutch plates, align the non-toothed part (A) with the hole in the reverse clutch retainer (B).
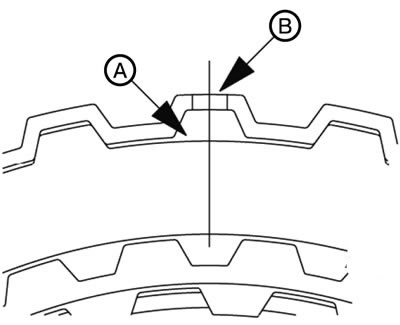
2) Install the reaction plate as shown in the figure.
Note: When installing the reaction plate, align the non-toothed part (A) with the hole in the reverse clutch retainer (B).
Disassembling the second gear brake mechanism
19. Install the spring ring (4).
1) Install the spring ring into the groove of the reverse clutch retainer.
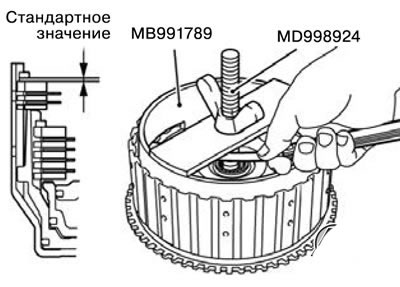
2) Install special tools MB991789 and MD998924 as shown in the figure and compress the coupling.
3) Make sure that the gap between the spring ring and the reaction plate is within the standard value. If the value is outside the standard value, select a suitable snap ring and adjust the gap to the standard value.
Standard value: 1.5 - 1.7 mm.
Standard value MB991789 MD998924
20. Install the input shaft (3).
21. Install the spring ring (2).
22. Install the sealing ring (1).