



Share with friends:
Passive safety system SRS car Mitsubishi Pajero 4

General information
To improve safety, it is possible to install a BZZ on the vehicle as additional equipment (additional passive safety system) and seat belts with pretensioners. These...
To improve safety, it is possible to install a BZZ on the vehicle as additional equipment (additional passive safety system) and seat belts with pretensioners. These...
Safety precautions for SRS maintenance
1. To prevent injury to yourself and others from accidental air bag deployment and accidental deployment of the seat belt pre-tensioner when performing maintenance work,...
1. To prevent injury to yourself and others from accidental air bag deployment and accidental deployment of the seat belt pre-tensioner when performing maintenance work,...

Special tools
Tool Number and name MB990784 Trim Remover MB990803 Steering Wheel Puller MUT-III MV686560 Adapter MB991885 Adapter MB992102 Adapter
Tool Number and name MB990784 Trim Remover MB990803 Steering Wheel Puller MUT-III MV686560 Adapter MB991885 Adapter MB992102 Adapter
SRS System Maintenance
SRS must be checked by an authorized dealer within 10 years from the date of vehicle registration.
SRS must be checked by an authorized dealer within 10 years from the date of vehicle registration.

Checking the SRS warning light
Turn the ignition switch to the "ON" position. Does the SRS indicator light come on for about 7 seconds, then go out and remain off for at least 5 seconds? If so, the...
Turn the ignition switch to the "ON" position. Does the SRS indicator light come on for about 7 seconds, then go out and remain off for at least 5 seconds? If so, the...
Visual inspection of SRS components
Turn the ignition key to the "LOCK" position (Blocking), disconnect the negative battery cable and wrap it with insulating tape. Caution: Wait at least 60 seconds after...
Turn the ignition key to the "LOCK" position (Blocking), disconnect the negative battery cable and wrap it with insulating tape. Caution: Wait at least 60 seconds after...

SRS airbag control unit
1. Check the SRS control unit housing and brackets for dents, cracks, deformation or rust. Caution: The SRS may not deploy if the electronic control unit is not...
1. Check the SRS control unit housing and brackets for dents, cracks, deformation or rust. Caution: The SRS may not deploy if the electronic control unit is not...
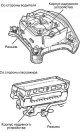
Airbag modules, steering wheel and clock spring
1. Remove the airbag modules, steering wheel and clock spring. Caution: Removed airbag modules should be stored in a clean, dry location with the airbag deployment side...
1. Remove the airbag modules, steering wheel and clock spring. Caution: Removed airbag modules should be stored in a clean, dry location with the airbag deployment side...

Front seat back assembly (side airbag module)
1. Check if everything is normal in the seat airbag module deployment section. 2. Check for damage to the connector, bent terminals, or pinched wiring harness.
1. Check if everything is normal in the seat airbag module deployment section. 2. Check for damage to the connector, bent terminals, or pinched wiring harness.

Side impact sensor
1. Make sure there is no rust or dents in the center pillar. 2. Check that the side impact sensor is not bent, broken, dented or corroded. 3. Make sure that the wire...
1. Make sure there is no rust or dents in the center pillar. 2. Check that the side impact sensor is not bent, broken, dented or corroded. 3. Make sure that the wire...
Front Wiring Harness/Floor Wiring Harness
1. Check the connectors for loose connections. 2. Check the wire harnesses for kinks, connectors for damage, and terminals for deformation. Caution: Improper connection...
1. Check the connectors for loose connections. 2. Check the wire harnesses for kinks, connectors for damage, and terminals for deformation. Caution: Improper connection...
SRS Electronic Control Unit
Caution: Before starting work, disconnect the negative (-) cable from the battery and wait at least 60 seconds. In addition, the disconnected terminal must be wrapped...
Caution: Before starting work, disconnect the negative (-) cable from the battery and wait at least 60 seconds. In addition, the disconnected terminal must be wrapped...

Removal the SRS electronic unit
1. Turn the ignition key to the "LOCK" position (Blocking). 2. Disconnect the negative battery terminal. 3. Remove the bottom cover and side cover of the instrument...
1. Turn the ignition key to the "LOCK" position (Blocking). 2. Disconnect the negative battery terminal. 3. Remove the bottom cover and side cover of the instrument...
Installing the SRS electronic unit
1. Install the SRS electronic control unit (2). Caution: The SRS may not deploy if the electronic control unit is not connected correctly, which could result in serious...
1. Install the SRS electronic control unit (2). Caution: The SRS may not deploy if the electronic control unit is not connected correctly, which could result in serious...

Removal the SRS electronic unit
1. Turn the ignition key to the "LOCK" position (Blocking). 2. Disconnect the negative battery terminal. 3. Remove the bottom cover and side cover of the instrument...
1. Turn the ignition key to the "LOCK" position (Blocking). 2. Disconnect the negative battery terminal. 3. Remove the bottom cover and side cover of the instrument...
Installing the SRS electronic unit
1. Install the SRS electronic control unit (2). Caution: The SRS may not deploy if the electronic control unit is not connected correctly, which could result in serious...
1. Install the SRS electronic control unit (2). Caution: The SRS may not deploy if the electronic control unit is not connected correctly, which could result in serious...

Checking the correct installation
1. Connect the negative battery terminal. 2. Turn the ignition switch to the "ON" position. 3. Does the SRS indicator light come on for approximately 7 seconds, go out,...
1. Connect the negative battery terminal. 2. Turn the ignition switch to the "ON" position. 3. Does the SRS indicator light come on for approximately 7 seconds, go out,...
Airbag modules and clock spring
Caution: Before starting work, disconnect the negative (-) terminal from the battery and wait at least 60 seconds. In addition, wrap the removed terminal with insulating...
Caution: Before starting work, disconnect the negative (-) terminal from the battery and wait at least 60 seconds. In addition, wrap the removed terminal with insulating...

Removal the airbag modules and clock spring
Driver side airbag module 1. Disconnect the negative battery terminal (1). 2. Remove the cover (2). 3. Disconnect the signal connector connection (3). 4. Disconnect the...
Driver side airbag module 1. Disconnect the negative battery terminal (1). 2. Remove the cover (2). 3. Disconnect the signal connector connection (3). 4. Disconnect the...

Installing airbag modules and clock spring
Driver side airbag module 1. Align the timing marks on the clock spring and, after turning the front wheels to the straight-ahead position, install the clock spring into...
Driver side airbag module 1. Align the timing marks on the clock spring and, after turning the front wheels to the straight-ahead position, install the clock spring into...
Side impact sensor
Caution: Disconnect the negative (-) battery terminal and wait 60 seconds or longer before starting work. Moreover, the disconnected battery terminal must be wrapped...
Caution: Disconnect the negative (-) battery terminal and wait 60 seconds or longer before starting work. Moreover, the disconnected battery terminal must be wrapped...

Removal the side impact sensor
1. Turn the ignition key to the "LOCK" position (Blocking). Note: The left side impact sensor is shown. The position of the right side impact sensor is symmetrical. 2....
1. Turn the ignition key to the "LOCK" position (Blocking). Note: The left side impact sensor is shown. The position of the right side impact sensor is symmetrical. 2....
Installing and testing the side impact sensor
Note: Check the side impact sensor for dents, cracks, deformations and measure the resistance between the terminals, even when installing a new side impact sensor. 1....
Note: Check the side impact sensor for dents, cracks, deformations and measure the resistance between the terminals, even when installing a new side impact sensor. 1....
Seat belt with pretensioner
Caution: Never attempt to disassemble or repair the seat belt with pretensioner. If it is faulty, replace it. Be especially careful when handling a seat belt with a...
Caution: Never attempt to disassemble or repair the seat belt with pretensioner. If it is faulty, replace it. Be especially careful when handling a seat belt with a...
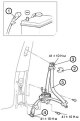
Removal the seat belt with pretensioner
1. Disconnect the negative battery terminal (1). 2. Remove the guide cover (2). 3. Loosen the screw securing the upper part of the inertial locking mechanism (to turn...
1. Disconnect the negative battery terminal (1). 2. Remove the guide cover (2). 3. Loosen the screw securing the upper part of the inertial locking mechanism (to turn...
Installing a seat belt with pretensioner
1. Install the seat belt with pretensioner (6). 2. Install the lower center pillar trim (5). 3. Tighten the bolt (4). 4. Tighten the screw securing the upper part of the...
1. Install the seat belt with pretensioner (6). 2. Install the lower center pillar trim (5). 3. Tighten the bolt (4). 4. Tighten the screw securing the upper part of the...
Checking the seat belt with pretensioner
Note: If any part is found to be faulty during the inspection, it must be replaced with a new one. Attention: Disposal of parts must be carried out in strict accordance...
Note: If any part is found to be faulty during the inspection, it must be replaced with a new one. Attention: Disposal of parts must be carried out in strict accordance...

Airbag module and seat belt pretensioner disposal procedure
When disposing of a vehicle equipped with airbags or seat belt pretensioners, or when disposing of airbags and pretensioners only, the procedures for the forced...
When disposing of a vehicle equipped with airbags or seat belt pretensioners, or when disposing of airbags and pretensioners only, the procedures for the forced...
Procedure for disposal of a deployed airbag module or a deployed seat belt pretensioner
Used airbag modules and seat belt pretensioners must be disposed of in accordance with the standards and requirements of regional laws on the recycling of industrial...
Used airbag modules and seat belt pretensioners must be disposed of in accordance with the standards and requirements of regional laws on the recycling of industrial...
This section is available on: russian, bulgarian, belarusian, ukrainian, serbian, croatian, romanian, polish, slovak, hungarian
Similar materials for other Mitsubishi models
➤ Electrical equipment: Security system SRS Mitsubishi Lancer 9 (2000-2007, petrol)
Link in different formats to this section
TEXTHTMLBB Code
- General information
- User manual
- Troubleshooting
- Maintenance
- Technical specifications
- Power unit
- Engine repair
- Cooling system
- Lubrication system
- Fuel system
- Engine management system
- Intake and exhaust system
- Engine electrical equipment
- Transmission
- Clutch
- Manual gearbox
- Automatic gearbox
- Drive shafts
- Chassis and running gear
- Front suspension
- Rear suspension
- Brake system
- Steering
- Body and interior
- Exterior (external elements)
- Interior (internal elements)
- Doors, locks and windows
- Body dimensions
- Electrical equipment
- Safety system (SRS)
- Air conditioner
- Equipment and devices
- Electrical diagrams
- General information
- User manual
- Seats and seat belts
- Instruments and controls
- Driving and operation
- Maintenance
- Power unit
- Gasoline engines
- Diesel engines
- Ignition system
- Engine electrical equipment
- Cooling and lubrication system
- Power and exhaust system
- Fuel system (gasoline)
- Fuel system (diesel)
- Transmission
- Clutch
- Mechanical gearbox
- Automatic gearbox
- Drive shafts and axles
- Chassis and running gear
- Front suspension
- Rear suspension
- Steering
- Brake system
- Body and interior
- Exterior (external elements)
- Interior (internal elements)
- Doors, locks and windows
- Electrical equipment
- Equipment and devices
- Heater and air conditioner
- Cruise control
- Headlights and lighting
- Electrical circuits