
English Русский
Български
Беларускі
Український
Српски
Hrvatski
Română
Polski
Slovenský
Magyar
Articles Bookmark Contacts Sitemap   
Company Audi Company Ford Company Hyundai Company Kia Company Mazda Company Mercedes-Benz Company Nissan
MitsubishiMan.ru


Home Colt Lancer Galant L200 Outlander Pajero Others
Pajero 4 (2006-2021) Pajero 1 and 2 (1982-1999)

Airbag module and seat belt pretensioner disposal procedure (Mitsubishi Pajero 4)

  • Home
  • Pajero
  • 4 (2006-2021)
  • Electrical equipment
  • Safety system (SRS)
  • Airbag module and seat belt pretensioner disposal procedure
0
When disposing of a vehicle equipped with airbags or seat belt pretensioners, or when disposing of airbags and pretensioners only, the procedures for the forced deployment of airbags and pretensioners must be followed before sending them for recycling.

Caution: If the vehicle is intended for scrap or other disposal, force the airbags to deploy inside the vehicle and the seat belt pretensioners to deploy by removing them from the vehicle. If only the airbag modules and pretensioners are sent for disposal, and the vehicle will continue to be used, then activate the airbags and pretensioners by removing them from the vehicle. Since a large amount of smoke is released when the airbags or pretensioners are deployed, try not to perform this operation near residential areas. Because there is a loud bang when the airbag and seat belt pretensioner deploy, try not to perform this operation near residential areas. If there are people nearby, warn them about the upcoming explosion. When performing these operations, specialists and nearby persons must wear protective headphones.


1. Park the car in an isolated place.

2. Disconnect the (-) and (+) power cables from the battery and then remove it from the vehicle.

Caution: Wait at least 60 seconds after disconnecting the power cables before performing further work.


3. Forced deployment of the driver's airbag:
  • 1) Remove the lower cover and lower steering column cover.
  • 2) Disconnect the two-pin connector (red) of the clock spring from the body wiring harness.

Note: After disconnecting the clock spring connector from the body wire harness, both pins of the clock spring connector will be automatically shorted to prevent unauthorized deployment of the air bag due to static electricity, etc.
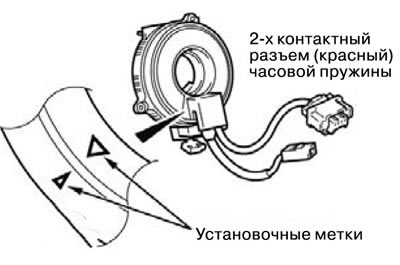


4. Forced deployment of the front passenger airbag:
  • 1) Remove the glove box.
  • 2) Disconnect the connector (red 2-pin) front passenger airbag module from the front wiring harness connector.

Note: When the air bag module connector is disconnected from the front wire harness, both terminals of the air bag module connector will be automatically shorted to prevent unauthorized deployment of the air bag due to static electricity, etc.


5. Forced deployment of the side airbag: Disconnect the connector (red 2-pin) side airbag module from the front wiring harness connector.

Caution: The driver and front passenger airbag modules must be deployed.


Note: If the side airbag module connector is disconnected from the front wire harness, both terminals of the airbag module connector will be automatically shorted to prevent unintentional airbag deployment due to static electricity, etc.
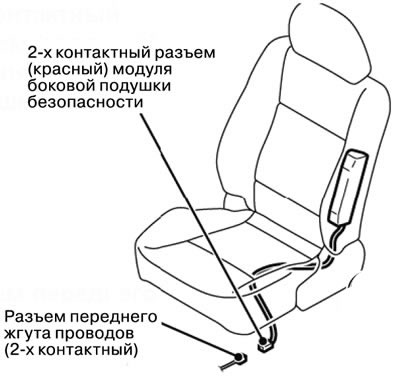


[The original material is posted on the website www.mitsubishiman.ru]


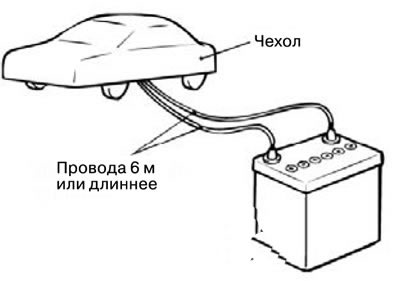
6. Connect two wires, each 6 meters or longer, to the two wires of the harness adapter "A" and wrap the connections with electrical tape. The other ends of the two wires must be connected to each other (shorted) to prevent unauthorized deployment of the airbag.
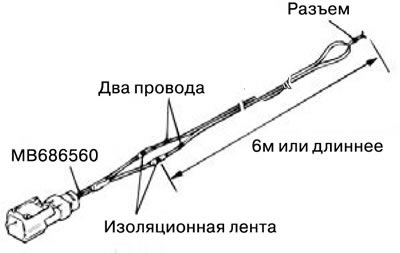


7. Connect the 2-pin connector (red) of the clock spring, airbag module (from the front passenger side), or side airbag module to the SRS airbag adapter "A" harness and route the long connecting wires out of the vehicle.
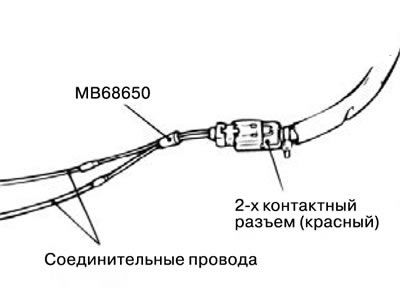


8. Close the door windows completely, close the doors and place a cover on the car to reduce noise levels.

Warning: If the glass is damaged, it may break, so the car must be covered.


9. At the maximum distance from the vehicle, disconnect the two shorted ends of the long wires and connect them to the battery removed from the vehicle. The airbag will deploy.


Caution: Before performing this operation, make sure that there are no unauthorized persons inside or near the vehicle. Wear safety glasses. After the airbag has deployed, the inflator body will become hot, so wait at least 30 minutes before handling it. Although the gas released is not poisonous, try not to inhale it. If the airbag does not deploy as a result of the above procedure, do not try to figure it out yourself and do not go close to the elements that have not deployed. Please contact your local distributor.


10. After activation, prepare the airbag module for disposal in accordance with the requirements of the Disposal Methodology.
This article is available at: russian, bulgarian, belarusian, ukrainian, serbian, croatian, romanian, polish, slovak, hungarian
This article was reviewed by: Miroslav Rakov
Share with friends:
◀ Previous
Pajero 4: Safety system (SRS)
Next ▶

Checking the seat belt with pretensioner
Installing a seat belt with pretensioner
Removal the seat belt with pretensioner
Seat belt with pretensioner
Installing and testing the side impact sensor
Procedure for disposal of a deployed airbag module or a deployed seat belt pretensioner
Similar materials for other Mitsubishi models

➤ Camshaft Drive Belt — Check, Tension (SOHC, 8 and 12 Valves) Mitsubishi Colt 4 and 5 (1991-2003)
➤ Front seat belt with pretensioner Mitsubishi Lancer 9 (2000-2007, petrol)
➤ Front seat adjustment Mitsubishi Galant 6 and 7 (1987-1998)
➤ Audible unfastened seat belt warning buzzer (buzzer) Mitsubishi L200 4 (2005-2014, diesel)
➤ Three-point seat belt (with inertia locking mechanism) Mitsubishi Outlander 1 (2003-2008)
➤ Seat belt pretensioner Mitsubishi Space Star (1998-2005)
Link in different formats to this article
Comments and feedback from visitors
No comments yet


Add up two numbers 39 + 24


Pajero 4 (2006-2021) 
  • General information
  • User manual
  • Troubleshooting
  • Maintenance
  • Technical specifications
  • Power unit
  • Engine repair
  • Cooling system
  • Lubrication system
  • Fuel system
  • Engine management system
  • Intake and exhaust system
  • Engine electrical equipment
  • Transmission
  • Clutch
  • Manual gearbox
  • Automatic gearbox
  • Drive shafts
  • Chassis and running gear
  • Front suspension
  • Rear suspension
  • Brake system
  • Steering
  • Body and interior
  • Exterior (external elements)
  • Interior (internal elements)
  • Doors, locks and windows
  • Body dimensions
  • Electrical equipment
  • Safety system (SRS)
  • Air conditioner
  • Equipment and devices
  • Electrical diagrams
Pajero 1 and 2 (1982-1999) 
  • General information
  • User manual
  • Seats and seat belts
  • Instruments and controls
  • Driving and operation
  • Maintenance
  • Power unit
  • Gasoline engines
  • Diesel engines
  • Ignition system
  • Engine electrical equipment
  • Cooling and lubrication system
  • Power and exhaust system
  • Fuel system (gasoline)
  • Fuel system (diesel)
  • Transmission
  • Clutch
  • Mechanical gearbox
  • Automatic gearbox
  • Drive shafts and axles
  • Chassis and running gear
  • Front suspension
  • Rear suspension
  • Steering
  • Brake system
  • Body and interior
  • Exterior (external elements)
  • Interior (internal elements)
  • Doors, locks and windows
  • Electrical equipment
  • Equipment and devices
  • Heater and air conditioner
  • Cruise control
  • Headlights and lighting
  • Electrical circuits
MitsubishiMan.ru © 2018–2026 • Mobile version • Articles about Mitsubishi • Contacts • Sitemap: EN BG BY UA RS HR RO PL SK HU • Site search • Bookmark
Colt 2 and 3 (1983-1993) · Colt 4 and 5 (1991-2003) · Colt 5 (1995-2003) · Lancer 3 and 5 (1984-1992) · Lancer 9 (2000-2007) · Galant 5 (1983-1989) · Galant 6 and 7 (1987-1998) · L200 4 (2005-2014) · Outlander 1 (2003-2008) · Pajero 1 and 2 (1982-1999) · Pajero 4 (2006-2021) · Carisma (1995-2004) · Space Star (1998-2005) ·
This resource sets cookies 🍪 to avoid bothering you with repeated data entry.