



Share with friends:
Manual gearbox of the car Mitsubishi Pajero 4

Gearbox — General Information
Manual transmission Name Specification Gearbox model V5M31 - E-XCL Engine model 4M41 Gearbox type Five-speed, manual Gear ratios of the gearbox 1st 4,234 2nd 2,238 3rd...
Manual transmission Name Specification Gearbox model V5M31 - E-XCL Engine model 4M41 Gearbox type Five-speed, manual Gear ratios of the gearbox 1st 4,234 2nd 2,238 3rd...
Lubricants
Name Recommended lubricant Volume, l Transmission oil Hypoid gear oil SAE 75W-90 or 75W-85W according to API GL-4 classification 3,2 Not enough for the transfer case...
Name Recommended lubricant Volume, l Transmission oil Hypoid gear oil SAE 75W-90 or 75W-85W according to API GL-4 classification 3,2 Not enough for the transfer case...

Special tools
Tool Number and name MD998835 Wrench Attachment MD998809 Wrench Attachment MD998348 Bearing Puller MD998020 Bearing Puller MD998304 Seal Installation Tool MD998812 Lid...
Tool Number and name MD998835 Wrench Attachment MD998809 Wrench Attachment MD998348 Bearing Puller MD998020 Bearing Puller MD998304 Seal Installation Tool MD998812 Lid...
Repair rules
1. It is necessary to prepare boxes and shelves in advance for unfolding and carrying dismantled parts. Place the removed parts in an orderly manner. Apply assembly...
1. It is necessary to prepare boxes and shelves in advance for unfolding and carrying dismantled parts. Place the removed parts in an orderly manner. Apply assembly...
Precautionary measures
Gasket formed in working position Some gearbox mounting surfaces are fitted with a gasket which is formed in the working position. To ensure the full functional...
Gasket formed in working position Some gearbox mounting surfaces are fitted with a gasket which is formed in the working position. To ensure the full functional...
Possible malfunctions
Manual transmission Sign Possible cause Vibration or noise The gearbox or engine is not mounted correctly. There is radial clearance. The gear or bearing is worn or...
Manual transmission Sign Possible cause Vibration or noise The gearbox or engine is not mounted correctly. There is radial clearance. The gear or bearing is worn or...

Technical operations on the car — checking the oil level
1. Unscrew the filler plug. 2. The oil level should be at the lower edge of the filler hole. 3. Check that the oil is not noticeably dirty and has the appropriate...
1. Unscrew the filler plug. 2. The oil level should be at the lower edge of the filler hole. 3. Check that the oil is not noticeably dirty and has the appropriate...

Technical operations on the car — changing the oil in the gearbox
Attention: Use caution as transmission oil has a high operating temperature. Be careful not to get burned. Be careful not to spill transmission oil on the exhaust pipe...
Attention: Use caution as transmission oil has a high operating temperature. Be careful not to get burned. Be careful not to spill transmission oil on the exhaust pipe...
Technical operations on the car — checking the oil level in the automatic transmission
1. Warm up the ATF (automatic transmission oil) to operating temperature (70-80°C), for this it is necessary to drive the car some distance. 2. Place the vehicle on a...
1. Warm up the ATF (automatic transmission oil) to operating temperature (70-80°C), for this it is necessary to drive the car some distance. 2. Place the vehicle on a...

Technical operations on the car — automatic transmission oil change
If you have a quick oil change system, you should use it. If there is no such installation, then the oil change must be carried out in the following order: 1. Disconnect...
If you have a quick oil change system, you should use it. If there is no such installation, then the oil change must be carried out in the following order: 1. Disconnect...
Technical operations on the car — replacement of the oil filter
1. Using a special tool (MB991610), remove the automatic transmission oil filter. 2. Clean the filter mounting surface from the bracket side. 3. Lubricate with ATF (oil...
1. Using a special tool (MB991610), remove the automatic transmission oil filter. 2. Clean the filter mounting surface from the bracket side. 3. Lubricate with ATF (oil...
Technical operations on the car — adjustment of the control cable and the starter interlock switch
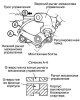
1. Set the automatic transmission selector lever to the "N" position. 2. Loosen the adjusting nut securing the cable to the control lever so that the cable and lever are...
1. Set the automatic transmission selector lever to the "N" position. 2. Loosen the adjusting nut securing the cable to the control lever so that the cable and lever are...

Technical operations on the car — checking the pressure in the hydraulic control system of the automatic transmission
1. Warm up the oil in the automatic transmission to an operating temperature of 80-100°C. 2. Raise the car on a lift so that the wheels can rotate freely. 3. Connect the...
1. Warm up the oil in the automatic transmission to an operating temperature of 80-100°C. 2. Raise the car on a lift so that the wheels can rotate freely. 3. Connect the...

Gear shift mechanism
Removal the gear shift mechanism Caution: When removing and installing the shift cables and linkages, be careful not to touch or hit the SRS control unit. 1. Set the...
Removal the gear shift mechanism Caution: When removing and installing the shift cables and linkages, be careful not to touch or hit the SRS control unit. 1. Set the...

Gearbox assembly
Removal the gearbox assembly Attention: To avoid damage to the paintwork, it is necessary to cover the body fenders with some material. Note: Mark the wires and tubes to...
Removal the gearbox assembly Attention: To avoid damage to the paintwork, it is necessary to cover the body fenders with some material. Note: Mark the wires and tubes to...

Transfer case control unit
Removal the transfer case control unit 1. Remove the front floor console. 2. Remove the transfer case control unit (1). 3. Remove the bracket (2). Installing the...
Removal the transfer case control unit 1. Remove the front floor console. 2. Remove the transfer case control unit (1). 3. Remove the bracket (2). Installing the...

Gearbox assembly — gearbox disassembly
Disassembling the gearbox 1. Remove the ventilation cover (1). 2. Remove the ventilation tube (2). 3. Remove the vacuum hose (3). 4. Remove the vacuum hose (4). 5....
Disassembling the gearbox 1. Remove the ventilation cover (1). 2. Remove the ventilation tube (2). 3. Remove the vacuum hose (3). 4. Remove the vacuum hose (4). 5....

Gearbox assembly — gearbox assembly
Gearbox assembly Note: When assembling, tighten the bolts to the tightening torques shown in the figure. 1. Perform adjustment before assembly. 1) Make adjustments using...
Gearbox assembly Note: When assembling, tighten the bolts to the tightening torques shown in the figure. 1. Perform adjustment before assembly. 1) Make adjustments using...

Gearbox assembly — check
Synchronizer ring 1. There should be no signs of abrasive wear or cracks. 2. There should be no traces of abrasive wear, rust, cracks or other noticeable defects on the...
Synchronizer ring 1. There should be no signs of abrasive wear or cracks. 2. There should be no traces of abrasive wear, rust, cracks or other noticeable defects on the...

Main drive gear
Disassembling the main drive gear 1. Remove the spring ring (1). 2. Remove the ball bearing (2). 1) Fix the ball bearing and remove it using special tool MD998801. 3....
Disassembling the main drive gear 1. Remove the spring ring (1). 2. Remove the ball bearing (2). 1) Fix the ball bearing and remove it using special tool MD998801. 3....

Counter shaft
Disassembling the counter shaft 1. Remove the spring ring (1). 2. Remove the roller bearing (2). 1) Remove the roller bearing using special tool MD998801. 3. Remove the...
Disassembling the counter shaft 1. Remove the spring ring (1). 2. Remove the roller bearing (2). 1) Remove the roller bearing using special tool MD998801. 3. Remove the...

Disassembling the main shaft
1. Remove the spring ring (1). 2. Remove the 3rd - 4th gear synchronizer ring gear (2). 3. Remove the sliding sleeve of the 3rd - 4th gear synchronizer (3). 1) Remove...
1. Remove the spring ring (1). 2. Remove the 3rd - 4th gear synchronizer ring gear (2). 3. Remove the sliding sleeve of the 3rd - 4th gear synchronizer (3). 1) Remove...

Assembling the main shaft
1. Install the main shaft (27). 2. Install the needle bearing (26). 3. Install the second gear pinion (25). 4. Install the inner synchronizer ring (24). 5. Install the...
1. Install the main shaft (27). 2. Install the needle bearing (26). 3. Install the second gear pinion (25). 4. Install the inner synchronizer ring (24). 5. Install the...

Checking the main shaft
Main shaft 1. Check the surface condition of the main shaft at the location where the needle bearing is installed. There should be no signs of abnormal wear, burning or...
Main shaft 1. Check the surface condition of the main shaft at the location where the needle bearing is installed. There should be no signs of abnormal wear, burning or...

Disassembling the transfer case
1. Remove the shift shaft drive gear (1). 2. Remove the dynamic shock absorber (2). 3. Remove the dust seal protection (3). 4. Remove the vehicle speed sensor (4). 5....
1. Remove the shift shaft drive gear (1). 2. Remove the dynamic shock absorber (2). 3. Remove the dust seal protection (3). 4. Remove the vehicle speed sensor (4). 5....

Adjustment before assembly
1. Make adjustments using soldering. 1) Install the solders (diameter 1 mm, and about 10 mm long) in the places indicated in the figure, in the transfer case housing. 2)...
1. Make adjustments using soldering. 1) Install the solders (diameter 1 mm, and about 10 mm long) in the places indicated in the figure, in the transfer case housing. 2)...

Transfer case assembly
Note: When assembling, tighten the bolts to the tightening torques shown in the figure. 1. Install the transfer case housing (68). 2. Install the oil guide (67). 3....
Note: When assembling, tighten the bolts to the tightening torques shown in the figure. 1. Install the transfer case housing (68). 2. Install the oil guide (67). 3....

Transfer case housing plate
Disassembling the transfer case housing plate 1. Unscrew the seal bolt (1). 2. Remove the bearing mount (2). 3. Remove the transfer case input gear (3). 4. Remove the...
Disassembling the transfer case housing plate 1. Unscrew the seal bolt (1). 2. Remove the bearing mount (2). 3. Remove the transfer case input gear (3). 4. Remove the...

Transfer case input gear
Disassembling the input gear of the transfer case 1. Remove the spring ring (1). 2. Remove the ball bearing (2). 1) Remove the ball bearing using special tool MD998801....
Disassembling the input gear of the transfer case 1. Remove the spring ring (1). 2. Remove the ball bearing (2). 1) Remove the ball bearing using special tool MD998801....

Counter shaft
Disassembling the counter shaft 1. Remove the ball bearing (1). 1) Remove the ball bearing using special tool MD998801. 2. Remove the spring ring (2). 3. Remove the...
Disassembling the counter shaft 1. Remove the ball bearing (1). 1) Remove the ball bearing using special tool MD998801. 2. Remove the spring ring (2). 3. Remove the...
Shift fork and shaft
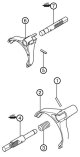
Disassembling the fork and shift shaft 1. Remove the spring pin (1). 2. Remove the 2-4WD shift fork (2). 3. Remove the spring (3). 4. Remove the 2-4WD shift shaft (4)....
Disassembling the fork and shift shaft 1. Remove the spring pin (1). 2. Remove the 2-4WD shift fork (2). 3. Remove the spring (3). 4. Remove the 2-4WD shift shaft (4)....

Rear output shaft
Disassembling the rear output shaft 1. Remove the spring ring (1). 2. Remove the ring gear (2). 3. Remove the spring ring (3). 4. Remove the ball bearing (4). 1) Remove...
Disassembling the rear output shaft 1. Remove the spring ring (1). 2. Remove the ring gear (2). 3. Remove the spring ring (3). 4. Remove the ball bearing (4). 1) Remove...

Transfer case drive shaft
Disassembling the transfer case drive shaft 1. Remove the ball bearing (1). 1) Fix the ball bearing using special tool MD998917. 2) Compress the transfer case drive...
Disassembling the transfer case drive shaft 1. Remove the ball bearing (1). 1) Fix the ball bearing using special tool MD998917. 2) Compress the transfer case drive...

Front output shaft
Disassembling the front output shaft 1. Remove the ball bearing (1). 1) Fix the ball bearing with special tool MD998801. 2) Compress the front output shaft with a press...
Disassembling the front output shaft 1. Remove the ball bearing (1). 1) Fix the ball bearing with special tool MD998801. 2) Compress the front output shaft with a press...
Pinion shift shaft
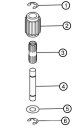
Disassembling the drive gear shift shaft 1. Remove the spring pin (1). 2. Remove the shift shaft drive gear (2). 3. Remove the bearing (3). 4. Remove the drive gear...
Disassembling the drive gear shift shaft 1. Remove the spring pin (1). 2. Remove the shift shaft drive gear (2). 3. Remove the bearing (3). 4. Remove the drive gear...
This section is available on: russian, bulgarian, belarusian, ukrainian, serbian, croatian, romanian, polish, slovak, hungarian
Similar materials for other Mitsubishi models
➤ Transmission: Manual gearbox Mitsubishi Colt 4 and 5 (1991-2003)
➤ Transmission: Car gearbox Mitsubishi Lancer 3 and 5 (1984-1992)
➤ Transmission: Manual gearbox Mitsubishi Galant 5 (1983-1989, petrol)
➤ Transmission: Mechanical gearbox Mitsubishi L200 4 (2005-2014, diesel)
➤ Transmission: Mechanical gearbox Mitsubishi Outlander 1 (2003-2008)
➤ Transmission: Mechanical gearbox Mitsubishi Space Star (1998-2005)
Link in different formats to this section
TEXTHTMLBB Code
- General information
- User manual
- Troubleshooting
- Maintenance
- Technical specifications
- Power unit
- Engine repair
- Cooling system
- Lubrication system
- Fuel system
- Engine management system
- Intake and exhaust system
- Engine electrical equipment
- Transmission
- Clutch
- Manual gearbox
- Automatic gearbox
- Drive shafts
- Chassis and running gear
- Front suspension
- Rear suspension
- Brake system
- Steering
- Body and interior
- Exterior (external elements)
- Interior (internal elements)
- Doors, locks and windows
- Body dimensions
- Electrical equipment
- Safety system (SRS)
- Air conditioner
- Equipment and devices
- Electrical diagrams
- General information
- User manual
- Seats and seat belts
- Instruments and controls
- Driving and operation
- Maintenance
- Power unit
- Gasoline engines
- Diesel engines
- Ignition system
- Engine electrical equipment
- Cooling and lubrication system
- Power and exhaust system
- Fuel system (gasoline)
- Fuel system (diesel)
- Transmission
- Clutch
- Mechanical gearbox
- Automatic gearbox
- Drive shafts and axles
- Chassis and running gear
- Front suspension
- Rear suspension
- Steering
- Brake system
- Body and interior
- Exterior (external elements)
- Interior (internal elements)
- Doors, locks and windows
- Electrical equipment
- Equipment and devices
- Heater and air conditioner
- Cruise control
- Headlights and lighting
- Electrical circuits