



Contents: Removal and installation ⤓ Examination ⤓ Checking the moment of the beginning…⤓ Replacing the protective cover of…⤓
Removal and installation
− The parts are removed in the order of numbers shown in the figure "Removing the anti-roll bar".
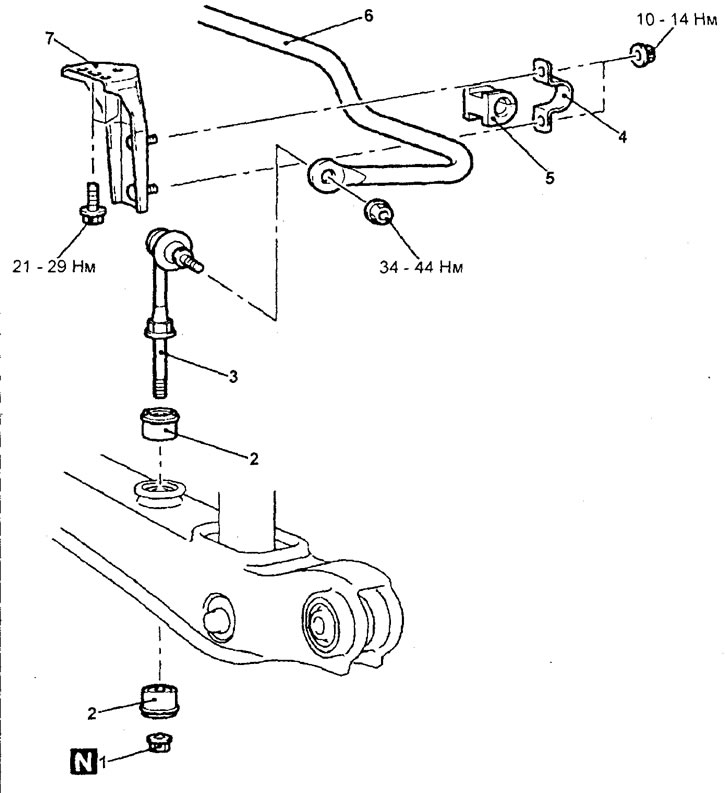
Removal the anti-roll bar. 1 - self-locking nut, 2 - rubber bushing, 3 - stabilizer bar, 4 - stabilizer mounting bracket, 5 - bushing, 6 - anti-roll bar, 7 - bracket support.
− Install the parts in the reverse order of removal. When installing the parts, pay attention to the following operations.
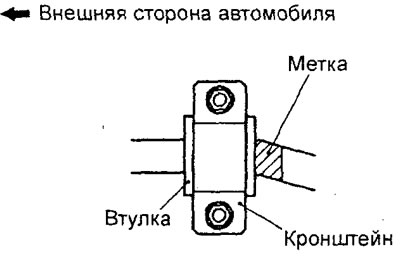
1. Installing the anti-roll bar.
Install the stabilizer bar, bushings and brackets as shown in the figure.
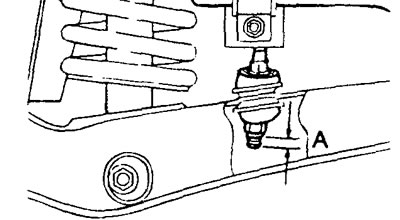
2. Installing the stabilizer bar.
Install the stabilizer bar so that the length of its protruding threaded part "A" is within the nominal value.
Nominal value "A" - 6 - 8 mm
- After installing the parts, check the protective covers for mechanical damage.
Examination
1. Check the bushings for wear and damage.
(The original was published on the website: mitsubishiman.ru)
2. Check the anti-roll bar for wear or damage.
3. Check the condition of all bolts
Checking the moment of the beginning of rotation of the pin of the ball joint of the stabilizer strut
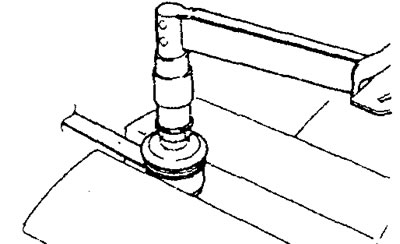
1. Rock the ball joint pin several times, put a nut on it, and, using a special torque wrench, measure the moment the ball joint pin begins to rotate.
Nominal value - 0.5 - 1.5 Nm
2. If the measured value exceeds the nominal value, replace the stabilizer bar assembly.
3. If the measured value is less than the nominal value, rotate the ball joint. If the rotation is smooth and without jamming, the stabilizer bar is considered fit for further use.
Replacing the protective cover of the stabilizer bar ball joint
Please note: the protective cover should only be replaced if it is damaged during maintenance work.
1. Remove the retaining ring and ball joint protective boot.
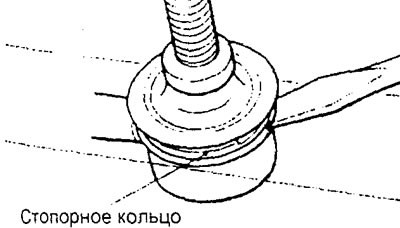
2. Apply general purpose grease to the sealing lip of the new boot and place it inside the boot.
Lubricant - R-2 general purpose grease or equivalent
3. Wrap the threaded portion of the ball joint pin with insulating tape, and then install the ball joint protective boot.
4. Secure the ball joint protective boot with the retaining ring.
5. Check the ball joint protective cover for cracks and damage.