
Head restraint adjustment
Headrest height adjustment lever:
- Left - type 1
- Right - type 2
Padded head restraints on top of the seat backs can reduce the risk of neck injury in the event of a rear impact.
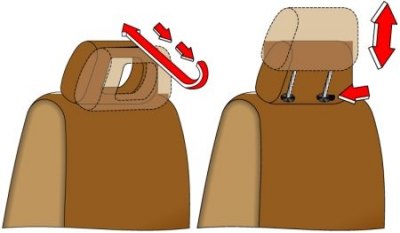
Type 1 (manually adjustable seats)
The headrests can be tilted forward two positions. If you try to tilt them further, they will return to their original position. The head restraints cannot be raised or lowered.
Type 2 (seats with automatic adjustment)
To reduce the risk of injury in the event of a collision, adjust the height of the head restraints so that the center of the head restraint is at eye level.
To raise the head restraint, pull it up. To lower the head restraint, push it down by pulling the head restraint adjustment knob in the direction of the arrow. After adjusting the height of the head restraint, push down on the head restraint to make sure it is securely locked.
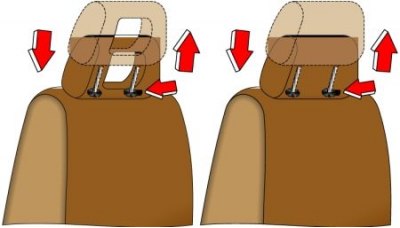
Removing the head restraints
Adjustment knob:
- Left - type 1
- Right - type 2
To remove the head restraints, push the handle in the direction of the arrow and pull the head restraint up.
To install the head restraints, first check that their front side is facing forward, then install them on the seatback by pushing the adjustment knob and lower them all the way down so that the locking latches engage. Check that the position of the adjustment knob is as shown in the illustration and try to lift the head restraints up to see if they are securely fastened.

1. Front seat
2. Back seat
3. Do not confuse!
Warning! Driving without head restraints is dangerous. Always drive with head restraints installed. Failure to install head restraints increases the risk of injury in the event of an accident.
Attention! The headrests for the front and rear seats are different in shape. When installing the head restraints, do not confuse the head restraints of the front and rear seats. The front seat head restraints are taller and thicker.