
English Русский
Български
Беларускі
Український
Српски
Hrvatski
Română
Polski
Slovenský
Magyar
Articles Bookmark Contacts Sitemap   
Company Audi Company Ford Company Hyundai Company Kia Company Mazda Company Mercedes-Benz Company Nissan
MitsubishiMan.ru


Home Colt Lancer Galant L200 Outlander Pajero Others
Lancer 9 (2000-2007, petrol) Lancer 3 and 5 (1984-1992)

Removal and installation the steering wheel (Mitsubishi Lancer 3)

  • Home
  • Lancer
  • 3 (1984-1992)
  • Chassis and running gear
  • Steering
  • Removal and installation the steering wheel
0
Contents: Removal ⤓ Installation ⤓
Note: Designations in the text refer to Figure K-4001.


Removal


Set the wheels to the straight ahead position.

Disconnect the ground cable from the battery.

Caution: This erases data in the electronic memory, such as the engine fault memory or the radio receiver code. Disconnect the battery only with the ignition switched off, otherwise the fuel injection device control unit may be damaged. Before disconnecting the battery, read the instructions in the "Radio receiver" and "Removing and installing the battery" sections.


The article is reprinted from a web resource [MitsubishiMan.ru]

Lift up the trim "5" in the middle of the steering wheel by first pulling the trim away from the steering wheel from below.

Unscrew the steering wheel mounting nut and the extension with a replaceable head.

Mark the position of the steering wheel on the control shaft by using a felt-tip pen or a scriber to draw a line along both parts.
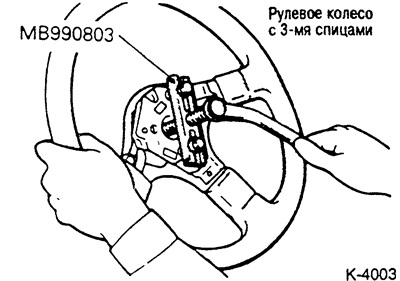


3-spoke steering wheel
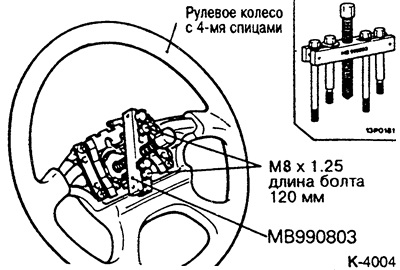


4-spoke steering wheel


Pull the steering wheel off the steering shaft with jerks. If the steering wheel does not come off in this way, use a suitable puller. To pull it off, screw the 2 puller bolts into the holes on the steering wheel on the left and right.


Caution: Do not remove the steering wheel by hammering, as this may damage the telescopic safety device.


Installation


Check that the turn signal switch is in neutral position, otherwise the steering wheel cam may be damaged when the steering wheel is installed.

Place the steering wheel on the splined joint of the steering shaft so that the spokes are horizontal and the markings match.

Secure the steering wheel with a nut.

Connect the battery ground cable, check the operation of the sound signal.

Make a test drive and check the position of the steering wheel when driving straight ahead. The steering wheel spokes should be horizontal, otherwise move the steering wheel to the appropriate position.

Check the automatic return to neutral of the turn signal switch.

If they are available, set the time on the clock and enter the security code into the radio.
This article is available at: russian, bulgarian, belarusian, ukrainian, serbian, croatian, romanian, polish, slovak, hungarian
This article was reviewed by: Dmitry Vasiliev
Share with friends:
◀ Previous
Lancer 3 and 5: Steering
Next ▶

Steering gearbox
Steering wheel / steering column — device
Removal and installation the steering tip
Removal and installation steering cuffs
Power steering — device
Checking the tightness of the steering system
Bleeding the steering system
Similar materials for other Mitsubishi models

➤ Checking the steering wheel play Mitsubishi Colt 4 and 5 (1991-2003)
➤ Removal and installation the steering wheel Mitsubishi Galant 6 and 7 (1987-1998)
➤ Steering wheel — disassembly and assembly Mitsubishi L200 4 (2005-2014, diesel)
➤ Locking and unlocking the steering wheel Mitsubishi Outlander 1 (2003-2008)
➤ Removal and installation the steering wheel Mitsubishi Pajero 1 and 2 (1982-1999)
➤ Steering wheel adjustment Mitsubishi Carisma (1995-2004)
Link in different formats to this article
Comments and feedback from visitors
No comments yet


Add up two numbers 42 + 44


Lancer 9 (2000-2007, petrol) 
  • General information
  • User manual
  • Maintenance
  • Power unit
  • Repair of MPI engines
  • Repair of GDI engines
  • Engine overhaul
  • Cooling and lubrication system
  • MPI fuel injection system
  • GDI fuel injection system
  • Intake and exhaust system
  • Starting and charging system
  • Transmission
  • Automatic gearbox
  • Variator (CVT)
  • Drive shafts and gearbox
  • Chassis and running gear
  • Front suspension
  • Rear suspension
  • Steering
  • Brake system
  • Body and interior
  • Doors, locks and windows
  • Exterior (external elements)
  • Interior (internal elements)
  • Electrical equipment
  • Heater and air conditioner
  • Security system SRS
  • Equipment and devices
  • Wiring diagrams (saloon)
  • Wiring diagrams (wagon)
Lancer 3 and 5 (1984-1992) 
  • General information
  • Maintenance
  • Power unit
  • Engine repair
  • Lubrication system
  • Cooling system
  • Ignition system
  • Fuel system
  • Carburetor
  • Fuel injection
  • Diesel power system
  • Exhaust system
  • Transmission
  • Clutch
  • Car gearbox
  • Chassis and running gear
  • Front suspension
  • Rear suspension
  • Steering
  • Brake system
  • Wheels and tires
  • Body and interior
  • Exterior (external elements)
  • Interior (internal elements)
  • Heating system
  • Electrical equipment
  • Equipment and devices
  • Power devices
  • Electrical circuits
MitsubishiMan.ru © 2018–2026 • Mobile version • Articles about Mitsubishi • Contacts • Sitemap: EN BG BY UA RS HR RO PL SK HU • Site search • Bookmark
Colt 2 and 3 (1983-1993) · Colt 4 and 5 (1991-2003) · Colt 5 (1995-2003) · Lancer 3 and 5 (1984-1992) · Lancer 9 (2000-2007) · Galant 5 (1983-1989) · Galant 6 and 7 (1987-1998) · L200 4 (2005-2014) · Outlander 1 (2003-2008) · Pajero 1 and 2 (1982-1999) · Pajero 4 (2006-2021) · Carisma (1995-2004) · Space Star (1998-2005) ·
This resource sets cookies 🍪 to avoid bothering you with repeated data entry.