
English Русский
Български
Беларускі
Український
Српски
Hrvatski
Română
Polski
Slovenský
Magyar
Articles Bookmark Contacts Sitemap   
Company Audi Company Ford Company Hyundai Company Kia Company Mazda Company Mercedes-Benz Company Nissan
MitsubishiMan.ru


Home Colt Lancer Galant L200 Outlander Pajero Others
Lancer 9 (2000-2007, petrol) Lancer 3 and 5 (1984-1992)

Checking the operation of the brake booster check valve (Mitsubishi Lancer 9)

  • Home
  • Lancer
  • 9 (2000-2007, petrol)
  • Chassis and running gear
  • Brake system
  • Checking the operation of the brake booster check valve
0
Contents: Table. Checking the vacuum booster…⤓ Checking the operation of the brake…⤓ Brake fluid pressure with brake…⤓ Brake fluid pressure with brake…⤓ Brake fluid pressure with brake…⤓ Brake fluid pressure with the brake…⤓
Caution: When testing the check valve, it must be connected to a vacuum hose.


1. Remove the vacuum hose.

Note: When removing the vacuum hose, do not disconnect the check valve from it.


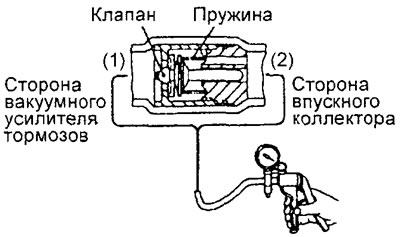
2. Check the operation of the check valve using a hand vacuum pump according to the table below.

Table. Checking the vacuum booster check valve.


Connecting the vacuum pump Admission/rejection criteria
From the brake booster side (1) A vacuum is created and maintained
From the intake manifold side (2) No vacuum is created

Note: If the check valve is faulty, it must be replaced together with the vacuum hose.


Checking the operation of the brake booster using pressure gauges


1. Connect the pressure gauges and vacuum gauge as shown in the figure.
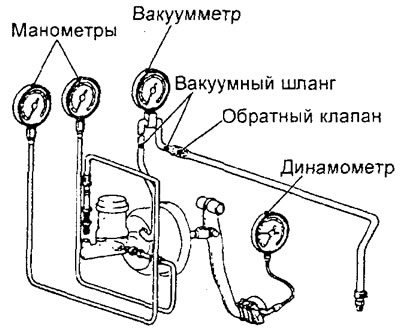


2. Perform a no-load amplifier test.


Start the engine. Stop the engine when the vacuum is 67 kPa. After stopping the engine, the vacuum does not drop within 15 seconds.

3. Perform a load test of the amplifier.

Start the engine and press the brake pedal with a force of 200 N. Stop the engine when the vacuum is 67 kPa. After the engine stops, the vacuum will decrease to approximately 3.3 kPa.

4. Perform the test with the vacuum booster not working.

Stop the engine. Make sure the vacuum is 0 kPa. Make sure the brake fluid pressure corresponds to the maximum permissible values with a brake pedal force of 100 N and 300 N.

Brake fluid pressure with brake booster not working (sedan).


Brake pedal force, N Brake fluid pressure, kPa
100 0
300 1824

Brake fluid pressure with brake booster not working (station wagon).


Brake pedal force, N Brake fluid pressure, kPa
100 0
300 1582

5. Perform a test of the amplifier operation.

Start the engine. When the vacuum reaches 67 kPa, make sure that the brake fluid pressure corresponds to the maximum permissible values with a brake pedal force of 100 N and 300 N.

Brake fluid pressure with brake booster operating (sedan).


Brake pedal force, N Brake fluid pressure, kPa
100 4432 - 4938
300 10421 - 10927

Brake fluid pressure with the brake booster operating (station wagon).


Brake pedal force, N Brake fluid pressure, kPa
100 4399 -4839
300 12162 - 12602

Note: If the results of one of the tests are unsatisfactory, then you should look for a fault in the vacuum hose, check valve or brake booster.
This article is available at: russian, bulgarian, belarusian, ukrainian, serbian, croatian, romanian, polish, slovak, hungarian
This article was reviewed by: Arseny Pavlov
Share with friends:
◀ Previous
Lancer 9: Brake system
Next ▶

Checking the operation of the brake booster
Checking and adjusting the brake pedal
Bleeding the brake system
Checking the brake fluid level sensor
Checking disc brakes
Checking the rear drum brakes
Brake pedal
Similar materials for other Mitsubishi models

➤ Functional check of the brake booster valve Mitsubishi Colt 5 (1995-2003, petrol)
➤ Checking the proper functioning of the brake booster Mitsubishi Galant 6 and 7 (1987-1998)
➤ Checking the brake booster Mitsubishi L200 4 (2005-2014, diesel)
➤ Checking the operation of the check valve Mitsubishi Outlander 1 (2003-2008)
➤ Checking the operation of the check valve Mitsubishi Pajero 4 (2006-2021)
➤ Checking the functionality of the brake booster check valve Mitsubishi Carisma (1995-2004)
Link in different formats to this article
Comments and feedback from visitors
No comments yet


Add up two numbers 28 + 47


Lancer 9 (2000-2007, petrol) 
  • General information
  • User manual
  • Maintenance
  • Power unit
  • Repair of MPI engines
  • Repair of GDI engines
  • Engine overhaul
  • Cooling and lubrication system
  • MPI fuel injection system
  • GDI fuel injection system
  • Intake and exhaust system
  • Starting and charging system
  • Transmission
  • Automatic gearbox
  • Variator (CVT)
  • Drive shafts and gearbox
  • Chassis and running gear
  • Front suspension
  • Rear suspension
  • Steering
  • Brake system
  • Body and interior
  • Doors, locks and windows
  • Exterior (external elements)
  • Interior (internal elements)
  • Electrical equipment
  • Heater and air conditioner
  • Security system SRS
  • Equipment and devices
  • Wiring diagrams (saloon)
  • Wiring diagrams (wagon)
Lancer 3 and 5 (1984-1992) 
  • General information
  • Maintenance
  • Power unit
  • Engine repair
  • Lubrication system
  • Cooling system
  • Ignition system
  • Fuel system
  • Carburetor
  • Fuel injection
  • Diesel power system
  • Exhaust system
  • Transmission
  • Clutch
  • Car gearbox
  • Chassis and running gear
  • Front suspension
  • Rear suspension
  • Steering
  • Brake system
  • Wheels and tires
  • Body and interior
  • Exterior (external elements)
  • Interior (internal elements)
  • Heating system
  • Electrical equipment
  • Equipment and devices
  • Power devices
  • Electrical circuits
MitsubishiMan.ru © 2018–2026 • Mobile version • Articles about Mitsubishi • Contacts • Sitemap: EN BG BY UA RS HR RO PL SK HU • Site search • Bookmark
Colt 2 and 3 (1983-1993) · Colt 4 and 5 (1991-2003) · Colt 5 (1995-2003) · Lancer 3 and 5 (1984-1992) · Lancer 9 (2000-2007) · Galant 5 (1983-1989) · Galant 6 and 7 (1987-1998) · L200 4 (2005-2014) · Outlander 1 (2003-2008) · Pajero 1 and 2 (1982-1999) · Pajero 4 (2006-2021) · Carisma (1995-2004) · Space Star (1998-2005) ·
This resource sets cookies 🍪 to avoid bothering you with repeated data entry.