
English Русский
Български
Беларускі
Український
Српски
Hrvatski
Română
Polski
Slovenský
Magyar
Articles Bookmark Contacts Sitemap   
Company Audi Company Ford Company Hyundai Company Kia Company Mazda Company Mercedes-Benz Company Nissan
MitsubishiMan.ru


Home Colt Lancer Galant L200 Outlander Pajero Others
Lancer 9 (2000-2007, petrol) Lancer 3 and 5 (1984-1992)

Checking and adjusting the brake pedal (Mitsubishi Lancer 9)

  • Home
  • Lancer
  • 9 (2000-2007, petrol)
  • Chassis and running gear
  • Brake system
  • Checking and adjusting the brake pedal
0
Contents: Checking the free travel of the…⤓ Checking the distance between the…⤓
Note: The procedure for checking the brake fluid level is given in the chapter "Maintenance and general check and adjustment procedures".


Adjusting the brake pedal height


- Remove the floor mat located under the brake pedal.

- Measure the height of the brake pedal above the floor as shown in the figure.

Nominal value "A" - 162.1- 172.1 mm
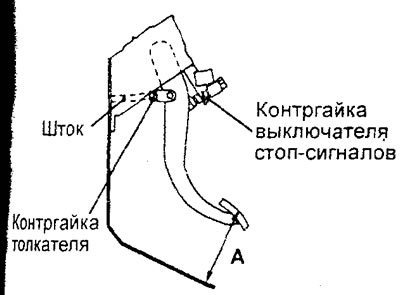


If the measured height "A" does not correspond to the nominal value, then to adjust it, perform the following operations:
  • a) Disconnect the brake light switch connector.
  • b) Loosen the brake light switch by 0.25 turns.
  • c) Remove the pin and adjust the height of the brake pedal above the floor by turning the pusher so that it corresponds to the nominal value.

Note: When the stem is rotated 180°, the pedal height changes by approximately 2.4 mm.

  • d) While holding the brake pedal with your hand at the highest possible height, turn the brake light switch until it touches the limiter.
  • d) Turn the switch an additional 0.25 turns and make sure that the gap between the limiter and the switch corresponds to that shown in the figure.

[The original can be found on the website www.mitsubishiman.ru]
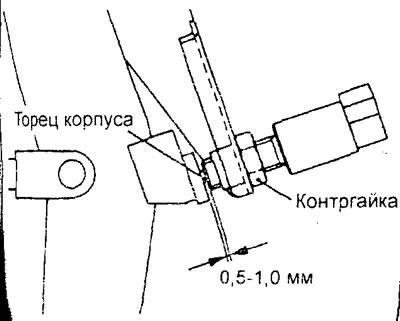


  • e) Connect the connector to the brake light switch.

Note: Make sure that the brake lights do not come on when the brake pedal is released.


4. Check the automatic transmission selector locking mechanism and the key locking mechanism in the ignition switch.

5. Place the floor mat back in place.

Checking the free travel of the brake pedal


1. With the engine not running, press the brake pedal two or three times. After the vacuum in the brake booster has decreased, press the brake pedal by hand and check that the free travel of the pedal "B" (until noticeable resistance to movement) corresponds to the nominal value.

Nominal value "B" - 3 - 8 mm
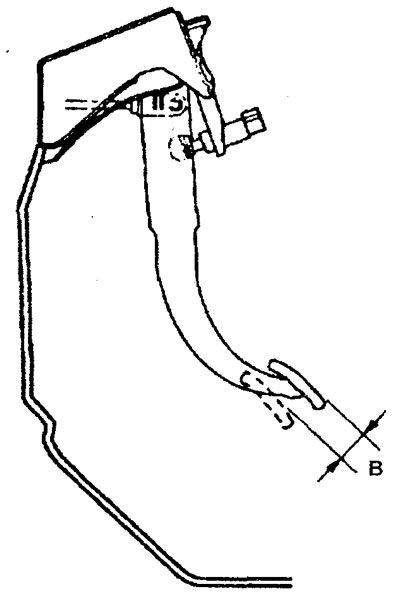


2. If the free play does not correspond to the nominal value, then perform the following checks:


  • a) Check that there is no excessive clearance in the connection between the brake pedal lever and the pushrod fork pin or the pin and the pushrod fork.
  • b) Checking the height of the brake pedal.
  • c) Checking the correct installation of the brake light switch, etc.

Checking the distance between the pressed brake pedal and the floor of the passenger compartment


1. Remove the floor mat located under the brake pedal.

2. Start the engine, press the brake pedal with a force of approximately 500 N and measure the distance "C" between the pressed brake pedal (at the top of the pedal pad) and the passenger compartment floor (driver's footrest).
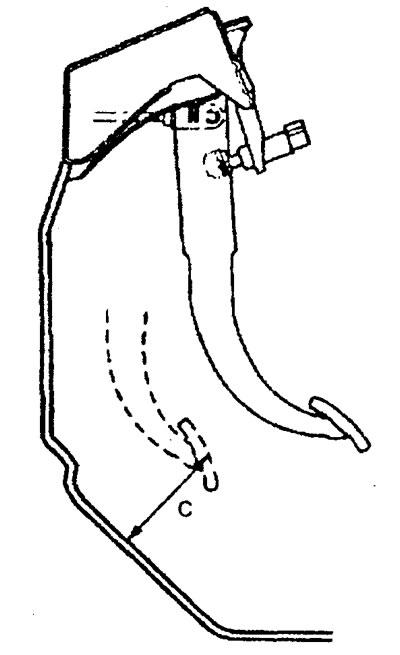


Nominal value "C" - 90 mm or more

2. If the measured distance is less than the nominal value, perform the following checks:
  • a) Checking for air in the brake hydraulic system.
  • b) Checking the thickness of the brake pads of a disc brake or drum brake.
  • c) Checking that the parking brake is not sticking.

3. Adjust or replace faulty parts if necessary.

4. Place the floor mat back in place.
This article is available at: russian, bulgarian, belarusian, ukrainian, serbian, croatian, romanian, polish, slovak, hungarian
This article was reviewed by: Arseny Pavlov
Share with friends:
◀ Previous
Lancer 9: Brake system
Next ▶

 
Checking the operation of the brake booster
Checking the operation of the brake booster check valve
Bleeding the brake system
Checking the brake fluid level sensor
Checking disc brakes
Similar materials for other Mitsubishi models

➤ Checking and adjusting the brake pedal Mitsubishi Colt 5 (1995-2003, petrol)
➤ Adjusting the foot brake pedal Mitsubishi Galant 6 and 7 (1987-1998)
➤ Checking the free travel of the brake pedal Mitsubishi L200 4 (2005-2014, diesel)
➤ Checking and adjusting the brake pedal Mitsubishi Outlander 1 (2003-2008)
➤ Checking and adjusting the brake pedal Mitsubishi Pajero 4 (2006-2021)
➤ Checking and adjusting the brake pedal Mitsubishi Carisma (1995-2004)
Link in different formats to this article
Comments and feedback from visitors
No comments yet


Add up two numbers 42 + 24


Lancer 9 (2000-2007, petrol) 
  • General information
  • User manual
  • Maintenance
  • Power unit
  • Repair of MPI engines
  • Repair of GDI engines
  • Engine overhaul
  • Cooling and lubrication system
  • MPI fuel injection system
  • GDI fuel injection system
  • Intake and exhaust system
  • Starting and charging system
  • Transmission
  • Automatic gearbox
  • Variator (CVT)
  • Drive shafts and gearbox
  • Chassis and running gear
  • Front suspension
  • Rear suspension
  • Steering
  • Brake system
  • Body and interior
  • Doors, locks and windows
  • Exterior (external elements)
  • Interior (internal elements)
  • Electrical equipment
  • Heater and air conditioner
  • Security system SRS
  • Equipment and devices
  • Wiring diagrams (saloon)
  • Wiring diagrams (wagon)
Lancer 3 and 5 (1984-1992) 
  • General information
  • Maintenance
  • Power unit
  • Engine repair
  • Lubrication system
  • Cooling system
  • Ignition system
  • Fuel system
  • Carburetor
  • Fuel injection
  • Diesel power system
  • Exhaust system
  • Transmission
  • Clutch
  • Car gearbox
  • Chassis and running gear
  • Front suspension
  • Rear suspension
  • Steering
  • Brake system
  • Wheels and tires
  • Body and interior
  • Exterior (external elements)
  • Interior (internal elements)
  • Heating system
  • Electrical equipment
  • Equipment and devices
  • Power devices
  • Electrical circuits
MitsubishiMan.ru © 2018–2026 • Mobile version • Articles about Mitsubishi • Contacts • Sitemap: EN BG BY UA RS HR RO PL SK HU • Site search • Bookmark
Colt 2 and 3 (1983-1993) · Colt 4 and 5 (1991-2003) · Colt 5 (1995-2003) · Lancer 3 and 5 (1984-1992) · Lancer 9 (2000-2007) · Galant 5 (1983-1989) · Galant 6 and 7 (1987-1998) · L200 4 (2005-2014) · Outlander 1 (2003-2008) · Pajero 1 and 2 (1982-1999) · Pajero 4 (2006-2021) · Carisma (1995-2004) · Space Star (1998-2005) ·
This resource sets cookies 🍪 to avoid bothering you with repeated data entry.