
English Русский
Български
Беларускі
Український
Српски
Hrvatski
Română
Polski
Slovenský
Magyar
Articles Bookmark Contacts Sitemap   
Company Audi Company Ford Company Hyundai Company Kia Company Mazda Company Mercedes-Benz Company Nissan
MitsubishiMan.ru


Home Colt Lancer Galant L200 Outlander Pajero Others
Outlander 1 (2003-2008)

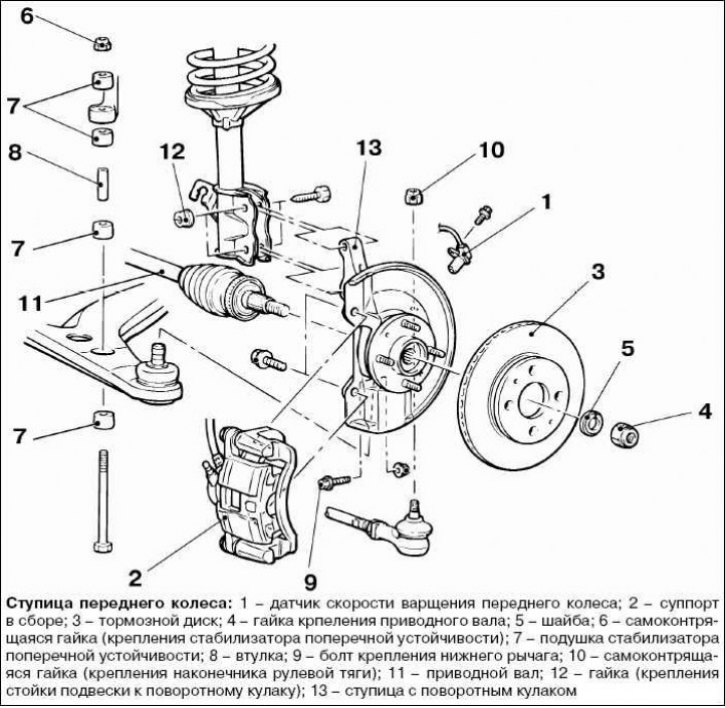
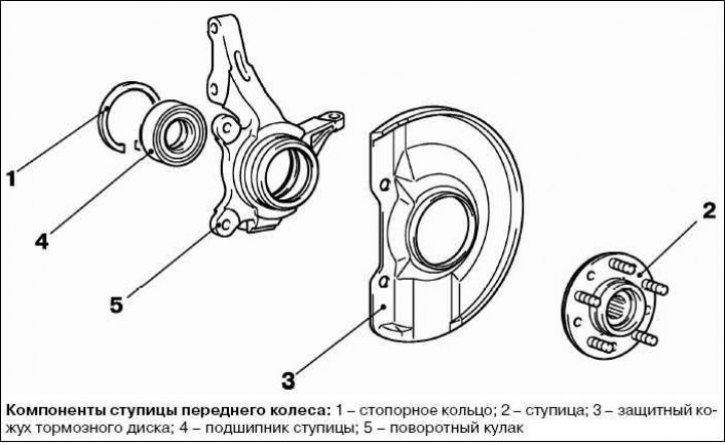
Removal and installation the front wheel hub assembly (Mitsubishi Outlander 1)

  • Home
  • Outlander
  • 1 (2003-2008)
  • Chassis and running gear
  • Front suspension
  • Removal and installation the front wheel hub assembly
0
Contents: Post-installation operations ⤓ Removal the caliper assembly ⤓ Removal the brake disc ⤓


Caution! When removing and installing the drive shaft, be careful not to hit the toothed ring of the wheel speed sensor, which is installed on the outer ring of the outer constant velocity joint. Otherwise, the toothed ring of the sensor will be damaged.


Attention! When performing maintenance work, be careful not to hit the pole piece located at the top of the front wheel speed sensor.


Post-installation operations


Check the condition of the protective case, paying attention to cracks and other damages. To do this, press on the case with your fingers.

Removal the caliper assembly


Secure the removed caliper assembly with wire or similar object,


Removal the brake disc


The material was borrowed from the website (MITSUBISHIMAN)

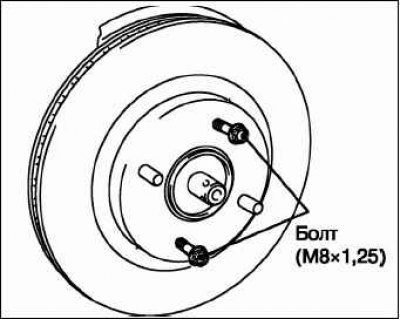
If the brake disc cannot be removed, then screw on the M8x1.25 bolts as shown in the figure. Remove the brake disc, tightening the bolts evenly and alternately.
This article is available at: russian, bulgarian, belarusian, ukrainian, serbian, croatian, romanian, polish, slovak, hungarian
This article was reviewed by: Arseny Pavlov
Share with friends:
◀ Previous
Outlander 1: Front suspension
Next ▶

Description and design of the front axle
Checking the vehicle's suspension for damage and loose fasteners
Disassembly and assembly of the front wheel hub assembly
Front Suspension Specifications and Testing
Disassembly and assembly of the telescopic rack assembly
Removal and installation the lower suspension arm
Similar materials for other Mitsubishi models

➤ General description of front wheel drive shafts Mitsubishi Colt 4 and 5 (1991-2003)
➤ Steering / Front Wheel Drive Mitsubishi Lancer 3 and 5 (1984-1992)
➤ Removal and installation of steering knuckles and hub… Mitsubishi Galant 6 and 7 (1987-1998)
➤ Checking the front and rear wheel hub bearings Mitsubishi L200 4 (2005-2014, diesel)
➤ Checking the axial clearance of the front wheel hub Mitsubishi Pajero 4 (2006-2021)
➤ Front Wheel Hub — Removal, Inspection and Installation Mitsubishi Carisma (1995-2004)
Link in different formats to this article
Comments and feedback from visitors
No comments yet


Add up two numbers 46 + 40


Outlander 1 (2003-2008) 
  • General information
  • User manual
  • Governing bodies
  • Salon equipment
  • Driving and maintenance
  • Power unit
  • Engine repair
  • Cooling and lubrication system
  • Fuel injection system (MPI)
  • Transmission
  • Clutch
  • Mechanical gearbox
  • Automatic gearbox
  • Drive shafts and cardan
  • Chassis and running gear
  • Wheels and tires
  • Front suspension
  • Rear suspension
  • Steering
  • Brake system
  • Body and interior
  • Exterior (external elements)
  • Doors, locks and windows
  • Electrical equipment
  • Equipment and devices
  • Headlights and lighting
  • Power devices
  • Ignition system
  • Electrical circuits
MitsubishiMan.ru © 2018–2026 • Mobile version • Articles about Mitsubishi • Contacts • Sitemap: EN BG BY UA RS HR RO PL SK HU • Site search • Bookmark
Colt 2 and 3 (1983-1993) · Colt 4 and 5 (1991-2003) · Colt 5 (1995-2003) · Lancer 3 and 5 (1984-1992) · Lancer 9 (2000-2007) · Galant 5 (1983-1989) · Galant 6 and 7 (1987-1998) · L200 4 (2005-2014) · Outlander 1 (2003-2008) · Pajero 1 and 2 (1982-1999) · Pajero 4 (2006-2021) · Carisma (1995-2004) · Space Star (1998-2005) ·
This resource sets cookies 🍪 to avoid bothering you with repeated data entry.