
English Русский
Български
Беларускі
Український
Српски
Hrvatski
Română
Polski
Slovenský
Magyar
Articles Bookmark Contacts Sitemap   
Company Audi Company Ford Company Hyundai Company Kia Company Mazda Company Mercedes-Benz Company Nissan
MitsubishiMan.ru


Home Colt Lancer Galant L200 Outlander Pajero Others
Lancer 9 (2000-2007, petrol) Lancer 3 and 5 (1984-1992)

Checking the battery (Mitsubishi Lancer 3)

  • Home
  • Lancer
  • 3 (1984-1992)
  • Electrical equipment
  • Power devices
  • Checking the battery
0
Contents: Checking the density of the…⤓ Checking the battery under load ⤓ Test values ⤓
There are two ways to test a battery. Depending on the testing method, different testing devices are required.

Checking the density of the electrolyte
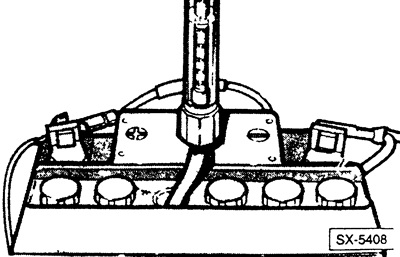


Together with voltage measurement, the density of the electrolyte allows you to make accurate conclusions about the state of charge of the battery. A hydrometer is used for testing. The higher the specific gravity (density) of the electrolyte, the higher the float rises. The density of the electrolyte can be read off the scale as specific gravity (g/ml) or in Baume degrees (+°Be). Batteries should have the following characteristics (at an electrolyte temperature of about 20°C):
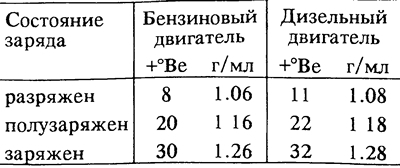


Check each battery can in sequence, all cans should have the same electrolyte density (permissible difference 0.04 g/ml). Otherwise, you can suspect a battery defect.


Checking the battery under load


Connect the voltmeter to the battery terminals.

Note: If the battery voltage (without consumers connected) is less than 12.2 V, the battery is discharged and must be charged.


Start the engine and measure the voltage.

During engine starting, the voltage should not drop below 8 V (at an electrolyte temperature of +20°C).

If the voltage drops immediately to zero and different electrolyte densities are measured in different jars, it can be concluded that the battery is faulty.

The total battery voltage can also be measured using a load fork. Follow the manufacturer's operating instructions.

Test values
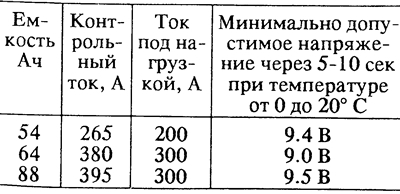


Note: If the total voltage during this measurement (duration 10 sec) drops below the specified values, the battery is either discharged or faulty.
This article is available at: russian, bulgarian, belarusian, ukrainian, serbian, croatian, romanian, polish, slovak, hungarian
This article was reviewed by: Dmitry Vasiliev
Share with friends:
◀ Previous
Lancer 3 and 5: Power devices
Next ▶

Removal and installation the battery
Self-discharge of the battery
Charging the battery
Storing the battery
Battery fault diagnostics
Generator — General Information
Similar materials for other Mitsubishi models

➤ Checking the battery Mitsubishi Colt 4 and 5 (1991-2003)
➤ Checking, servicing and charging the battery Mitsubishi Galant 6 and 7 (1987-1998)
➤ Checking the level and density of battery electrolyte Mitsubishi L200 4 (2005-2014, diesel)
➤ Checking the condition of the battery and its terminals Mitsubishi Outlander 1 (2003-2008)
➤ Replacing the remote control battery Mitsubishi Pajero 1 and 2 (1982-1999)
➤ Checking the voltage drop on the wire connecting the… Mitsubishi Space Star (1998-2005)
Link in different formats to this article
Comments and feedback from visitors
No comments yet


Add up two numbers 29 + 35


Lancer 9 (2000-2007, petrol) 
  • General information
  • User manual
  • Maintenance
  • Power unit
  • Repair of MPI engines
  • Repair of GDI engines
  • Engine overhaul
  • Cooling and lubrication system
  • MPI fuel injection system
  • GDI fuel injection system
  • Intake and exhaust system
  • Starting and charging system
  • Transmission
  • Automatic gearbox
  • Variator (CVT)
  • Drive shafts and gearbox
  • Chassis and running gear
  • Front suspension
  • Rear suspension
  • Steering
  • Brake system
  • Body and interior
  • Doors, locks and windows
  • Exterior (external elements)
  • Interior (internal elements)
  • Electrical equipment
  • Heater and air conditioner
  • Security system SRS
  • Equipment and devices
  • Wiring diagrams (saloon)
  • Wiring diagrams (wagon)
Lancer 3 and 5 (1984-1992) 
  • General information
  • Maintenance
  • Power unit
  • Engine repair
  • Lubrication system
  • Cooling system
  • Ignition system
  • Fuel system
  • Carburetor
  • Fuel injection
  • Diesel power system
  • Exhaust system
  • Transmission
  • Clutch
  • Car gearbox
  • Chassis and running gear
  • Front suspension
  • Rear suspension
  • Steering
  • Brake system
  • Wheels and tires
  • Body and interior
  • Exterior (external elements)
  • Interior (internal elements)
  • Heating system
  • Electrical equipment
  • Equipment and devices
  • Power devices
  • Electrical circuits
MitsubishiMan.ru © 2018–2026 • Mobile version • Articles about Mitsubishi • Contacts • Sitemap: EN BG BY UA RS HR RO PL SK HU • Site search • Bookmark
Colt 2 and 3 (1983-1993) · Colt 4 and 5 (1991-2003) · Colt 5 (1995-2003) · Lancer 3 and 5 (1984-1992) · Lancer 9 (2000-2007) · Galant 5 (1983-1989) · Galant 6 and 7 (1987-1998) · L200 4 (2005-2014) · Outlander 1 (2003-2008) · Pajero 1 and 2 (1982-1999) · Pajero 4 (2006-2021) · Carisma (1995-2004) · Space Star (1998-2005) ·
This resource sets cookies 🍪 to avoid bothering you with repeated data entry.