
For proper balancing, the wheel assembly must be correctly fixed on the stand. One of the important conditions for proper installation is the installation of the wheel in the center of the shaft of the balancing stand.
Wheel balancers removed from the vehicle must be periodically calibrated in order to obtain accurate results when balancing wheels.
A poorly calibrated wheel balancer can cause unnecessary tire, shock absorber, suspension or steering replacements.
Calibrate the wheel balancer every 100 wheel balances.
The operation manual of the balancing stand should describe the operations for its calibration. If the steps to calibrate your balancer are not available, use the general views described in this section for zero calibration, static and dynamic balancing. This flowchart also contains the steps to check the calibration of the balancer.
Methodology (tips for balancing)
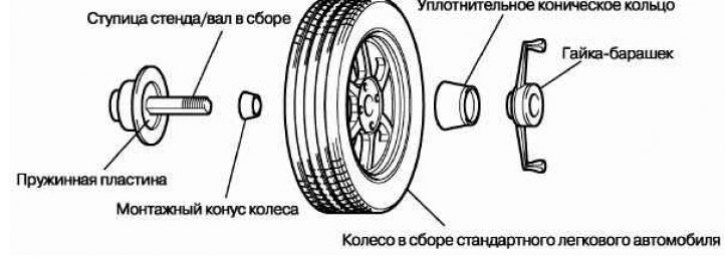
Check for dirt and rust on the balancer cone and wheel mounting cone.
On this vehicle, the center hole of the wheel on the hub side is chamfered.
In this case, it is necessary to use a reverse cone on the balancing stand to center the wheel under test on the stand shaft.
Install the wheel mounting cone. The acceptable cone diameter for this vehicle's wheel is 67.0 mm.
Before balancing, remove all weights from the wheel (at both sides). Also check the condition of the wheel and tire on both sides.
When installing the weights, nail them in with strikes applied at right angles.
Confirmation of correctly performed wheel balancing
After finishing wheel balancing, loosen the wing nut and rotate the wheel 180°relative to the hub of the wheel balancer. Re-tighten the wing nut and check the wheel balance again. If necessary, repeat wheel balancing operations.
Rotate the wheel another 180°relative to the wheel hub.
If each time the wheel is unbalanced when it is subsequently rotated relative to the hub of the stand, then most likely the balancing stand requires calibration.
Balancer Calibration Check
Place the undamaged wheel and tire assembly on the balancer. Balance the wheel.
Check zero calibration. Loosen the wing nut of the stand, turn the wheel half a turn (180°), re-tighten the wing nut.
Check wheel balance. If the imbalance does not exceed 5 g, the zero calibration is OK. Rebalance the wheel and go to step 4 to check the static balance. If the imbalance is greater than 5 g, proceed to the next step.
Loosen the wing nut of the stand, turn the wheel a quarter of a turn (90°), re-tightening the wing nut. Check wheel balance. If the imbalance is less than 5 g, then the wheel may not be centered on the stand, or the mounting cones, cup and/or wing nut may be damaged or dirty, or may not fit the wheel. It may be necessary to contact «Operation manual» balancing stand to clarify the rules for mounting wheels on the stand. After completing the necessary adjustments, check the wheel balance again. If everything is in order, go to the next step.
If the imbalance exceeds 5 g, the balancer needs to be calibrated. Contact the manufacturer of the balancing stand in connection with the need to calibrate the stand by their representatives.
Static balancing check
Attach a 5g weight to the outer bead of the wheel rim. Check wheel balance. The balancer should detect a 5±2g imbalance between 170 and 190°from this 5g weight.
If the imbalance is within the normal range, the static balance calibration is in order. Proceed to the next step in checking dynamic balancing.
If the imbalance exceeds the norm, the balancing stand needs to be calibrated. Contact the manufacturer of the balancing stand in connection with the need to calibrate the stand by their representatives.
Checking dynamic balancing
Attach the 5g weight to the inner bead of the rim at a 180°angle to the 5g weight that was attached in the previous step. Recheck the imbalance. The balancer should detect a 5±2 g imbalance from 170 to 190°from both the inner and outer 5 gram weights. If the imbalance is within the normal range, the dynamic balance calibration is in order. Balancer calibration check completed. If the imbalance exceeds the norm, the balancing stand needs to be calibrated. Contact the manufacturer of the balancing stand in connection with the need to calibrate the stand by their representatives.
Tire pressure check
Attention! The nominal tire pressure is indicated on a label on the B-pillar on the driver's side.
Tire wear check
Tire tread depth: minimum 1.6 mm.
If the tire tread depth is less than the specified limit, replace the tire.
Attention! When the tread depth of a tire becomes less than 1.6 mm, a wear indicator appears on the tire.
Tire Runout Check
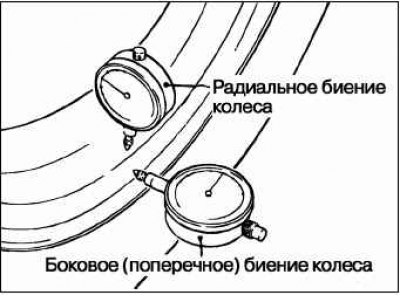
Raise the car so that its wheel does not touch the floor. While slowly rotating the wheel by hand, measure the runout of the wheel with a dial gauge.
If the wheel runout exceeds the limit, replace the wheel.
Limit value

Parts Installation Operations
Tighten the wheel nuts to the specified torque.
Rated tightening torque: 98±10 Nm.