
English Русский
Български
Беларускі
Український
Српски
Hrvatski
Română
Polski
Slovenský
Magyar
Articles Bookmark Contacts Sitemap   
Company Audi Company Ford Company Hyundai Company Kia Company Mazda Company Mercedes-Benz Company Nissan
MitsubishiMan.ru


Home Colt Lancer Galant L200 Outlander Pajero Others
Lancer 9 (2000-2007, petrol) Lancer 3 and 5 (1984-1992)

Checking/Adjusting Clutch Pedal Free Travel (Mitsubishi Lancer 3)

  • Home
  • Lancer
  • 3 (1984-1992)
  • Transmission
  • Clutch
  • Checking/Adjusting Clutch Pedal Free Travel
0
Contents: Mechanical clutch drive ⤓ Hydraulically operated clutch ⤓
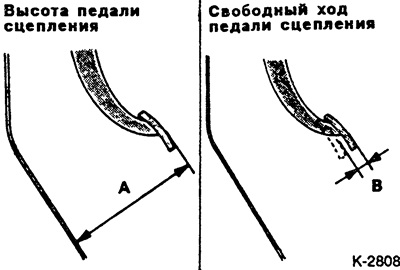
The height and free play of the clutch pedal should be checked if there is difficulty in disengaging and engaging the clutch, and also after removing the primary clutch cylinder.

Mechanical clutch drive


Measure the distance from the pedal to the floor trim.

  • Required value A (1.84 - 8.88): 158-163 mm.
  • Required value A (9.88 - 3.92): 168-171 mm.

On cars manufactured from January 1984 to August 1988, adjustment is made by turning the stop bolt at the pedal support. Before doing this, loosen the lock nut and tighten it again after adjustment.

On cars manufactured from August 1988 to March 1992, the pedal height is not adjustable. If necessary, check the pedal support for deformation and possibly replace it.

Press the clutch pedal with your finger until you feel a noticeable resistance. Measure the free travel of the pedal. The required value B: 20-30 mm.
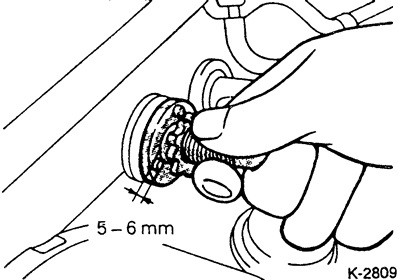


If the pedal free play is outside the tolerance, adjust the clutch pedal free play by turning the outer clutch cable mounting nut on the bulkhead. To do this, pull out the cable casing from the engine compartment side and check the play at the mounting nut. The required value is 5-6 mm. If it differs from this value, turn the mounting nut. Then press the clutch pedal several times and check the pedal free play again.
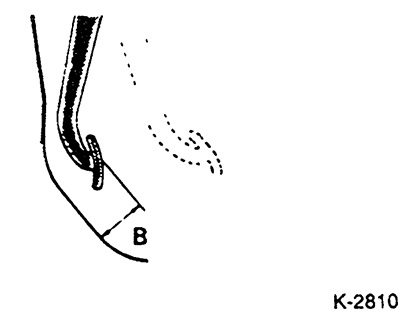


Press the clutch pedal several times and check whether the distance from the pedal to the floor with the clutch depressed is within the tolerance. The required value B is 80 mm or more. If not, the clutch is probably faulty.

Hydraulically operated clutch


Measure the distance from the rubber pedal pad to the floor trim, see Fig. K-2808.
  • Required value A (9.88 - 4.89): 170-175 mm.
  • Required value A (5.89 - 3.92): 168-171 mm.

Press the clutch pedal with your finger until you feel a noticeable resistance. Measure the free travel of the pedal. The required value B: 1-3 mm.

If the clutch pedal height or free play is outside the tolerances, adjust the clutch pedal as follows:
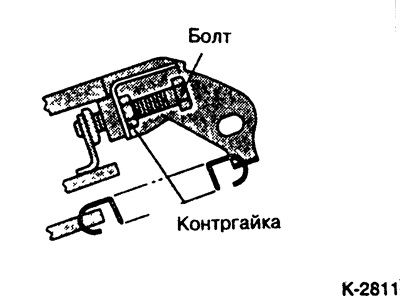


Loosen the lock nut and adjust the clutch pedal height with the adjusting bolt. Tighten the lock nut to approximately 15 Nm.


Note: If the clutch pedal height is lower than the required value, loosen the bolt and then turn the push rod until adjustment can be made. After adjustment, tighten the adjusting bolt until the pedal stops and then tighten the lock nut.
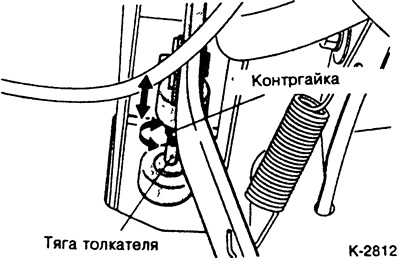


Adjust the clutch pedal free play at the fork head pin by turning the push rod. Then tighten the rod lock nut to about 15 Nm.

Caution: When adjusting the height or free travel of the clutch pedal, ensure that the push rod does not rest against the master cylinder.
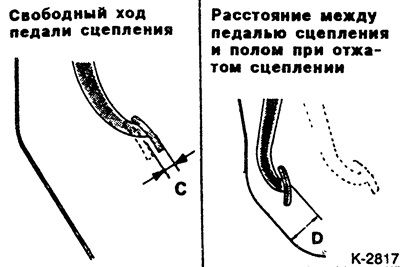


Press the clutch pedal several times and check whether the distance from the pedal to the floor with the clutch depressed is within the tolerance. The required value is 70 mm or more. The free travel of the clutch pedal should be 6 to 13 mm.

If the distance or pedal free play is outside the tolerance range, the clutch or master cylinder is likely defective, or there is air in the hydraulic system.
This article is available at: russian, bulgarian, belarusian, ukrainian, serbian, croatian, romanian, polish, slovak, hungarian
This article was reviewed by: Dmitry Vasiliev
Share with friends:
◀ Previous
Lancer 3 and 5: Clutch
Next ▶

Removal and installation the release bearing
Removal and installation / checking of the clutch
Clutch — device
Removal and installation the clutch cable
Hydraulic clutch — device
Bleeding the Clutch Hydraulic Drive
Diagnosing Clutch Faults
Similar materials for other Mitsubishi models

➤ Checking and adjusting the free travel of the clutch pedal Mitsubishi Colt 2 and 3 (1983-1993)
➤ Checking and adjusting the free travel of the clutch pedal… Mitsubishi Galant 5 (1983-1989, petrol)
➤ Checking and adjusting the free travel of the clutch pedal Mitsubishi L200 4 (2005-2014, diesel)
➤ Checking the free travel of the clutch pedal Mitsubishi Outlander 1 (2003-2008)
➤ Checking and adjusting the clutch pedal Mitsubishi Pajero 4 (2006-2021)
➤ Checking and adjusting the clutch pedal Mitsubishi Carisma (1995-2004)
Link in different formats to this article
Comments and feedback from visitors
No comments yet


Add up two numbers 11 + 40


Lancer 9 (2000-2007, petrol) 
  • General information
  • User manual
  • Maintenance
  • Power unit
  • Repair of MPI engines
  • Repair of GDI engines
  • Engine overhaul
  • Cooling and lubrication system
  • MPI fuel injection system
  • GDI fuel injection system
  • Intake and exhaust system
  • Starting and charging system
  • Transmission
  • Automatic gearbox
  • Variator (CVT)
  • Drive shafts and gearbox
  • Chassis and running gear
  • Front suspension
  • Rear suspension
  • Steering
  • Brake system
  • Body and interior
  • Doors, locks and windows
  • Exterior (external elements)
  • Interior (internal elements)
  • Electrical equipment
  • Heater and air conditioner
  • Security system SRS
  • Equipment and devices
  • Wiring diagrams (saloon)
  • Wiring diagrams (wagon)
Lancer 3 and 5 (1984-1992) 
  • General information
  • Maintenance
  • Power unit
  • Engine repair
  • Lubrication system
  • Cooling system
  • Ignition system
  • Fuel system
  • Carburetor
  • Fuel injection
  • Diesel power system
  • Exhaust system
  • Transmission
  • Clutch
  • Car gearbox
  • Chassis and running gear
  • Front suspension
  • Rear suspension
  • Steering
  • Brake system
  • Wheels and tires
  • Body and interior
  • Exterior (external elements)
  • Interior (internal elements)
  • Heating system
  • Electrical equipment
  • Equipment and devices
  • Power devices
  • Electrical circuits
MitsubishiMan.ru © 2018–2026 • Mobile version • Articles about Mitsubishi • Contacts • Sitemap: EN BG BY UA RS HR RO PL SK HU • Site search • Bookmark
Colt 2 and 3 (1983-1993) · Colt 4 and 5 (1991-2003) · Colt 5 (1995-2003) · Lancer 3 and 5 (1984-1992) · Lancer 9 (2000-2007) · Galant 5 (1983-1989) · Galant 6 and 7 (1987-1998) · L200 4 (2005-2014) · Outlander 1 (2003-2008) · Pajero 1 and 2 (1982-1999) · Pajero 4 (2006-2021) · Carisma (1995-2004) · Space Star (1998-2005) ·
This resource sets cookies 🍪 to avoid bothering you with repeated data entry.