English Русский
Български
Беларускі
Український
Српски
Hrvatski
Română
Polski
Slovenský
Magyar
Articles Bookmark Contacts Sitemap   
Company Audi Company Ford Company Hyundai Company Kia Company Mazda Company Mercedes-Benz Company Nissan
MitsubishiMan.ru


Home Colt Lancer Galant L200 Outlander Pajero Others
Outlander 1 (2003-2008)

Disassembly and assembly of the shock absorber strut (Mitsubishi Outlander 1)

  • Home
  • Outlander
  • 1 (2003-2008)
  • Chassis and running gear
  • Rear suspension
  • Disassembly and assembly of the shock absorber strut
0
Contents: Loosen the rear suspension spring…⤓ Disposal of rear shock absorber ⤓ Installing the lower support cup of…⤓ Installing the rear suspension spring ⤓ Installing the upper support cup of…⤓ Installing the upper support of the…⤓ Tightening the rear suspension…⤓

Loosen the rear suspension spring nut (self-locking nut)


Attention! After securing the suspension spring, install the special tool (MB991239) evenly so that its maximum length corresponds to the length of the spring.
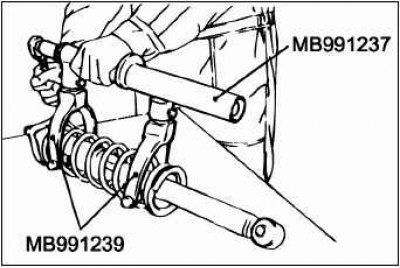


Do not use an impact wrench to tighten the spring compressor bolt (MB991237). The special tool will break.

To compress the suspension spring, use the following special tool.
  • MB991237: Spring compressor device.
  • МВ991239: set of levers.

Warning! Do not use an impact wrench to loosen the rear suspension spring nut (self-locking nut). The vibration from the impact wrench will cause the special tool (MB991237 and MB991239) to slip, resulting in injury.
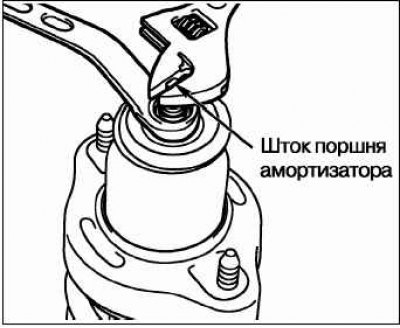


While holding the piston rod from turning, unscrew the rear suspension spring nut (self-locking nut).


Disposal of rear shock absorber


Caution: Wear safety glasses to protect your eyes from flying metal chips.


The article was taken from the website www.mitsubishiman.ru
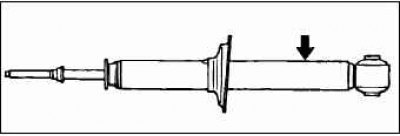


Before scrapping, the gas must be removed from the telescopic stand. Lay the telescopic stand horizontally and extend the stand rod. Drill a hole of about 3 mm in diameter in the place shown in the figure and release the gas from the stand.

Installing the lower support cup of the rear suspension spring
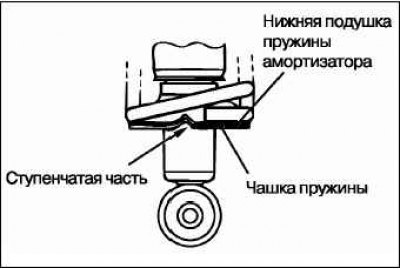


Align the stepped portion of the lower cushion with the stepped portion of the lower shock absorber spring seat and install the lower spring cushion in place.

Installing the rear suspension spring


Caution! Do not use an impact wrench to tighten the spring compressor bolt (MB991237). The special tool will break.
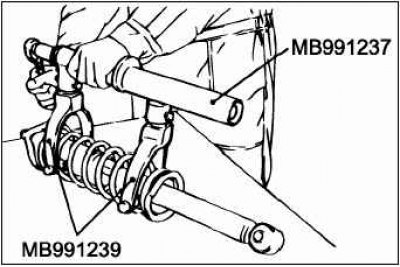


Using a special tool, compress the spring and install it on the lower spring cushion of the rear suspension.
  • MB991237: Spring compressor device.
  • МВ991239: set of levers.


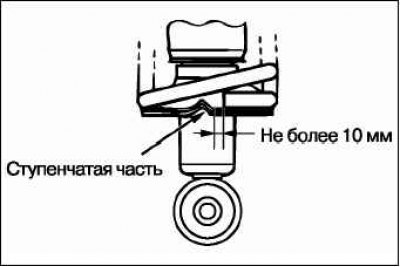
The lower part of the rear suspension spring should be positioned as shown in the figure.

Installing the upper support cup of the rear suspension spring
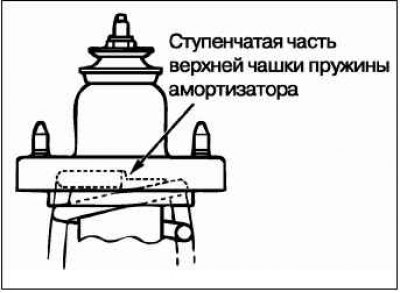


Align the stepped portion of the upper cushion with the top portion of the shock absorber spring and install the upper spring cushion into place.


Installing the upper support of the rear shock absorber
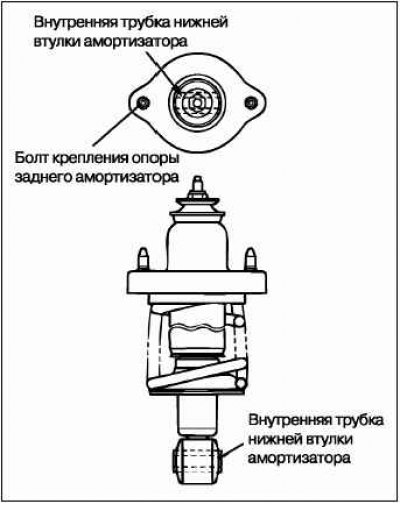


Install the rear shock absorber upper mount so that the axis of the lower shock absorber bushing inner tube is in line with the mount mounting bolts when looking at the assembly from directly above.

Tightening the rear suspension spring nut (self-locking nut)


Do not fully tighten the rear suspension spring nut (self-locking nut).

Caution! Do not use an impact wrench to tighten the nut (self-locking nut) of the rear suspension spring, otherwise the self-locking nut will be damaged.


Remove the special tool (MB991237, MB991239), and finally tighten the rear suspension spring nut (self-locking nut) to a torque of 25±5Nm.
This article is available at: russian, bulgarian, belarusian, ukrainian, serbian, croatian, romanian, polish, slovak, hungarian
This article was reviewed by: Arseny Pavlov
Share with friends:
◀ Previous
Outlander 1: Rear suspension
Next ▶

Removal and installation the shock absorber assembly
Removal and installation the trailing arm assembly
Installing the Upper Control Arm/Steering Rod Assembly
Removal and installation suspension arms
Rear suspension specifications and testing
 
Similar materials for other Mitsubishi models

➤ Shock absorber strut — removal and installation Mitsubishi Colt 4 and 5 (1991-2003)
➤ Disassembling the front strut / removing and installing the… Mitsubishi Lancer 3 and 5 (1984-1992)
➤ Front Strut/Shock Absorber and Coil Spring — Removal,… Mitsubishi Galant 5 (1983-1989, petrol)
➤ Front suspension shock absorber strut Mitsubishi L200 4 (2005-2014, diesel)
➤ Shock absorber operating mode regulator Mitsubishi Pajero 1 and 2 (1982-1999)
➤ Front suspension shock absorber strut Mitsubishi Space Star (1998-2005)
Link in different formats to this article
Comments and feedback from visitors
No comments yet


Add up two numbers 40 + 34


Outlander 1 (2003-2008) 
  • General information
  • User manual
  • Governing bodies
  • Salon equipment
  • Driving and maintenance
  • Power unit
  • Engine repair
  • Cooling and lubrication system
  • Fuel injection system (MPI)
  • Transmission
  • Clutch
  • Mechanical gearbox
  • Automatic gearbox
  • Drive shafts and cardan
  • Chassis and running gear
  • Wheels and tires
  • Front suspension
  • Rear suspension
  • Steering
  • Brake system
  • Body and interior
  • Exterior (external elements)
  • Doors, locks and windows
  • Electrical equipment
  • Equipment and devices
  • Headlights and lighting
  • Power devices
  • Ignition system
  • Electrical circuits
MitsubishiMan.ru © 2018–2026 • Mobile version • Articles about Mitsubishi • Contacts • Sitemap: EN BG BY UA RS HR RO PL SK HU • Site search • Bookmark
Colt 2 and 3 (1983-1993) · Colt 4 and 5 (1991-2003) · Colt 5 (1995-2003) · Lancer 3 and 5 (1984-1992) · Lancer 9 (2000-2007) · Galant 5 (1983-1989) · Galant 6 and 7 (1987-1998) · L200 4 (2005-2014) · Outlander 1 (2003-2008) · Pajero 1 and 2 (1982-1999) · Pajero 4 (2006-2021) · Carisma (1995-2004) · Space Star (1998-2005) ·
This resource sets cookies 🍪 to avoid bothering you with repeated data entry.