
Mirage models through 1992 no.
Front wipers
Removing
1. Disconnect the negative cable from the battery.
Attention! If the stereo system installed in the car is equipped with a security code, before disconnecting the battery, make sure that you have the correct combination to activate the audio system!
2. Remove wiper arms (see Section Removal and installation of levers of screen wipers).
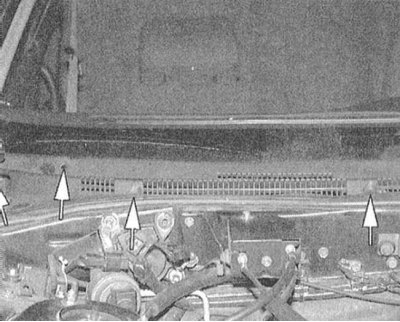
3. Remove the front trim panel.
4. Remove both holders of a windshield.
5. Pushing inward a couple of millimeters (no more) center pins, release the plastic fasteners securing the front panel.
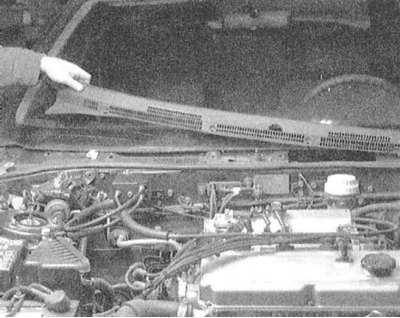
6. Remove the air intake screen.
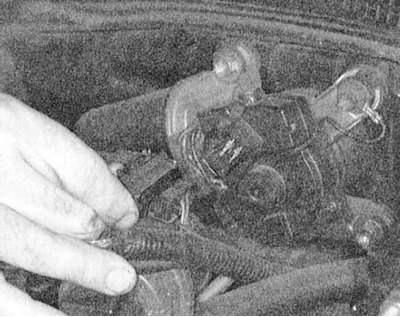
7. Release bolts of fastening of the electric motor of a drive of screen wipers. Disconnect the drive rod from the motor assembly, - if necessary, remove the rod from the car.
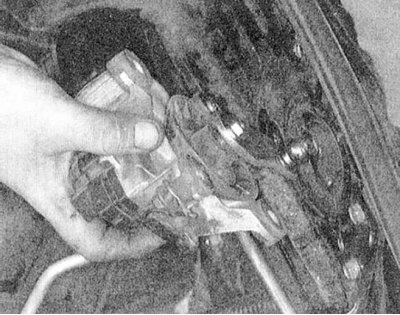
Attention! The angle of installation of the crank lever relative to the electric motor is selected at the factory, which is why these elements should not be removed unless absolutely necessary. If you cannot avoid dismantling the lever, first mark the installation positions of the components. Remove the electric motor.
Installation
1. Establish the electric motor on the regular place and connect to it draft of a drive of screen wipers.
2. Connect the electrical wiring to the motor.
3. When installing the finishing sections, make sure that the latches snap into place - the central pins should be flush with the surface of the panel. Replace damaged fasteners.
4. Reinstall the wiper arms (see Section Removal and installation of levers of screen wipers).
5. Finally, connect the negative wire to the battery and check that the wipers are working properly.
Rear wiper
Removing
1. Disconnect the negative cable from the battery.
Attention! If the stereo system installed in the car is equipped with a security code, before disconnecting the battery, make sure that you have the correct combination to activate the audio system!
2. Remove the rear wiper arm (see Section Removal and installation of levers of screen wipers).
3. Remove the large section of the tailgate interior trim panel (see chapter Body).
4. Disconnect the electrical wiring from the drive motor.
5. Remove the electric motor, - try not to weaken the fit of the stem bushing of the rotary axis of the lever.
Installation
1. Install the electric motor in its regular place - make sure that the bushing is turned with the mark in the form of an arrow down.
2. Reinstall the wiper arm (see Section Removal and installation of levers of screen wipers).
3. Connect a negative wire to the battery and check up serviceability of functioning of a screen wiper.
4. Finally, reinstall the door trim panel (see chapter Body).
Mirage models since 1993 issue.
Removing
1. Disconnect the negative cable from the battery.
Attention! If the stereo system installed in the car is equipped with a security code, before disconnecting the battery, make sure that you have the correct combination to activate the audio system!
2. Remove wiper arms (see Section Removal and installation of levers of screen wipers).
3. Remove the front trim panel.
4. Remove both holders of a windshield.
5. Pushing inward a couple of millimeters (no more) center pins, release the plastic fasteners securing the front panel.
6. Remove the air intake screen.
7. Release bolts of fastening of the electric motor of a drive of screen wipers. Disconnect the drive rod from the motor assembly, - if necessary, remove the rod from the car.
Attention! The angle of installation of the crank lever relative to the electric motor is selected at the factory, which is why these elements should not be removed unless absolutely necessary. If you cannot avoid dismantling the lever, first mark the installation positions of the components. Remove the electric motor.
Installation
1. Establish the electric motor on the regular place and connect to it draft of a drive of screen wipers.
2. Connect the electrical wiring to the motor.
3. When installing the finishing sections, make sure that the latches snap into place - the central pins should be flush with the surface of the panel. Replace damaged fasteners.
4. Reinstall the wiper arms (see Section Removal and installation of levers of screen wipers).
5. Finally, connect the negative wire to the battery and check that the wipers are working properly.
Galant models through 1993 no.
Removing
1. Disconnect the negative cable from the battery.
Attention! If the stereo system installed in the car is equipped with a security code, before disconnecting the battery, make sure that you have the correct combination to activate the audio system!
2. Remove wiper arms (see Section Removal and installation of levers of screen wipers).
3. Remove the front trim panel.
4. Remove the air intake trim panels.
5. Remove the access port cover.
6. Release bolts of fastening of an electromotor of a drive of screen wipers. Disconnect the drive rod from the motor assembly, - if necessary, remove the rod from the car.
Attention! The angle of installation of the crank lever relative to the electric motor is selected at the factory, which is why these elements should not be removed unless absolutely necessary. If you cannot avoid dismantling the lever, first mark the installation positions of the components. Remove the electric motor.
Installation
1. Establish the electric motor on the regular place and connect to it draft of a drive of screen wipers.
2. Connect the electrical wiring to the motor.
3. Install trim panels.
4. Reinstall the wiper arms (see Section Removal and installation of levers of screen wipers).
5. Finally, connect the negative wire to the battery and check that the wipers are working properly.
Diamante models since 1994
Front wipers
Removing
1. Disconnect the negative cable from the battery.
Attention! If the stereo system installed in the car is equipped with a security code, before disconnecting the battery, make sure that you have the correct combination to activate the audio system!
2. Remove wiper arms (see Section Removal and installation of levers of screen wipers).
3. Remove the front trim panel.
 |  |
4. Air intake cover.
5. Disconnect the electrical wiring from the electric motor.
6. Remove the access port cover.
7. Release bolts of fastening of the electric motor of a drive of screen wipers. Disconnect the drive rod from the motor assembly, - if necessary, remove the rod from the car.
Attention! The angle of installation of the crank lever relative to the electric motor is selected at the factory, which is why these elements should not be removed unless absolutely necessary. If you cannot avoid dismantling the lever, first mark the installation positions of the components. Remove the electric motor.
 |  |
Installation
1. Establish the electric motor on the regular place and connect to it draft of a drive of screen wipers.
2. Connect the electrical wiring to the motor.
3. Replace the access cover.
4. Install the air intake cover.
5. Install trim panel.
6. Reinstall the wiper arms (see Section Removal and installation of levers of screen wipers).
7. Finally, connect the negative wire to the battery and check that the wipers are working properly.
Rear wiper
Removing
1. Disconnect the negative cable from the battery.
Attention! If the stereo system installed in the car is equipped with a security code, before disconnecting the battery, make sure that you have the correct combination to activate the audio system!
2. Remove the rear wiper arm (see Section Removal and installation of levers of screen wipers).
3. Remove the lower section of the inner upholstery panel of the tailgate (see chapter Body).
4. Disconnect the electrical wiring from the drive motor.
5. Turn out fixing bolts and remove the electric motor.
Installation
1. Install the electric motor in its regular place - make sure that the bushing is turned with the mark in the form of an arrow down.
2. Reinstall the wiper arm (see Section Removal and installation of levers of screen wipers).
3. Connect a negative wire to the battery and check up serviceability of functioning of a screen wiper.
4. Finally, reinstall the door trim panel (see chapter Body).