



Contents: Removal and installation ⤓ Examination ⤓
Removal and installation
− Before you begin removing parts, perform the following operations:
- a) Raise the power unit until the gearbox support is free of load.
- b) Remove the battery and battery tray.
- c) Remove the air filter.
- d) Remove the rear support of the power unit.
− The parts are removed in the order of numbers shown in the figure "Removing the gearbox support".
− Installation of parts is carried out in the reverse order of removal.
- When installing the parts, pay attention to the operation of installing the gearbox support limiters.
Install the gearbox support limiter so that the arrow on the limiter points upward.
The original was published on the website: mitsubishiman.ru
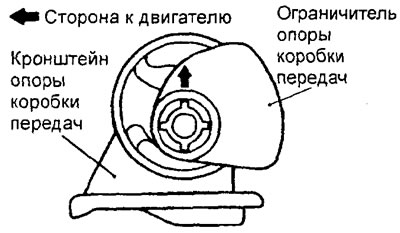
- After completing the installation of the parts, perform the following operations:
- a) Install the rear support of the power unit.
- b) Install the air filter.
- c) Install the battery and battery tray.
- d) Lower the power unit onto the supports.
Examination
Check the gearbox support for cracks, delamination and deformation.
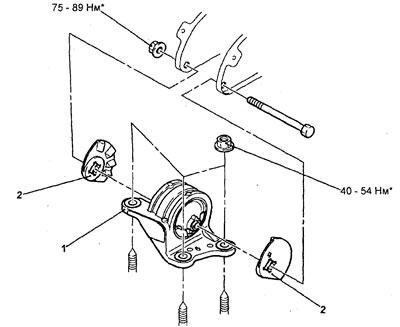
Removal the gearbox support. 1 - gearbox support bracket, 2 - gearbox support limiter. Note: The symbol in the figure indicates fastening elements that should first be pre-tightened and finally tightened after the engine has been completely lowered onto the supports with the vehicle in a horizontal position.
Note: The symbol in the figure indicates fastening elements that should first be pre-tightened and finally tightened after the engine has been completely lowered onto the supports with the vehicle in a horizontal position.