
English Русский
Български
Беларускі
Український
Српски
Hrvatski
Română
Polski
Slovenský
Magyar
Articles Bookmark Contacts Sitemap   
Company Audi Company Ford Company Hyundai Company Kia Company Mazda Company Mercedes-Benz Company Nissan
MitsubishiMan.ru


Home Colt Lancer Galant L200 Outlander Pajero Others
Outlander 1 (2003-2008)

Using sealant as gaskets (Mitsubishi Outlander 1)

  • Home
  • Outlander
  • 1 (2003-2008)
  • Transmission
  • Automatic gearbox
  • Using sealant as gaskets
0
Contents: Disassembly ⤓ Preparing the surface for sealant…⤓ Rules for using sealants ⤓
The gearbox has several places where sealant is used as a gasket. To avoid leaks in these places during operation, it is necessary to follow certain rules for using the sealant. The thickness of the sealant bead, its continuity and its location are of the utmost importance. If the bead is too thin, a leak may occur. On the other hand, if the bead is too thick, the sealant will be squeezed out and, as a result, the oil channels will become clogged. Therefore, the sealant bead must be continuous and have the appropriate diameter. Since RTV interacts with moisture from the atmospheric air after hardening, it is usually used to seal metal flanges.

Disassembly


Parts assembled with sealant can usually be easily disassembled without the use of special tools. However, in some cases, the sealant between the surfaces being joined can be destroyed by light tapping with a mallet or similar tool. In this case, care must be taken to avoid damaging the surfaces being joined.

Preparing the surface for sealant application


Using a scraper or wire brush, thoroughly clean the surfaces to which the sealant is to be applied. The surface to which the sealant is to be applied must be flat. Clean the surface from oil and foreign materials. Do not forget to remove the remains of the old sealant in the holes for installing the bolts.

Rules for using sealants


When assembling parts using sealant, it is necessary to follow some rules, which are quite simple. The bead of sealant must be continuous and have no gaps. Always completely frame the holes for installing bolts with sealant. Excess sealant can be wiped off before it hardens. While the sealant is still wet (less than 15 minutes), install the parts to be connected in place. After installing the parts, make sure that the sealant only gets to the right places. Do not allow oil or water to get into the places where the sealant is used and do not start the engine until a sufficient amount of time has passed (approximately 1 hour) after assembly.


The procedure for using the sealant may vary for different places. Therefore, when using the sealant, you must follow the rules given in the text below.

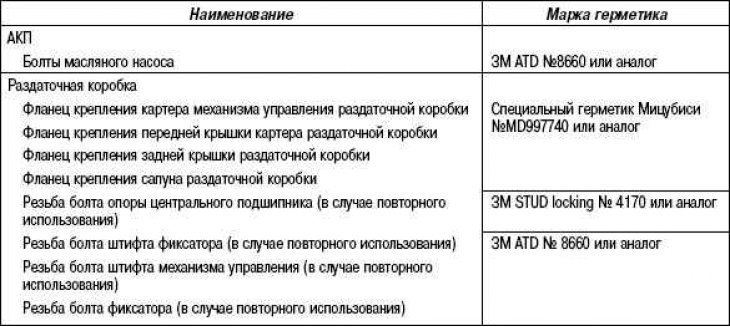
Sealants used


This article is available at: russian, bulgarian, belarusian, ukrainian, serbian, croatian, romanian, polish, slovak, hungarian
This article was reviewed by: Arseny Pavlov
Share with friends:
◀ Previous
Outlander 1: Automatic gearbox
Next ▶

Precautions required when disassembling and assembling automatic transmission
Flushing the hydraulic line of the gearbox heat exchanger
Automatic transmission fluid replacement
Checking the fluid level in the automatic transmission (hot engine)
Checking the fluid level in the automatic transmission (cold engine)
Checking the automatic transmission control components
Removal and installation the selector lever assembly
Link in different formats to this article
Comments and feedback from visitors
No comments yet


Add up two numbers 38 + 43


Outlander 1 (2003-2008) 
  • General information
  • User manual
  • Governing bodies
  • Salon equipment
  • Driving and maintenance
  • Power unit
  • Engine repair
  • Cooling and lubrication system
  • Fuel injection system (MPI)
  • Transmission
  • Clutch
  • Mechanical gearbox
  • Automatic gearbox
  • Drive shafts and cardan
  • Chassis and running gear
  • Wheels and tires
  • Front suspension
  • Rear suspension
  • Steering
  • Brake system
  • Body and interior
  • Exterior (external elements)
  • Doors, locks and windows
  • Electrical equipment
  • Equipment and devices
  • Headlights and lighting
  • Power devices
  • Ignition system
  • Electrical circuits
MitsubishiMan.ru © 2018–2026 • Mobile version • Articles about Mitsubishi • Contacts • Sitemap: EN BG BY UA RS HR RO PL SK HU • Site search • Bookmark
Colt 2 and 3 (1983-1993) · Colt 4 and 5 (1991-2003) · Colt 5 (1995-2003) · Lancer 3 and 5 (1984-1992) · Lancer 9 (2000-2007) · Galant 5 (1983-1989) · Galant 6 and 7 (1987-1998) · L200 4 (2005-2014) · Outlander 1 (2003-2008) · Pajero 1 and 2 (1982-1999) · Pajero 4 (2006-2021) · Carisma (1995-2004) · Space Star (1998-2005) ·
This resource sets cookies 🍪 to avoid bothering you with repeated data entry.