



Contents: Checking the automatic transmission…⤓ Checking the automatic transmission…⤓ Checking the electromagnetic valves ⤓ Checking on a fully braked vehicle…⤓ Analysis of the test results on a…⤓ Main line pressure adjustment ⤓ Checking the operation of the…⤓ Checking the starter interlock switch ⤓ Checking the ignition lock mechanism ⤓ Adjusting the control cable and…⤓
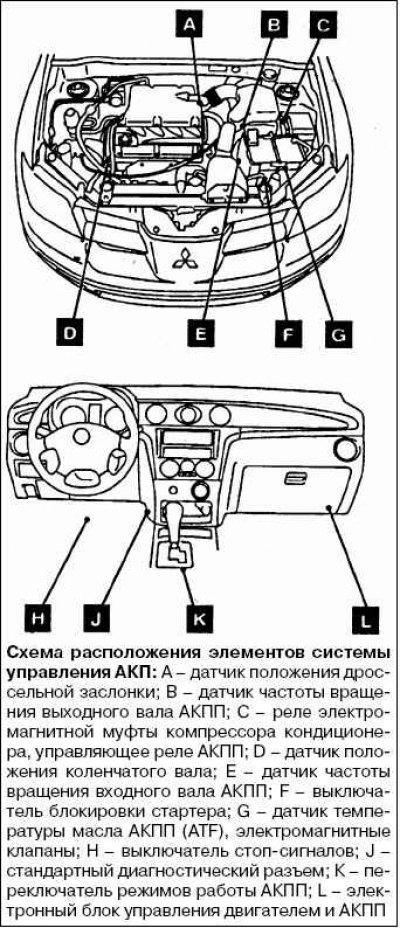
Checking the automatic transmission oil temperature sensor
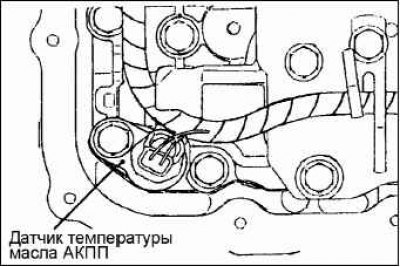
Remove the automatic transmission oil temperature sensor.
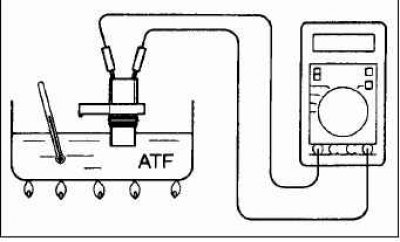
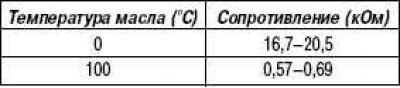
Measure the resistance between terminals No.1 and No.2 of the automatic transmission oil temperature sensor connector.
Nominal value
Lubricant Used. Transfer Case
Checking the automatic transmission control relay
 | 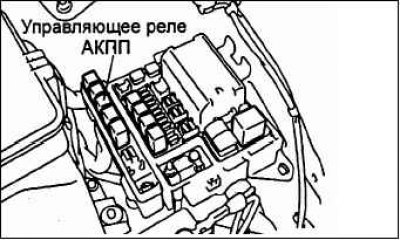 |
Remove the automatic transmission control relay.
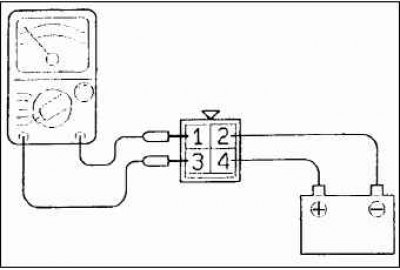
Using jumper wires, connect terminal 2 of the control relay to the negative (–) terminal of the battery, and terminal 4 to the positive (+) terminal.
Check the condition of the circuit between terminals 1 and 3 of the automatic transmission control relay.
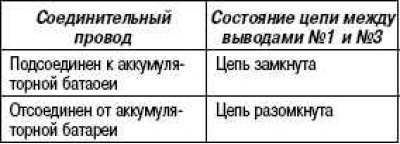
If there is a malfunction, replace the automatic transmission control relay.
Checking the electromagnetic valves
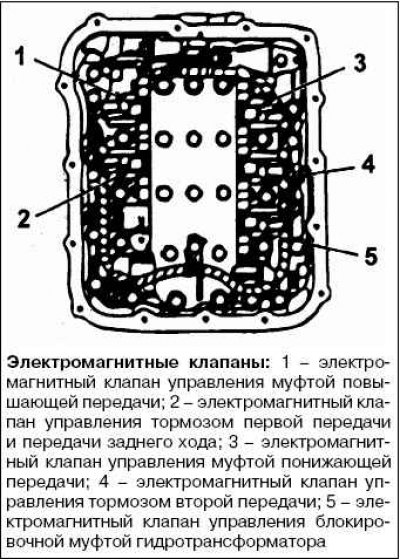
Remove the control valve block cover. Disconnect the connectors of each solenoid valve.
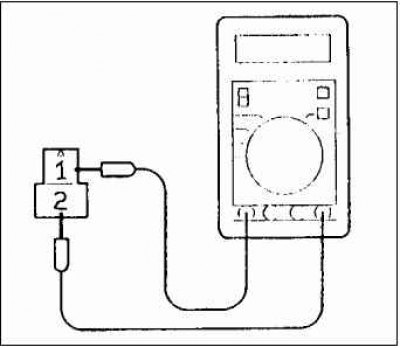
Measure the resistance value between terminals 1 and 2 of each solenoid valve connector.
Nominal values
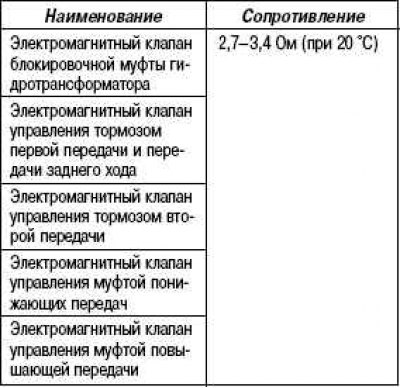
If the resistance does not match the required value, replace the solenoid valve.
Checking on a fully braked vehicle (STALL TEST)
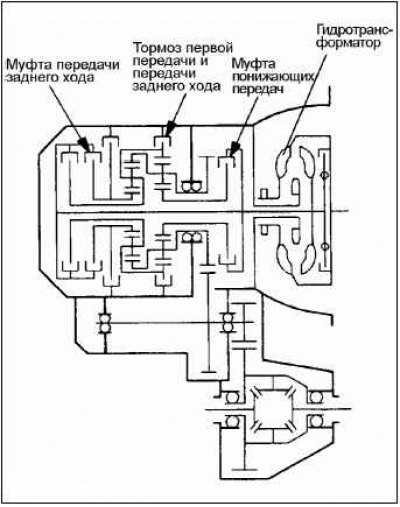
The purpose of this test is to measure the maximum engine crankshaft speed in the "D" and "R" ranges with the automatic transmission output shaft completely stopped. The value of this speed can be used to judge the performance of the torque converter, freewheel clutch, and also to determine the presence of slip in some friction elements of the automatic transmission control.
Caution: No one should be in front or behind the vehicle during this check.
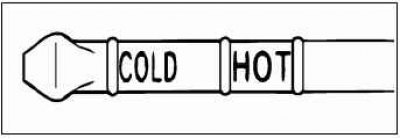
Check the level and temperature of the oil in the automatic transmission, as well as the temperature of the engine coolant.
- Oil level: "HOT" mark on the dipstick.
- Oil temperature: 80–100°C.
- Engine coolant temperature: 80–100°C.
Place parking blocks under the rear wheels.
Fully apply the parking brake and press the brake pedal all the way down.
Start the engine.
Set the automatic transmission selector lever to position "D", press the accelerator pedal all the way down and determine the engine crankshaft speed at this moment.
Caution: Do not keep the accelerator pedal fully depressed for more than eight seconds.
If this check is performed two or more times in a row, then after each check it is necessary to move the automatic transmission selector lever to the "N" position and allow the oil in the automatic transmission to cool down to operating temperature with the engine running at a frequency of 1000 min⁻¹, after which the next check can be performed.
Nominal engine speed during Stall Test: 2100–2600 min⁻¹.
Set the automatic transmission selector lever to the "R" position, press the accelerator pedal all the way down and determine the engine crankshaft speed at this moment.
Nominal engine speed during Stall Test: 2100–2600 min⁻¹.
Analysis of the test results on a fully braked vehicle
Engine speed during Stall Test in ranges "D" and "R" is higher than the nominal value:
low pressure in the control system. Slipping of the first gear and reverse gear brake.
The engine speed during the Stall Test is higher than the nominal value only in the "D" range:
slippage of the downshift clutch.
Engine crankshaft speed during Stall Test is higher than nominal value only in the "R" range: reverse clutch slippage.
Engine speed during Stall Test in ranges "D" and "R" is less than minimum nominal value: torque converter defective, engine defective.
Main line pressure adjustment
[Article reprinted from the website: MITSUBISHIMAN.ru]
Drain the automatic transmission oil and remove the control valve block cover.
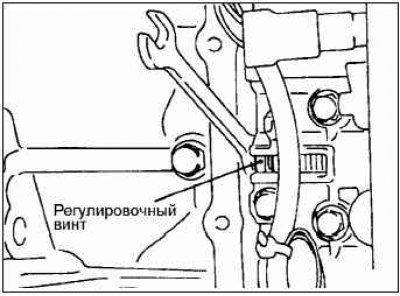
The pressure in the downshift clutch booster is adjusted using the adjusting screw shown in the figure.
When the adjusting screw is turned to the left, the pressure increases.
Note: The pressure in the underdrive clutch booster should be in the middle of the nominal range.
Nominal range: 1010–1050 kPa.
One turn of the adjusting screw changes the pressure value by 35 kPa.
Replace the valve body cover and fill the gearbox with oil.
Perform a pressure check.
If necessary, readjust the pressure in the main line.
Checking the operation of the automatic transmission selector lever
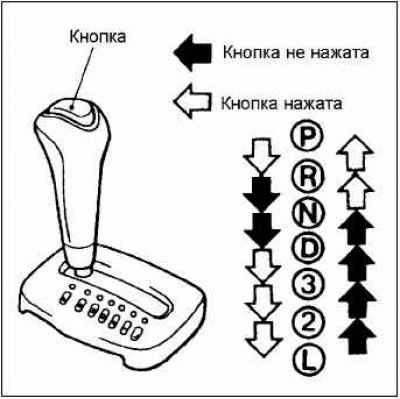
Check the ease and smoothness of movement of the automatic transmission selector lever and its fixation in each position. Check the readings of the automatic transmission selector lever position indicator, which should match the position of the lever itself.
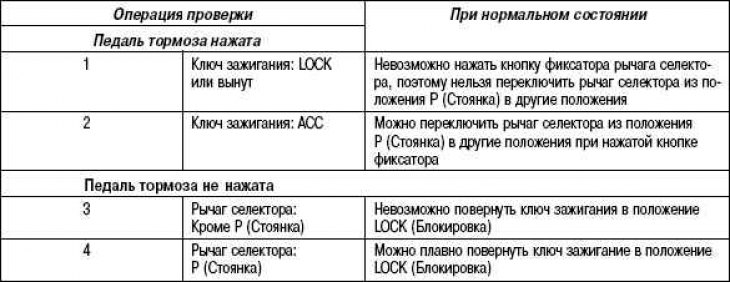
Check the operation of the automatic transmission selector lever lock mechanism (see figure).
Start the engine and check the operation of the gearbox control mechanism (when moving the lever from position "N" to "D", the car should move forward, and when moving the lever to position "R", the car should move backward).
If faults are detected in the gearbox control mechanism, adjust the control mechanism cable connecting the automatic transmission selector lever to the control valve block. Check for excessive wear of the automatic transmission control mechanism parts.
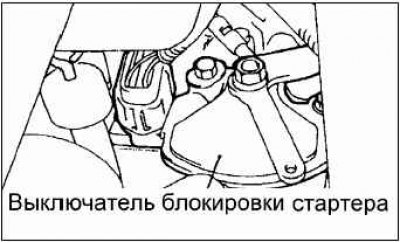
Checking the starter interlock switch
 | 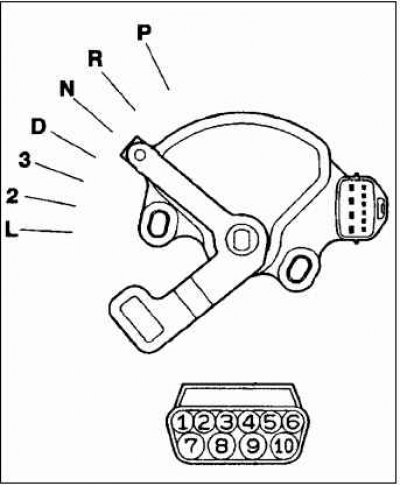 |
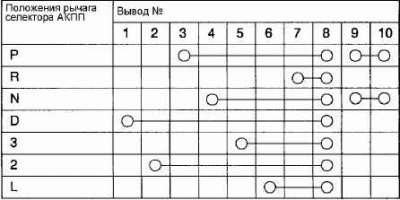
Checking the ignition lock mechanism
Adjusting the control cable and starter interlock switch
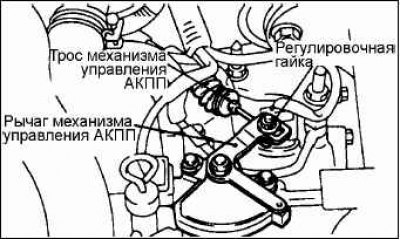
Set the automatic transmission selector lever to the "N" position.
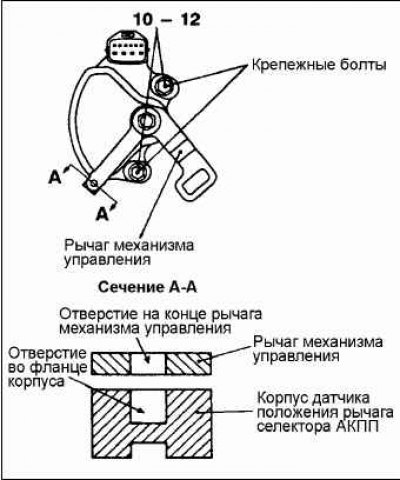
Loosen the adjusting nut securing the cable to the control lever until the cable and lever are free.
Set the control lever to the "N" position.
Loosen the range selector lever position sensor mounting bolts and turn it so that the hole in the sensor housing flange aligns with the hole at the end of the control lever (section A-A).
While holding the sensor in this position, tighten the mounting bolts to the specified torque.
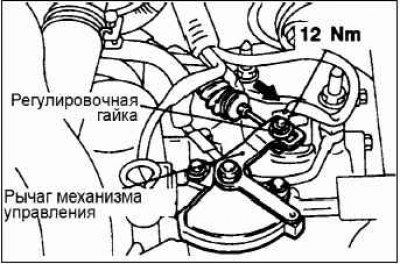
Carefully pull the cable connecting the automatic transmission selector lever to the control valve block in the direction of the arrow and then tighten the adjusting nut.
Make sure that the automatic transmission selector lever is in the "N" position.
Check that the gears being engaged correspond to the position of the automatic transmission selector lever.
Turn the ignition key to any position except "LOCK" and shift the selector lever with the brake pedal depressed and the lock button pressed.
Shift the selector lever without pressing the release button.
Shift the selector lever while pressing the release button.
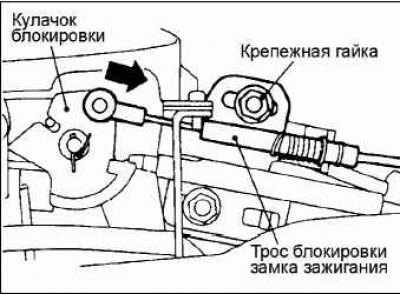
If a malfunction is found during the above check, adjust the ignition lock cable in the manner described below.
Remove the floor console box.
Shift the selector lever to position P (Park).
Turn the ignition key to the LOCK position
Loosen the ignition lock cable retaining nut.
While lightly pressing the cable connected to the locking cam in the direction of the arrow, tighten the fastening nut.
Install the floor console box.
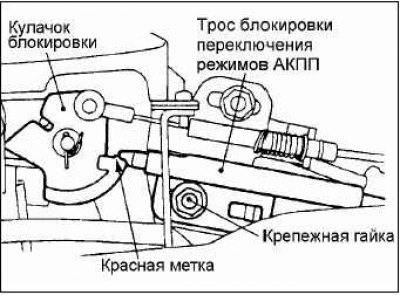
If a malfunction is detected during the above check, adjust the automatic transmission mode lock cable.
Remove the floor console box.
Shift the selector lever to position "P" (Park).
Loosen the ignition lock cable retaining nut.
Tighten the retaining nut when the end of the shift lock cable reaches the red mark on the shift lock cam.
Install the floor console box.