
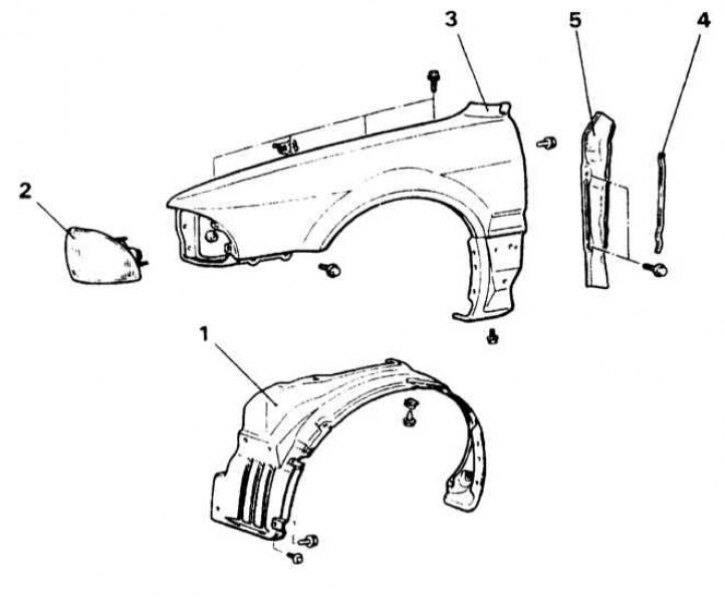
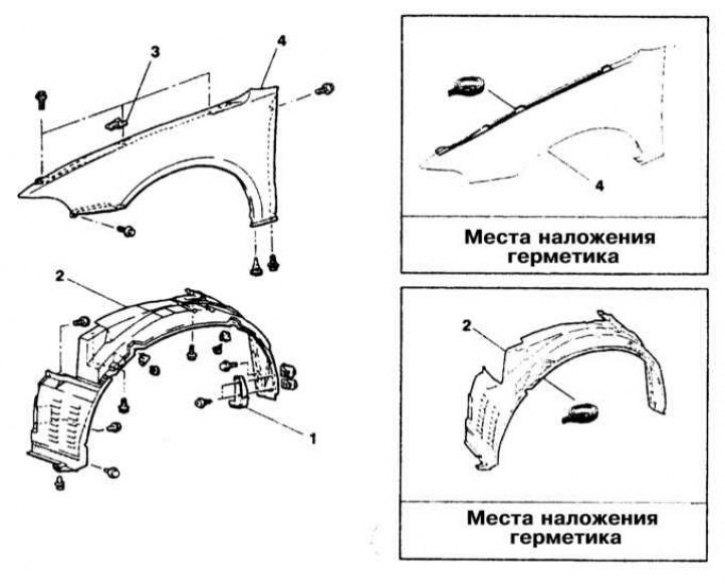
Installation details of the front wing on Diamante models 1992÷1996. issue
1 - Wheel arch protection locker; 2 - Direction indicator / parking light; 3 - Front fender; 4 - Sealant; 5 - Insulator
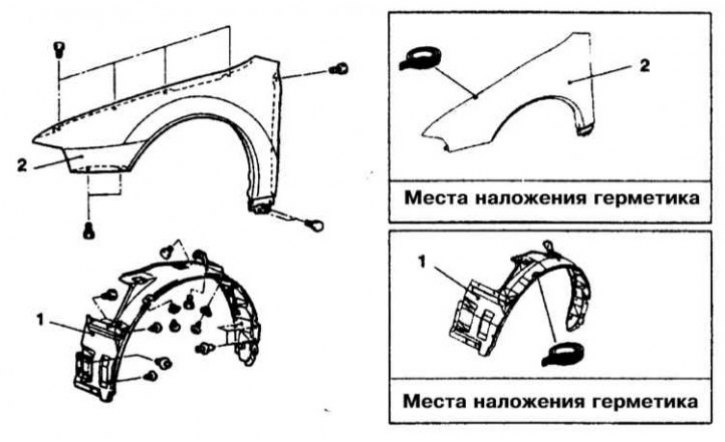
Installation details of the front fender on Diamante models since 1997 vol.
1 - Locker wheel arch protection; 2 - Wing
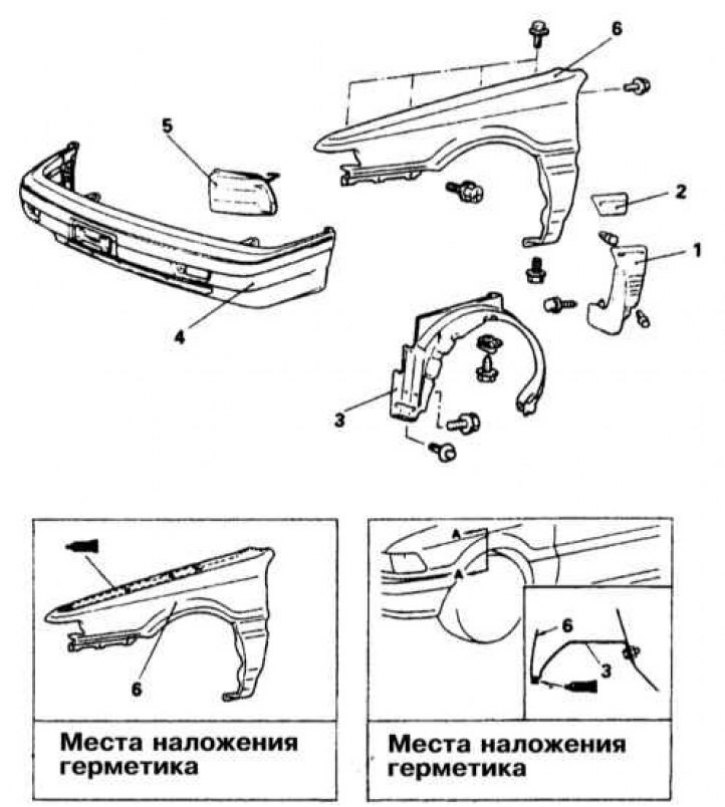
Installation details of the front wing on Galant models up to 1993 issue
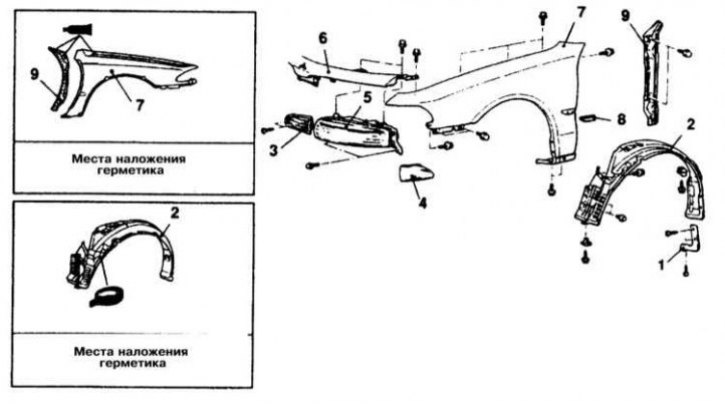
Installation details of the front wing on Galant models 1994÷1998. issue
1 - Gravel protection; 2 - Wheel arch protection locker; 3 - Radiator grille; 4 - Turn indicator; 5 - Assembling the headlight; 6 - Front panel; 7 - Front fender; 8 - Side protection molding; 9 - Insulator
Installation details of the front fender on Galant models since 1999 vol.
1 - gravel protection; 2 - Wheel arch protection locker
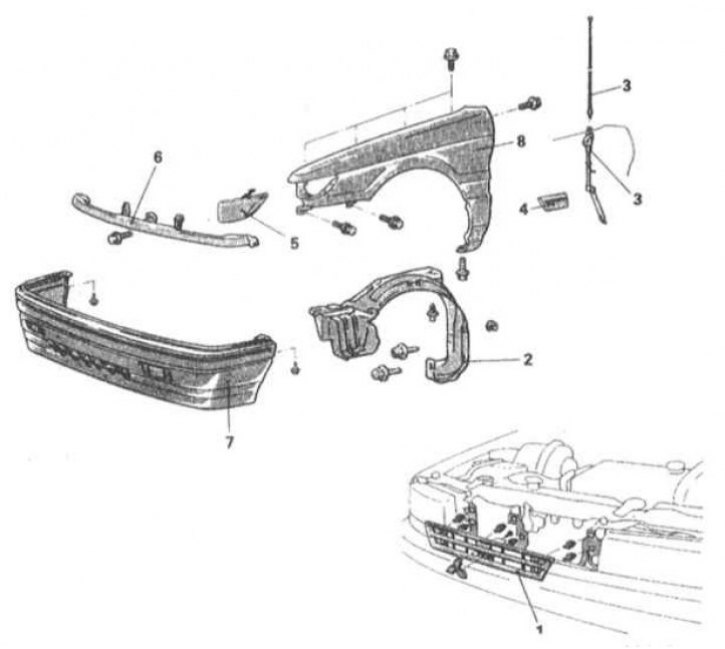
Installation details of the front wing on Mirage models up to 1992, no.
1 - Radiator grille; 2 - Wheel arch protection locker; 3 - Antenna (right wing); 4 - Side protection molding; 5 - Combined lamp; 6 - Grid finishing panel; 7 - Front bumper; 8 - Wing
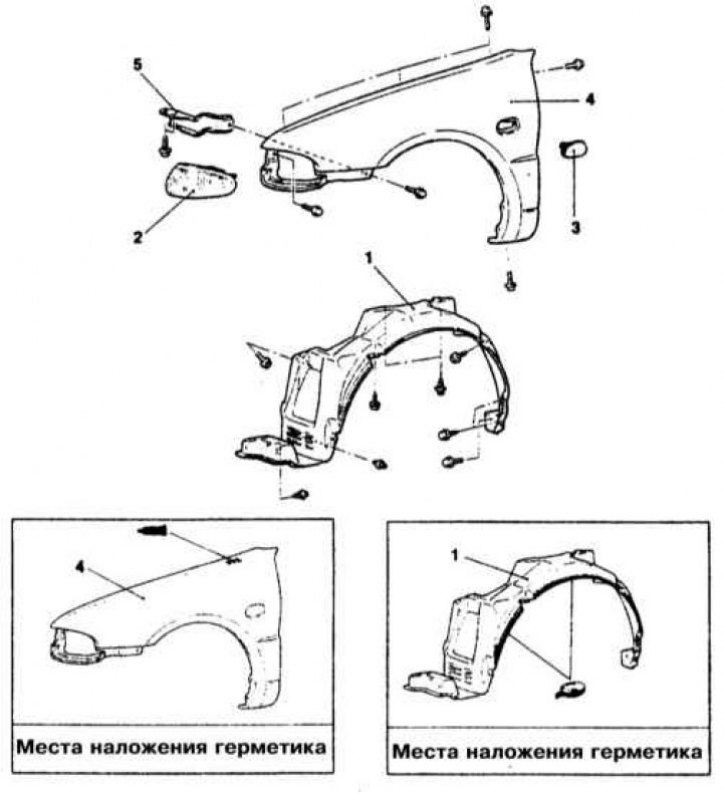
Installation details of the front wing on Mirage models since 1993 vol.
1 - Wheel arch protection locker; 2 - Turn indicator; 3 - Ornament; 4 - Wing; 5 - Mounting bracket
Diamante models 1992÷1996 issue
Removing
1. Details of the installation of the front wing on the Diamante models 1992÷1996. issue shown in the illustration.
2. Disconnect the negative cable from the battery.
Attention! If the stereo system installed in the car is equipped with a security code, before disconnecting the battery, make sure that you have the correct combination to activate the audio system!
3. Jack up the car and put it on stands. Remove the corresponding front wheel.
4. Remove the front mud baffle.
5. Remove the side protection molding.
6. Remove the front side fairing.
7. Release the clips and remove the wheel arch protection locker.
8. Remove the turn signal/parking light assembly.
9. Turn out the fixing bolts located along top, bottom and back edges of a wing and remove the wing panel from the car.
Installation
Installation is carried out in the reverse order - the landing surfaces of the body should be lubricated with sealant type 3M ATD No. 8625 before installing the wing. Make sure that the mounting bolts are tightened with the required force (6 Nm).
Diamante models since 1997
Removing
1. Disconnect the negative cable from the battery.
Attention! If the stereo system installed in the car is equipped with a security code, before disconnecting the battery, make sure that you have the correct combination to activate the audio system!
2. Jack up the car and put it on stands. Remove the corresponding front wheel.
3. Remove the front bumper.
4. Remove the front side fairing.
5. Release the fasteners and remove the wheel arch protection locker.
6. Turn out the fixing bolts located along top, bottom and back edges of a wing and remove the wing panel from the car.
Installation
Installation is carried out in the reverse order - the landing surfaces of the body should be lubricated with sealant type 3M ATD No. 8625 before installing the wing. Make sure that the mounting bolts are tightened with the required force (6 Nm).
Galant models through 1993 no.
Removing
1. Installation details of the front wing on Galant models up to 1993, no. shown in the illustration.
2. Disconnect the negative cable from the battery.
Attention! If the stereo system installed in the car is equipped with a security code, before disconnecting the battery, make sure that you have the correct combination to activate the audio system!
3. Jack up the car and put it on stands. Remove the corresponding front wheel.
4. Remove facing of a wing.
5. Remove the side protection molding.
6. Release the clips and remove the wheel arch protection locker.
7. Remove the front bumper.
8. Remove the turn signal/combination light assembly.
9. Turn out the fixing bolts located along top, bottom and back edges of a wing and remove the wing panel from the car.
Installation
Installation is carried out in the reverse order - the landing surfaces of the body should be lubricated with sealant type 3M ATD No. 8625 before installing the wing. Make sure that the mounting bolts are tightened with the required force (6 Nm).
Galant models 1994÷1998 issue
Removing
1. Details of the installation of the front wing on Galant models 1994÷1998. issue shown in the illustration.
2. Disconnect the negative cable from the battery.
Attention! If the stereo system installed in the car is equipped with a security code, before disconnecting the battery, make sure that you have the correct combination to activate the audio system!
3. Jack up the car and put it on stands. Remove the corresponding front wheel.
4. Remove gravel protection.
5. Release the clips and remove the wheel arch protection locker.
6. Remove a radiator lattice.
7. Remove the turn signal assembly.
8. Remove the headlight assembly.
9. Remove the front panel.
10. Turn out the fixing bolts located along top, bottom and back edges of a wing and remove the wing panel from the car.
Installation
Installation is carried out in the reverse order - the landing surfaces of the body should be lubricated with sealant type 3M ATD No. 8531 or 8646 before installing the wing. Make sure that the mounting bolts are tightened with the required force (6 Nm).
Galant models since 1999
Removing
1. Installation details of the front wing on Galant models from 1999 vol. shown in the illustration.
2. Disconnect the negative cable from the battery.
Attention! If the stereo system installed in the car is equipped with a security code, before disconnecting the battery, make sure that you have the correct combination to activate the audio system!
3. Jack up the car and put it on stands. Remove the corresponding front wheel.
4. Remove gravel protection.
5. Remove the front bumper.
6. Remove the headlight assembly.
7. Remove the wing side trim.
8. Remove gravel protection.
9. Release the clips and remove the wheel arch protection locker.
10. Remove the hood damper bracket.
11. Turn out the fixing bolts located along top, bottom and back edges of a wing and remove the wing panel from the car.
Installation
Installation is carried out in the reverse order - the landing surfaces of the body should be lubricated with sealant type 3M ATD No. 8625 before installing the wing. Make sure that the mounting bolts are tightened with the required force (6 Nm).
Mirage models through 1992 no.
Removing
1. Details of the installation of the front wing on Mirage models up to 1992, no. shown in the illustration.
2. Disconnect the negative cable from the battery.
Attention! If the stereo system installed in the car is equipped with a security code, before disconnecting the battery, make sure that you have the correct combination to activate the audio system!
3. Jack up the car and put it on stands. Remove the corresponding front wheel.
4. Remove a radiator lattice.
5. Release the clips and remove the wheel arch protection locker.
6. Remove the radio antenna assembly.
7. Remove the side protection molding.
8. Remove the headlight assembly.
9. Remove the grill trim panel.
10. Remove the front bumper.
11. Turn out the fixing bolts located along top, bottom and back edges of a wing and remove the wing panel from the car.
Installation
Installation is carried out in the reverse order - the landing surfaces of the body should be lubricated with sealant type 3M ATD No. 8625 before installing the wing. Make sure that the mounting bolts are tightened with the required force (6 Nm).
Mirage models since 1993 issue.
Removing
1. Details of the installation of the front wing on Mirage models from 1993 vol. shown in the illustration.
2. Disconnect the negative cable from the battery.
Attention! If the stereo system installed in the car is equipped with a security code, before disconnecting the battery, make sure that you have the correct combination to activate the audio system!
3. Jack up the car and put it on stands. Remove the corresponding front wheel.
4. Remove the front bumper.
5. Release the clips and remove the wheel arch protection locker.
6. Remove the turn signal assembly.
7. Remove the wing ornament.
8. Turn out the fixing bolts located along top, bottom and back edges of a wing and remove the wing panel from the car.
Installation
Installation is carried out in the reverse order - the landing surfaces of the body should be lubricated with sealant type 3M ATD No. 8531 or No. 8646 before installing the wing. Make sure that the mounting bolts are tightened with the required force (6 Nm).