
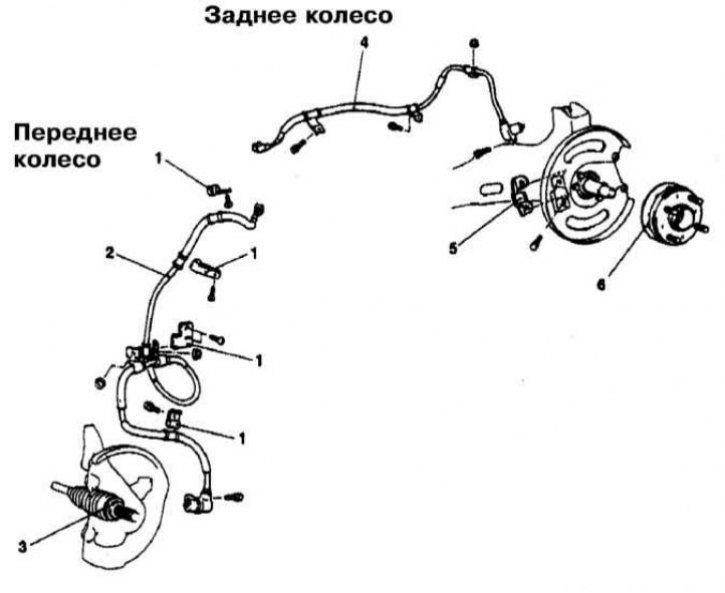
Installation details of the front and rear wheel speed sensors on Mirage models
1 - Retainer; 2 - Front wheel speed sensor; 3 - Sensor rotor; 4 - Rear wheel speed sensor; 5 - Sensor support bracket; 6 - Sensor rotor
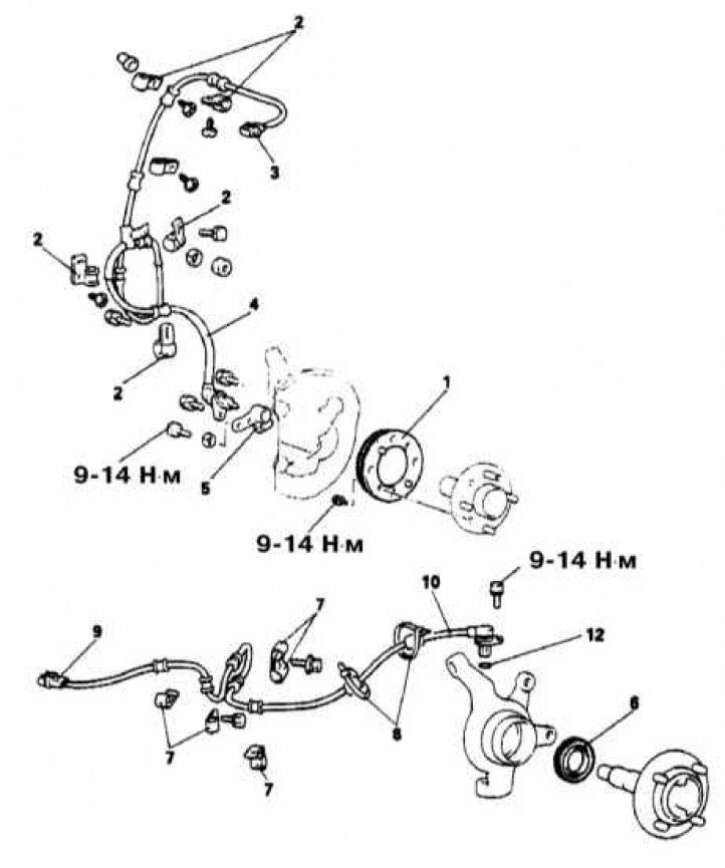
Installation details for wheel sensors on Galant AWD models up to 1993 vol.
1 - Rotor of the front wheel speed sensor; 2 - Retainer; 3 - Contact connector of the electrical wiring of the front wheel sensor; 4 - Front wheel speed sensor; 5 - Sensor support bracket; 6 - Rear wheel speed sensor rotor; 7 - Retainer; 8 - Bandage; 9 - Pin connector of the wiring of the rear wheel sensor; 10 - Rear wheel speed sensor; 12 - O-ring
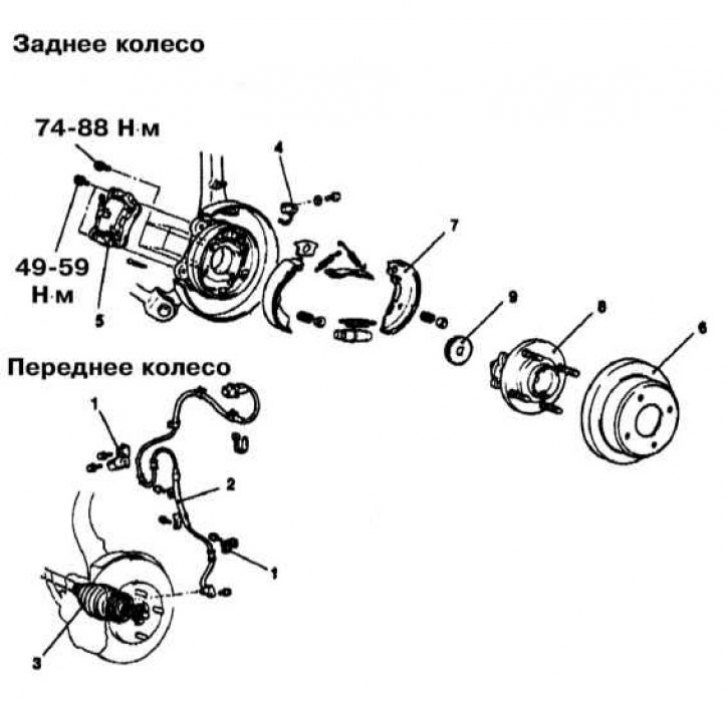
Installation details of wheel sensors on Galant AWD models since 1994 vol.
1 - Retainer; 2 - Front wheel speed sensor; 3 - Drive shaft; 4 - Rear wheel speed sensor; 5 - Brake caliper; 6 - Brake disc; 7 - Shoe assembly; 8 - Hub assembly; 9 - Sensor rotor
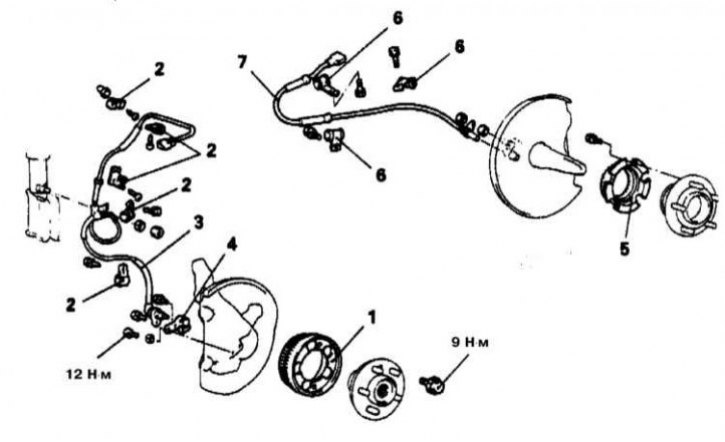
Wheel sensor installation details on Diamante models
1 - Rotor of the front wheel sensor; 2 - Retainer; 3 - Front wheel speed sensor; 4 - Front wheel sensor support bracket; 5 - Rear wheel sensor rotor; 6 - Retainer; 7 - Rear wheel speed sensor
Front wheel speed sensors
Removing
1. Installation details of the front wheel speed sensors on Mirage models are shown in the illustration.
2. Disconnect the negative cable from the battery.
Attention! If the stereo system installed in the car is equipped with a security code, before disconnecting the battery, make sure that you have the correct combination to activate the audio system! To prevent the airbags from deploying, proceed to dismantle the sensor at least 90 seconds after disconnecting the battery.
3. Jack up the car and put it on stands. Remove the relevant wheel.
4. Remove the wheel arch protection locker.
5. Disconnect from the wheel gauge electroconducting.
6. Remove the sensor wiring harness clips.
7. Remove the sensor from the support bracket.
Installation
1. Install the sensor on the support bracket and tighten the mounting bolt.
2. Establish clamps of fastening of a plait of electroconducting.
3. Connect the electrical wiring to the sensor.
4. Connect the negative cable to the battery.
Rear wheel speed sensors
Removing
1. The installation details of the rear wheel speed sensors on Mirage models are shown in the illustration.
2. Disconnect the negative cable from the battery.
Attention! If the stereo system installed in the car is equipped with a security code, before disconnecting the battery, make sure that you have the correct combination to activate the audio system! To prevent the airbags from deploying, proceed to dismantle the sensor at least 90 seconds after disconnecting the battery.
3. Jack up the car and put it on stands. Remove the relevant wheel.
4. Disconnect from the wheel gauge electroconducting.
5. Remove the sensor wiring harness clips.
6. Turn out a fixing bolt and remove the wheel gauge.
Installation
1. Install the sensor in its original place and loosely tighten the mounting bolt.
2. Establish clamps of fastening of a plait of electroconducting.
3. Connect the electrical wiring to the sensor.
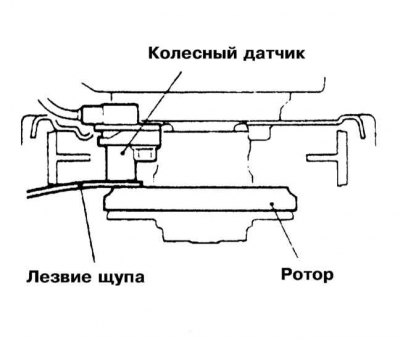
4. Using a non-magnetic blade-type feeler gauge, adjust the gap between the sensor and its rotor, the required value is 0.3-0.9 mm.
5. Completely tighten the fasteners and recheck that the gap is set correctly. Repeat the adjustment if necessary.
6. Connect the negative cable to the battery.
Galant Models
Front wheel speed sensors
Removing
1. Installation details of wheel sensors on Galant models are shown in the illustrations.
2. Disconnect the negative cable from the battery.
Attention! If the stereo system installed in the car is equipped with a security code, before disconnecting the battery, make sure that you have the correct combination to activate the audio system! To prevent the airbags from deploying, proceed to dismantle the sensor at least 90 seconds after disconnecting the battery.
3. Jack up the car and put it on stands. Remove the corresponding front wheel.
4. Remove the wheel arch protection locker.
5. Disconnect from the wheel gauge electroconducting.
6. Turn out coupling bolts and remove collars of fastening of a plait of electroconducting of the gauge.
7. Turn out a fixing bolt and remove the wheel sensor.
Installation
1. Install the sensor in its original place and tighten the mounting bolt.
Note. The gap between the sensor and its rotor cannot be adjusted, but must be checked. The required value is 28.2÷28.4 mm. If the result of the change is out of range, replace the sensor or rotor.
2. Secure the sensor wiring harness with bandage clamps, - tighten the tie bolts firmly.
3. Connect the electrical wiring to the sensor.
4. Install the wheel arch protection locker.
5. Replace the wheel and lower the vehicle to the ground.
6. Connect the negative cable to the battery.
Rear wheel speed sensors
Removing
1. The installation details of the wheel sensors are shown in the illustrations.
2. Disconnect the negative cable from the battery.
Attention! If the stereo system installed in the car is equipped with a security code, before disconnecting the battery, make sure that you have the correct combination to activate the audio system! To prevent the airbags from deploying, proceed to dismantle the sensor at least 90 seconds after disconnecting the battery.
3. Jack up the car and put it on stands. Remove the corresponding front wheel.
4. Disconnect from the wheel gauge electroconducting.
5. Turn out coupling bolts and remove collars of fastening of a plait of electroconducting of the gauge.
6. Turn out a fixing bolt and remove the wheel sensor.
Installation
1. Install the sensor in its original place and tighten the mounting bolt.
Note. The gap between the sensor and its rotor cannot be adjusted, but must be checked. The required value is 28.2÷28.4 mm. If the result of the change is out of range, replace the sensor or rotor.
2. Secure the sensor wiring harness with bandage clamps, - tighten the tie bolts firmly.
3. Connect the electrical wiring to the sensor.
4. Replace the wheel and lower the vehicle to the ground.
5. Connect the negative cable to the battery.
Diamante Models
Front wheel speed sensors
Removing
1. The installation details of the front wheel speed sensors on Diamante models are shown in the illustration.
2. Disconnect the negative cable from the battery.
Attention! If the stereo system installed in the car is equipped with a security code, before disconnecting the battery, make sure that you have the correct combination to activate the audio system! To prevent the airbags from deploying, proceed to dismantle the sensor at least 90 seconds after disconnecting the battery.
3. Jack up the car and put it on stands. Remove the corresponding wheel.
4. Remove the wheel arch protection locker.
5. Disconnect from the wheel gauge electroconducting.
6. Remove the sensor wiring harness clips.
7. Remove the wheel sensor.
Installation
1. Install the sensor in its regular place and tighten it with the required force (12 Nm).
2. Establish clamps of fastening of a plait of electroconducting.
3. Connect the electrical wiring to the sensor.
4. Connect the negative cable to the battery.
Rear wheel speed sensors
Removing
1. The installation details of the rear wheel speed sensors on Mirage models are shown in the illustration.
2. Disconnect the negative cable from the battery.
Attention! If the stereo system installed in the car is equipped with a security code, before disconnecting the battery, make sure that you have the correct combination to activate the audio system! To prevent the airbags from deploying, proceed to dismantle the sensor at least 90 seconds after disconnecting the battery.
3. Jack up the car and put it on stands. Remove the relevant wheel.
4. Disconnect from the wheel gauge electroconducting.
5. Remove the sensor wiring harness clips.
6. On all-wheel drive (AWD) models, remove the cable tie.
7. Turn out a fixing bolt and remove the wheel gauge together with a sealing ring.
Installation
1. Install the sensor in its regular place (don't forget to replace the o-ring) and tighten it to the required torque (12 Nm).
2. Establish clamps of fastening of a plait of electroconducting.
3. Install the cable brace.
4. Connect the electrical wiring to the sensor.
5. Connect the negative cable to the battery.