



Mirage Models
Attention! On models equipped with drum brakes on the rear wheels, the brake shoes of the main brake mechanism must first be adjusted.
1. Check the free movement of the parking brake drive cable.
2. Counting the number of clicks of the ratchet, apply a force of 200 N to the parking brake lever. The recommended value is 5÷7 clicks.
3. Make adjustments if necessary.
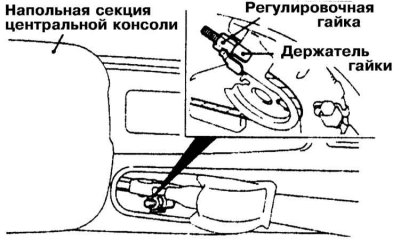
4. The adjustment nut can be accessed from inside the floor section of the center console.
5. Loosen the cable assembly rod lock nut.
6. Turn the adjusting nut until the desired result is achieved (by the number of ratchet clicks). Make sure that there is no play between the adjusting nut and the lever, then tighten the lock nut.
Warning! Do not overdo it - excessively tight cable tension may cause failure of automatic brake regulators, as well as "grabbing" of the brakes!
7. After adjusting the lever travel, jack up the rear of the vehicle and check the freedom of rotation of the rear wheels with the parking brake released.
8. Check that the parking brake holds the vehicle securely on the slope.
Galant models up to 1993.
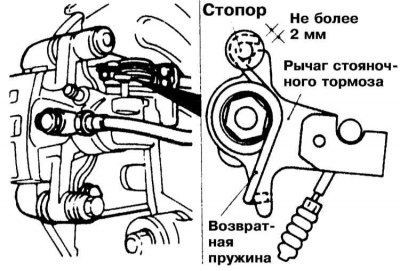
1. As in the previous case, when the lever is cocked with a force of 200 N, the ratchet should produce 5 to 7 clicks. The parking brake drive units to be adjusted are shown in the illustration.
2. Before adjusting the cable drive, it is necessary to adjust the parking brake shoes, for which jack up the car and place it on supports. Remove the plug from the brake disc, remove the caliper and tie it with wire to the suspension elements without disconnecting the hydraulic line. Rotate the self-adjusting wheel with a suitable tool to block the rotation of the brake disc. Unscrew the wheel five notches in the opposite direction and make sure that the disc rotates with slight resistance. Reinstall the caliper and check the proper functioning of the brake mechanism.
3. After finishing adjusting the parking brake friction shoes, proceed to adjusting the cable drive.
4. Turn the adjusting nut until the required number of ratchet clicks is achieved when the parking brake lever is pulled up with a certain amount of force.
5. Jack up the rear of the car and place it on supports and check the freedom of rotation of the rear wheels with the parking brake released. If necessary, loosen the adjusting nut slightly.
Galant models since 1994.
1. The requirements for the number of ratchet clicks when cocking the lever with a force of 200 N remain the same (5÷7 clicks). If necessary, make the appropriate adjustments.
2. Remove the inner mat from the center console floor section.
3. Loosen the adjusting nut on the end of the cable assembly rod to loosen the drive tension.
4. With the engine idling, firmly press the foot brake pedal five or six times - the pedal travel should stabilize, which confirms the proper functioning of the automatic regulator mechanism and the correct setting of the gap between the shoes and the working surface of the brake drum.
5. Next, in the standard manner (see the previous subsection), adjust the cable drive. Jack up the rear of the car and check the freedom of rotation of the rear wheels with the parking brake released.
Diamante Models
1. On Diamante models, applying a force of 200 N to the parking brake lever should be accompanied by three to five clicks of the ratchet.
2. Check that the parking brake shoes are adjusted correctly and make appropriate adjustments if necessary.
3. Remove the floor section of the center console. Release the parking brake lever and loosen the adjuster lock nut at the base of the lever assembly.
4. Jack up the car and place it on stands. Remove the corresponding rear wheel and remove the plug from the brake disc.
5. Remove the brake caliper and, without disconnecting the hydraulic line, tie it with wire to the suspension element.
6. Rotate the self-adjusting wheel with a suitable tool to block the rotation of the brake disc. Turn the wheel five notches in the opposite direction and make sure that the disc rotates with slight resistance.
7. Install the caliper and check the proper functioning of the brake mechanism.
8. After finishing adjusting the parking brake friction shoes, proceed to adjusting the cable drive.
9. Turn the adjusting nut until the required number of ratchet clicks is achieved when the parking brake lever is pulled up with a certain amount of force.
10. Jack up the rear of the car and place it on supports and check the freedom of rotation of the rear wheels with the parking brake released. If necessary, loosen the adjusting nut slightly.